Hitachi DZ-MV270A Owners Guide - Page 69
Starting Disc Navigation and Interpreting Navigation Screen
 |
View all Hitachi DZ-MV270A manuals
Add to My Manuals
Save this manual to your list of manuals |
Page 69 highlights
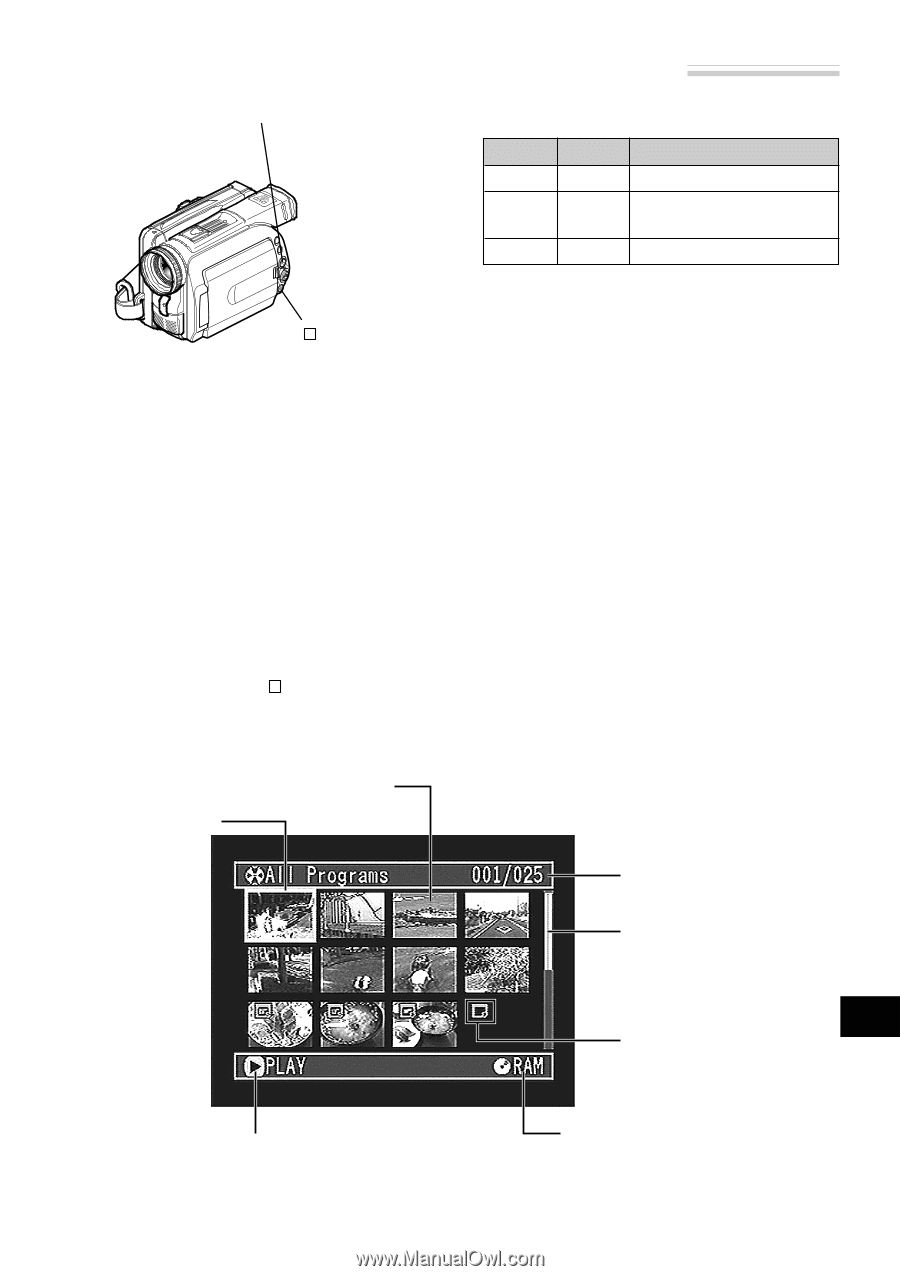
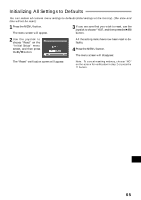
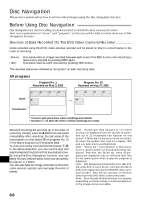
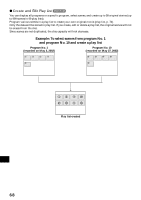
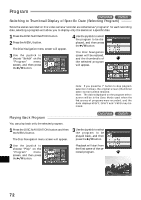
Starting Disc Navigation and Interpreting Navigation Screen DISC NAVIGATION button You can know the status of scenes from the colors of cursor and bar graph: Cursor Bar graph Status of scenes Yellow Blue Current cursor position Blue Blue Range of scenes being selected Red Red Scenes already selected button Note: Do not proceed with a following step while the disc is being r ecognized or the CHARGE/ACCESS indicator is blinking. 1 Press the DISC NAVIGATION button. The thumbnails for all programs will appear. Note: The DISC NAVIGATION button will not work without a disc inserted. 2 Press the DISC NAVIGATION button. Disc Navigation will be terminated and the DVD video camera/recorder will enter the recording pause status. You can also press the button to end Disc Navigation. Cursor Thumbnail Tilt the joystick to right when the yellow cursor is in the scene at the bottom right corner of thumbnail display screen, or tilt down the joystick when the yellow cursor is in any scene on the bottom row: The following 12 thumbnails (following page) will appear. Note that when the following pages cannot be displayed, you are on the last page. Tilt the joystick to left when the yellow cursor is in the scene at the top left corner, or tilt up the joystick when the yellow cursor is in any scene on the top row: The preceding 12 thumbnails (preceding page) will appear. Note that when the previous pages cannot be displayed, you are on the first page. Note: Tilting up or down the joystick and holding it will continuously change the page in units of 12 thumbnails. Note: Each time Disc Navigation is started with a DVD-R disc inserted, message "Creating Thumbnail ..." will appear. After the message appears, the thumbnail display screen will appear. Note: If the following discs are inserted, the Disc Navigation screen will appear or some message will be displayed: - Write-protected disc - Finalized DVD-R disc Selected scene number/ Number of all scenes Bar graph (current page position **) Still image icon English Operating guide* and recording date/ time of scene being selected Disc type icon * The operating guide will vary depending on the current status of DVD video camera/recorder. ** When there are two or more thumbnail display pages. 69
-
 1
1 -
2
-
3
-
4
-
5
-
6
-
7
-
8
-
9
-
10
-
11
-
12
-
13
-
14
-
15
-
16
-
17
-
18
-
19
-
20
-
21
-
22
-
23
-
24
-
25
-
26
-
27
-
28
-
29
-
30
-
31
-
32
-
33
-
34
-
35
-
36
-
37
-
38
-
39
-
40
-
41
-
42
-
43
-
44
-
45
-
46
-
47
-
48
-
49
-
50
-
51
-
52
-
53
-
54
-
55
-
56
-
57
-
58
-
59
-
60
-
61
-
62
-
63
-
 64
64 -
 65
65 -
 66
66 -
 67
67 -
 68
68 -
 69
69 -
 70
70 -
 71
71 -
 72
72 -
 73
73 -
 74
74 -
75
-
76
-
77
-
78
-
79
-
80
-
81
-
82
-
83
-
84
-
85
-
86
-
87
-
88
-
89
-
90
-
91
-
92
-
93
-
94
-
95
-
96
-
97
-
98
-
99
-
100
-
101
-
102
-
103
-
104
-
105
-
106
-
107
-
108
-
109
-
110
-
111
-
112
-
113
-
114
 |
 |