Hitachi DZ-MV270A Owners Guide - Page 87
Disc Management
 |
View all Hitachi DZ-MV270A manuals
Add to My Manuals
Save this manual to your list of manuals |
Page 87 highlights
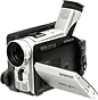
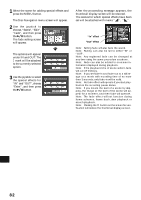
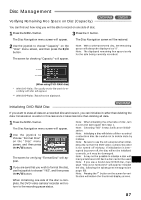
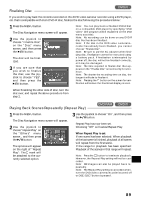
Disc Management Verifying Remaining Free Space on Disc (Capacity) You can find out how long you will be able to record on one side of disc. 1 Press the MENU button. 3 Press the button. The Disc Navigation menu screen will appear. The Disc Navigation screen will be restored. 2 Use the joystick to choose "Capacity" on the "Disc" menu screen, and then press the button. The screen for checking "Capacity" will appear. Note: With a write-protected disc, the remaining space will always be displayed as "0". Note: The displayed remaining free space is only for the side being currently recorded. * ** (When using DVD-RAM disc) * With DVD-R disc: The quality mode first used for re- cording with disc will appear. ** With DVD-R disc: This will not be displayed. Initializing DVD-RAM Disc If you want to erase all data on a recorded disc and reuse it, you can initialize it rather than deleting the data: Initialization is useful in this case since it takes less time than deleting all data. 1 Press the MENU button. The Disc Navigation menu screen will appear. 2 Use the joystick to choose "Format Disc" on the "Disc" menu screen, and then press the button. The screen for verifying "Format Disc" will appear. 3 If you are sure that you wish to format the disc, use the joystick to choose "YES", and then press the button. When initializing one side of the disc is complete, the DVD video camera/recorder will return to the recording pause status. Note: When initializing the other side of disc, turn it over and start again from step 1. Note: Choosing "NO" in step 3 will cancel initialization. Note: Initializing a disc will delete all the r ecorded contents on disc: Be careful not to delete data by mistake. Note: Be sure to use the AC adapter when initializing disc so that the DVD video camera/recorder is not turned off midway. If initialization is inter rupted by power off, the disc will not be initialized correctly, or it may be damaged. Note: It may not be possible to initialize a disc with many scratches or dirt: Such a disc cannot be used. English Note: If you use a brand-new DVD-R disc, message "Disc is not formatted" will appear: Initialize the disc, following the subsequent messages (see page 99). Note: Pressing the button on the screen for verification will restore the thumbnail display screen. 87
-
 1
1 -
2
-
3
-
4
-
5
-
6
-
7
-
8
-
9
-
10
-
11
-
12
-
13
-
14
-
15
-
16
-
17
-
18
-
19
-
20
-
21
-
22
-
23
-
24
-
25
-
26
-
27
-
28
-
29
-
30
-
31
-
32
-
33
-
34
-
35
-
36
-
37
-
38
-
39
-
40
-
41
-
42
-
43
-
44
-
45
-
46
-
47
-
48
-
49
-
50
-
51
-
52
-
53
-
54
-
55
-
56
-
57
-
58
-
59
-
60
-
61
-
62
-
63
-
64
-
65
-
66
-
67
-
68
-
69
-
70
-
71
-
72
-
73
-
74
-
75
-
76
-
77
-
78
-
79
-
80
-
81
-
 82
82 -
 83
83 -
 84
84 -
 85
85 -
 86
86 -
 87
87 -
 88
88 -
 89
89 -
 90
90 -
 91
91 -
 92
92 -
93
-
94
-
95
-
96
-
97
-
98
-
99
-
100
-
101
-
102
-
103
-
104
-
105
-
106
-
107
-
108
-
109
-
110
-
111
-
112
-
113
-
114
 |
 |