Hitachi DZ-MV270A Owners Guide - Page 84
Arranging Order of Scenes Move
 |
View all Hitachi DZ-MV270A manuals
Add to My Manuals
Save this manual to your list of manuals |
Page 84 highlights
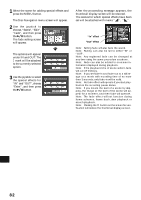
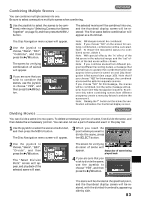
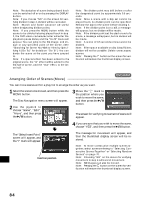
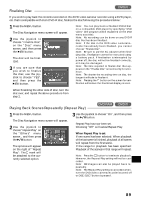
Note: The status bar of scene being played back can be switched off or on by pressing the DISPLAY button. Note: If you choose "NO" on the screen for verifying division in step 4, division will be canceled. Note: Search and frame advance are useful when designating division points. Note: If you press the MENU button while the scene to be divided is being played back in step 2, the DVD video camera/recorder will enter the playback pause status, and the "Go To" menu will appear. You can jump to the first image, end image or any specified point of the scene. (See "Searching for Scene You Wish to View by Specifying It (Go To)" for details on "Go To".) You can divide the scene at the point you have jumped to. Note: If a special effect has been added to the original scene, the "In" effect will be added to the first half of scene, and the "Out" efect, to the latter half. Note: The division point may drift before or after the designated point by approximately 0.5 seconds. Note: Since a scene with a skip set cannot be played back, no division point can be specified: Release the skip for the scene before dividing it. Note: If the division point is at a still, a message will appear, but no division will be made. Note: If the division point is at the start or end of a scene, a message will appear, but no division will be made. Note: A scene of 0.5 seconds or less cannot be divided. Note: If free space available on disc is insuf ficient, division will not be possible: Delete unnecessary scenes. Note: Pressing the button on the screen for verification will restore the thumbnail display screen. Arranging Order of Scenes (Move) You can move scenes within a play list to arrange the order as you want. 1 Select the scene to be moved, and then press the MENU button. The Disc Navigation menu screen will appear. 2 Use the joystick to choose "Scene", "Edit", "Move", and then press the button. 3 Move the " " mark to the position where you wish to move the scene, and then press the button. The screen for verifying movement of scene will appear. 4 If you are sure that you wish to move the scene, choose "YES", and then press the button. The "Select Insert Point" screen will appear, and the "I" mark will appear. English Insertion position The message for movement will appear, and then the thumbnail display screen will be restored. Note: To move consecutive multiple scenes together, select scenes r eferring to "Selecting Consecutive Scenes Together" or "Selecting Random Scenes" on page 70. Note: Choosing "NO" on the screen for verifying movement in step 4 will cancel movement. Note: Still images can also be moved. Note: Pressing the button on the screen for verification will restore the thumbnail display screen. 84
-
 1
1 -
2
-
3
-
4
-
5
-
6
-
7
-
8
-
9
-
10
-
11
-
12
-
13
-
14
-
15
-
16
-
17
-
18
-
19
-
20
-
21
-
22
-
23
-
24
-
25
-
26
-
27
-
28
-
29
-
30
-
31
-
32
-
33
-
34
-
35
-
36
-
37
-
38
-
39
-
40
-
41
-
42
-
43
-
44
-
45
-
46
-
47
-
48
-
49
-
50
-
51
-
52
-
53
-
54
-
55
-
56
-
57
-
58
-
59
-
60
-
61
-
62
-
63
-
64
-
65
-
66
-
67
-
68
-
69
-
70
-
71
-
72
-
73
-
74
-
75
-
76
-
77
-
78
-
 79
79 -
 80
80 -
 81
81 -
 82
82 -
 83
83 -
 84
84 -
 85
85 -
 86
86 -
 87
87 -
 88
88 -
 89
89 -
90
-
91
-
92
-
93
-
94
-
95
-
96
-
97
-
98
-
99
-
100
-
101
-
102
-
103
-
104
-
105
-
106
-
107
-
108
-
109
-
110
-
111
-
112
-
113
-
114
 |
 |
