Kyocera FS-3900DN IB-23 User's Manual in PDF Format - Page 15
Using the Printer's Operator Panel, Verifying the IP Address Settings - printer problems
 |
UPC - 674983006900
View all Kyocera FS-3900DN manuals
Add to My Manuals
Save this manual to your list of manuals |
Page 15 highlights
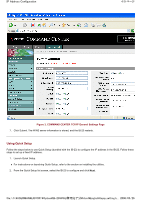
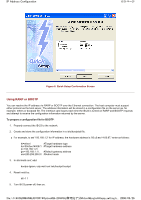
IP Address Configuration 8/9 ページ Using the Printer's Operator Panel You can directly enter the IP address, gateway address, and subnet mask address using the menu system from the operator panel. The following procedure is applicable to virtually all Kyocera Mita printers except those having no operator panel. For digital copier operator panel setting instructions, refer to the operation manual. To set the IP address information, proceed as follows: 1. Press MENU (MODE). 2. Press the ^ (+) key until the printer displays: Interface > Option If the above does not show 'Option,' press ENTER. Press the ^ (+) key repeatedly until it shows Option. Then, press ENTER again. 3. Press the > key. 4. Press the ^ (+) key until the printer displays: >TCP/IP > On 5. Press the > key. 6. Press the ^ (+) key until the printer displays: >>IP Address 000.000.000.000 7. To enter the IP address, press ENTER. A cursor (_) begins to blink at the rightmost 3-digit segment. Use the ^ (+) key to increase and the v (-) key to decrease the figure. When the rightmost segment is done, use the < key to move the cursor to the next segment. Again, use the ^ (+) key to increase and the v (-) key to decrease the figure for the segment. Repeat this procedure for all the segments. When all segments are done, press ENTER. 8. Press the ^ (+) key. The printer will display: >>Gateway 000.000.000.000 Using the same manner as 7. above, complete the gateway address. Press ENTER. 9. Press the ^ (+) key. The printer will display: >>Subnet mask 000.000.000.000 Using the same manner as 7. above, complete the subnet mask address. Press ENTER. 10. Press MENU (MODE). Turn the printer off and on. IP address configuration is complete. Verifying the IP Address Settings Print a network status page to verify that the IP address information has been properly set. The network status page will also be useful during diagnostics on network problems. file://F:\USERMAN\EXPORT\Option\IB-23\P6 English\tcpip_setting.h... 2006/05/26
-
 1
1 -
2
-
3
-
4
-
5
-
6
-
7
-
8
-
9
-
 10
10 -
 11
11 -
 12
12 -
 13
13 -
 14
14 -
 15
15 -
 16
16 -
 17
17 -
 18
18 -
 19
19 -
 20
20 -
21
-
22
-
23
-
24
-
25
-
26
-
27
-
28
-
29
-
30
-
31
-
32
-
33
-
34
-
35
-
36
-
37
-
38
-
39
-
40
-
41
-
42
-
43
-
44
-
45
-
46
-
47
-
48
-
49
-
50
-
51
-
52
-
53
-
54
-
55
-
56
-
57
-
58
-
59
-
60
-
61
-
62
-
63
-
64
-
65
-
66
-
67
-
68
-
69
-
70
-
71
-
72
-
73
-
74
-
75
-
76
-
77
-
78
-
79
-
80
-
81
-
82
-
83
-
84
-
85
-
86
-
87
-
88
-
89
-
90
-
91
-
92
-
93
-
94
-
95
-
96
-
97
-
98
-
99
-
100
-
101
-
102
-
103
-
104
 |
 |