Kyocera FS-3900DN IB-23 User's Manual in PDF Format - Page 6
Installing the IB-23 Interface Card in the Printer
 |
UPC - 674983006900
View all Kyocera FS-3900DN manuals
Add to My Manuals
Save this manual to your list of manuals |
Page 6 highlights
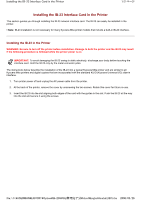
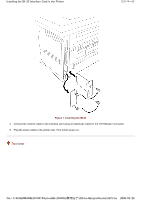
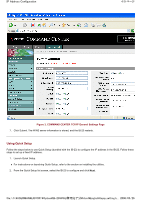
Installing the IB-23 Interface Card in the Printer 1/2 ページ Installing the IB-23 Interface Card in the Printer This section guides you through installing the IB-23 network interface card. The IB-23 can easily be installed in the printer. ! Note: IB-23 installation is not necessary for many Kyocera Mita printer models that include a built-in IB-23 interface. Installing the IB-23 in the Printer WARNING: Be sure to turn off the printer before installation. Damage to both the printer and the IB-23 may result if the following procedure is followed while the printer power is on. IMPORTANT: To avoid damaging the IB-23 owing to static electricity, discharge your body before touching the interface card. Hold the IB-23 only by the metal connector plate. The instructions below describe the installation of the IB-23 into a typical Kyocera Mita printer and are similar to all Kyocera Mita printers and digital copiers that are incorporated with the standard KUIO (Kyocera Universal I/O) slide-in interface. 1. Turn printer power off and unplug the AC power cable from the printer. 2. At the back of the printer, remove the cover by unscrewing the two screws. Retain this cover for future re-use. 3. Insert the IB-23 into the slot aligning both edges of the card with the guides in the slot. Push the IB-23 all the way into the slot and secure it using the screws. file://F:\USERMAN\EXPORT\Option\IB-23\P6 English\install_NIC.htm 2006/05/26
-
 1
1 -
 2
2 -
 3
3 -
 4
4 -
 5
5 -
 6
6 -
 7
7 -
 8
8 -
 9
9 -
 10
10 -
 11
11 -
 12
12 -
13
-
14
-
15
-
16
-
17
-
18
-
19
-
20
-
21
-
22
-
23
-
24
-
25
-
26
-
27
-
28
-
29
-
30
-
31
-
32
-
33
-
34
-
35
-
36
-
37
-
38
-
39
-
40
-
41
-
42
-
43
-
44
-
45
-
46
-
47
-
48
-
49
-
50
-
51
-
52
-
53
-
54
-
55
-
56
-
57
-
58
-
59
-
60
-
61
-
62
-
63
-
64
-
65
-
66
-
67
-
68
-
69
-
70
-
71
-
72
-
73
-
74
-
75
-
76
-
77
-
78
-
79
-
80
-
81
-
82
-
83
-
84
-
85
-
86
-
87
-
88
-
89
-
90
-
91
-
92
-
93
-
94
-
95
-
96
-
97
-
98
-
99
-
100
-
101
-
102
-
103
-
104
 |
 |