Kyocera FS-3900DN IB-23 User's Manual in PDF Format - Page 34
E-mail Printing
 |
UPC - 674983006900
View all Kyocera FS-3900DN manuals
Add to My Manuals
Save this manual to your list of manuals |
Page 34 highlights
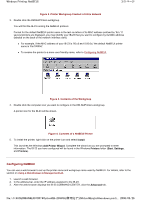
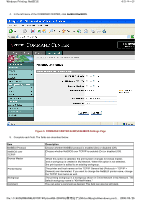
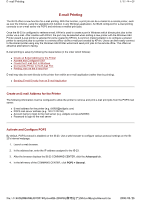
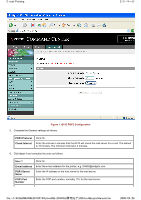
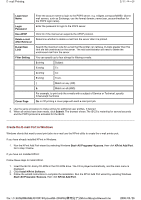
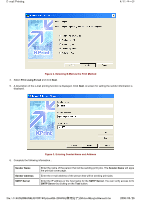
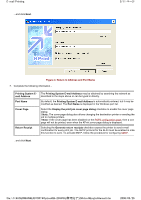
E-mail Printing 1/11 ページ E-mail Printing The IB-23 offers a new function for e-mail printing. With this function, a print job can be e-mailed to a remote printer, such as over the Internet, using the standard print function in any Windows application. An IB-23 configured for e-mail printing connects to an e-mail server via POP3 and retrieves e-mailed print jobs. Once the IB-23 is configured to retrieve e-mail, KPrint is used to create a port in Windows which directs print jobs to the printer via e-mail. After creation with KPrint, the port may be selected when adding a new printer with the Windows Add Printer wizard (Local printer is selected for ports created by KPrint). A common implementation is to configure a shared printer to send print jobs to a printer in a remote office via the e-mail port created by KPrint. Users can then easily connect to the shared printer using only the Windows Add Printer wizard and send print jobs to the remote office. This offers an attractive alternative to faxing. E-mail printing is setup by following the steps below (in the order which follows): „ Create an E-mail Address for the Printer „ Activate and Configure POP3 „ Create the E-mail Port in Windows „ Connect the Printer to the E-mail Port „ Printing Jobs via the E-mail Port E-mail may also be sent directly to the printer from within an e-mail application (rather than by printing). „ Sending E-mail Directly from an E-mail Application Create an E-mail Address for the Printer The following information must be configured to allow the printer to retrieve and print e-mail print jobs from the POP3 mail server. „ E-mail address for the printer (e.g. [email protected]) „ POP3 mail server address (e.g. 130.21.222.56) „ Account name to login to the mail server (e.g. widgets.com/pusr/fs6950) „ Password to login to the mail server Activate and Configure POP3 By default, POP3 protocol is disabled on the IB-23. Use a web browser to configure various protocol settings on the IB23's internal webpage. 1. Launch a web browser. 2. In the address bar, enter the IP address assigned to the IB-23. 3. After the browser displays the IB-23 COMMAND CENTER, click the Advanced tab. 4. In the left menu of the COMMAND CENTER, click POP3 > General. file://F:\USERMAN\EXPORT\Option\IB-23\P6 English\email.htm 2006/05/26
-
 1
1 -
2
-
3
-
4
-
5
-
6
-
7
-
8
-
9
-
10
-
11
-
12
-
13
-
14
-
15
-
16
-
17
-
18
-
19
-
20
-
21
-
22
-
23
-
24
-
25
-
26
-
27
-
28
-
 29
29 -
 30
30 -
 31
31 -
 32
32 -
 33
33 -
 34
34 -
 35
35 -
 36
36 -
 37
37 -
 38
38 -
 39
39 -
40
-
41
-
42
-
43
-
44
-
45
-
46
-
47
-
48
-
49
-
50
-
51
-
52
-
53
-
54
-
55
-
56
-
57
-
58
-
59
-
60
-
61
-
62
-
63
-
64
-
65
-
66
-
67
-
68
-
69
-
70
-
71
-
72
-
73
-
74
-
75
-
76
-
77
-
78
-
79
-
80
-
81
-
82
-
83
-
84
-
85
-
86
-
87
-
88
-
89
-
90
-
91
-
92
-
93
-
94
-
95
-
96
-
97
-
98
-
99
-
100
-
101
-
102
-
103
-
104
 |
 |