Lexmark MX6500e User's Guide - Page 148
Creating shortcuts, Creating an FTP shortcut using the Embedded Web Server
 |
View all Lexmark MX6500e manuals
Add to My Manuals
Save this manual to your list of manuals |
Page 148 highlights
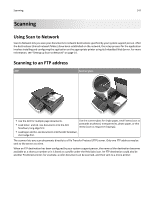
Scanning 148 Creating shortcuts Instead of entering the entire FTP site address on the scanner control panel each time you want to send a document to an FTP server, you can create a permanent FTP destination and assign a shortcut number. There are two methods for creating shortcut numbers: using the Embedded Web Server and using the scanner control panel. Creating an FTP shortcut using the Embedded Web Server 1 Type the scanner IP address in the address field of your Web browser. If you do not know the IP address or host name of the scanner, then you can: • View the information on the scanner control panel home screen, or in the TCP/IP section under the Networks/Ports menu. • Print a network setup page or menu settings page and locate the information in the TCP/IP section. 2 Click Settings. 3 Under Other Settings, click Manage Shortcuts. Note: A password may be required. If you do not have an ID and password, then get one from your system support person. 4 Click FTP Shortcut Setup. 5 Enter the appropriate information. 6 Enter a shortcut number. If you enter a number that is already in use, then you are prompted to select another number. 7 Click Add. Creating an FTP shortcut using the scanner control panel 1 From the scanner home screen, navigate to: FTP > FTP > type the FTP address > > type a name for the shortcut > Done 2 Verify that the shortcut name and number are correct, and then touch OK. Notes: • If the name or number is incorrect, then touch Cancel, and then reenter the information. • If you enter a number that is already in use, then you are prompted to select another number. Scanning to an FTP address You can use the scanner to send scanned documents to an FTP address in a number of ways. You can type the FTP address, use a shortcut number, or use the address book. You can also use the Multi Send, Scan to Network, or MyShortcut application from the scanner home screen. For more information, see the "Activating the home screen applications" section of the User's Guide. Scanning to an FTP address using the scanner control panel 1 Load an original document facedown, long edge first into the ADF tray or facedown on the scanner glass.
-
 1
1 -
2
-
3
-
4
-
5
-
6
-
7
-
8
-
9
-
10
-
11
-
12
-
13
-
14
-
15
-
16
-
17
-
18
-
19
-
20
-
21
-
22
-
23
-
24
-
25
-
26
-
27
-
28
-
29
-
30
-
31
-
32
-
33
-
34
-
35
-
36
-
37
-
38
-
39
-
40
-
41
-
42
-
43
-
44
-
45
-
46
-
47
-
48
-
49
-
50
-
51
-
52
-
53
-
54
-
55
-
56
-
57
-
58
-
59
-
60
-
61
-
62
-
63
-
64
-
65
-
66
-
67
-
68
-
69
-
70
-
71
-
72
-
73
-
74
-
75
-
76
-
77
-
78
-
79
-
80
-
81
-
82
-
83
-
84
-
85
-
86
-
87
-
88
-
89
-
90
-
91
-
92
-
93
-
94
-
95
-
96
-
97
-
98
-
99
-
100
-
101
-
102
-
103
-
104
-
105
-
106
-
107
-
108
-
109
-
110
-
111
-
112
-
113
-
114
-
115
-
116
-
117
-
118
-
119
-
120
-
121
-
122
-
123
-
124
-
125
-
126
-
127
-
128
-
129
-
130
-
131
-
132
-
133
-
134
-
135
-
136
-
137
-
138
-
139
-
140
-
141
-
142
-
 143
143 -
 144
144 -
 145
145 -
 146
146 -
 147
147 -
 148
148 -
 149
149 -
 150
150 -
 151
151 -
 152
152 -
 153
153 -
154
-
155
-
156
-
157
-
158
-
159
-
160
-
161
-
162
-
163
-
164
-
165
-
166
-
167
-
168
-
169
-
170
-
171
-
172
-
173
-
174
-
175
-
176
-
177
-
178
-
179
-
180
-
181
-
182
-
183
-
184
-
185
-
186
-
187
-
188
-
189
-
190
-
191
-
192
-
193
-
194
-
195
-
196
-
197
-
198
-
199
-
200
-
201
-
202
-
203
-
204
-
205
-
206
-
207
-
208
-
209
-
210
-
211
-
212
-
213
-
214
-
215
-
216
-
217
-
218
-
219
-
220
-
221
-
222
-
223
-
224
-
225
-
226
-
227
-
228
-
229
-
230
-
231
-
232
-
233
-
234
-
235
-
236
-
237
-
238
-
239
-
240
-
241
-
242
-
243
-
244
-
245
-
246
-
247
-
248
-
249
-
250
-
251
-
252
-
253
-
254
-
255
-
256
-
257
-
258
-
259
-
260
-
261
-
262
-
263
-
264
-
265
-
266
-
267
-
268
-
269
-
270
-
271
-
272
-
273
-
274
-
275
-
276
-
277
-
278
-
279
-
280
-
281
-
282
-
283
-
284
-
285
-
286
-
287
-
288
-
289
-
290
-
291
-
292
-
293
-
294
-
295
-
296
-
297
-
298
-
299
-
300
-
301
-
302
-
303
-
304
-
305
-
306
-
307
-
308
-
309
-
310
-
311
-
312
-
313
-
314
-
315
-
316
-
317
-
318
-
319
-
320
-
321
-
322
-
323
-
324
-
325
-
326
-
327
-
328
-
329
-
330
-
331
-
332
-
333
-
334
-
335
-
336
-
337
-
338
-
339
-
340
-
341
-
342
-
343
-
344
-
345
-
346
-
347
-
348
-
349
-
350
-
351
-
352
-
353
-
354
-
355
-
356
-
357
-
358
-
359
-
360
-
361
-
362
-
363
-
364
-
365
-
366
-
367
-
368
-
369
-
370
-
371
-
372
-
373
-
374
-
375
-
376
-
377
-
378
-
379
-
380
-
381
-
382
-
383
-
384
-
385
-
386
-
387
-
388
-
389
-
390
-
391
-
392
-
393
-
394
-
395
-
396
 |
 |