Lexmark X342N Service Manual - Page 63
Serial number, USB, SCANNER CALIBRATION - Go to, ATM MENU - Go to, FAX SETTINGS - Go
 |
UPC - 734646256292
View all Lexmark X342N manuals
Add to My Manuals
Save this manual to your list of manuals |
Page 63 highlights
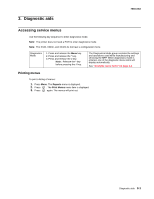
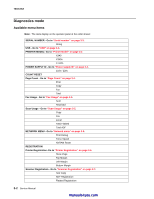
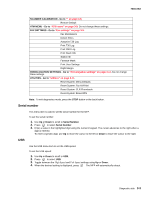
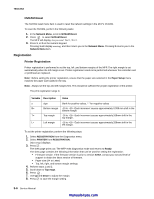
7003-XXX SCANNER CALIBRATION - Go to "" on page 3-8. Restore Default ATM MENU - Go to "ATM menu" on page 3-9. Do not change these settings. FAX SETTINGS - Go to "Fax settings" on page 3-9. Fax Modulations Detect EOLs Autoprint T30 Log Print T30 Log Print CND Log Print Stack Info Station ID Faxtrace Mask Print User Settings Right Margin HOMOLOGATION SETTINGS - Go to "Homologation settings" on page 3-11. Do not change these settings. UTILITIES - Go to "Utilities" on page 3-11. Reset System: Menu Defaults Reset System: Fax NVRAM Reset System: CLR Phonebook Reset System: Erase EFS Note: To exit diagnostics mode, press the STOP button or the back button. Serial number This menu item is used to set the serial number for the MFP. To set the serial number: 1. Use Up or Down to scroll to Serial Number. 2. Press to select Serial Number. 3. Enter a value in the highlighted digit using the numeric keypad. The cursor advances to the right when a digit is entered. To enter a specific digit, use Up to move the cursor to the left or Down to move the cursor to the right. USB Use the USB menu item to set the USB speed. To set the USB speed: 1. Use Up or Down to scroll to USB. 2. Press to select USB. 3. Toggle between the High Speed and Full Speed settings using Up or Down. 4. When the desired setting is displayed, press . The MFP will automatically reboot. Diagnostic aids 3-3
-
 1
1 -
2
-
3
-
4
-
5
-
6
-
7
-
8
-
9
-
10
-
11
-
12
-
13
-
14
-
15
-
16
-
17
-
18
-
19
-
20
-
21
-
22
-
23
-
24
-
25
-
26
-
27
-
28
-
29
-
30
-
31
-
32
-
33
-
34
-
35
-
36
-
37
-
38
-
39
-
40
-
41
-
42
-
43
-
44
-
45
-
46
-
47
-
48
-
49
-
50
-
51
-
52
-
53
-
54
-
55
-
56
-
57
-
 58
58 -
 59
59 -
 60
60 -
 61
61 -
 62
62 -
 63
63 -
 64
64 -
 65
65 -
 66
66 -
 67
67 -
 68
68 -
69
-
70
-
71
-
72
-
73
-
74
-
75
-
76
-
77
-
78
-
79
-
80
-
81
-
82
-
83
-
84
-
85
-
86
-
87
-
88
-
89
-
90
-
91
-
92
-
93
-
94
-
95
-
96
-
97
-
98
-
99
-
100
-
101
-
102
-
103
-
104
-
105
-
106
-
107
-
108
-
109
-
110
-
111
-
112
-
113
-
114
-
115
-
116
-
117
-
118
-
119
-
120
-
121
-
122
-
123
-
124
-
125
-
126
-
127
-
128
-
129
-
130
-
131
-
132
-
133
-
134
-
135
-
136
-
137
-
138
-
139
-
140
-
141
-
142
-
143
-
144
-
145
-
146
-
147
-
148
-
149
-
150
-
151
-
152
-
153
-
154
-
155
-
156
-
157
-
158
-
159
-
160
-
161
-
162
-
163
 |
 |