Lexmark X342N Service Manual - Page 88
Developer drive coupling assembly removal, Left side cover removal
 |
UPC - 734646256292
View all Lexmark X342N manuals
Add to My Manuals
Save this manual to your list of manuals |
Page 88 highlights
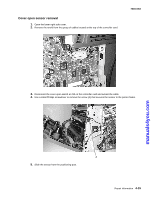
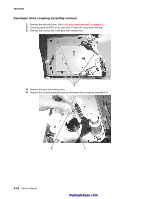
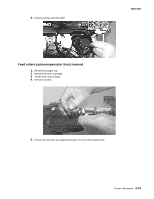
7003-XXX Developer drive coupling assembly removal 1. Remove the left side cover. See "Left side cover removal" on page 4-3. 2. Carefully place the MFP on its right side. Protect the cover from marring. 3. Remove four screws (A) in the gear train metal cover. 4. Remove the gear train metal cover. 5. Remove the conical spring (B) and the developer drive coupling assembly (C). 4-16 Service Manual manuals4you.com
-
 1
1 -
2
-
3
-
4
-
5
-
6
-
7
-
8
-
9
-
10
-
11
-
12
-
13
-
14
-
15
-
16
-
17
-
18
-
19
-
20
-
21
-
22
-
23
-
24
-
25
-
26
-
27
-
28
-
29
-
30
-
31
-
32
-
33
-
34
-
35
-
36
-
37
-
38
-
39
-
40
-
41
-
42
-
43
-
44
-
45
-
46
-
47
-
48
-
49
-
50
-
51
-
52
-
53
-
54
-
55
-
56
-
57
-
58
-
59
-
60
-
61
-
62
-
63
-
64
-
65
-
66
-
67
-
68
-
69
-
70
-
71
-
72
-
73
-
74
-
75
-
76
-
77
-
78
-
79
-
80
-
81
-
82
-
 83
83 -
 84
84 -
 85
85 -
 86
86 -
 87
87 -
 88
88 -
 89
89 -
 90
90 -
 91
91 -
 92
92 -
 93
93 -
94
-
95
-
96
-
97
-
98
-
99
-
100
-
101
-
102
-
103
-
104
-
105
-
106
-
107
-
108
-
109
-
110
-
111
-
112
-
113
-
114
-
115
-
116
-
117
-
118
-
119
-
120
-
121
-
122
-
123
-
124
-
125
-
126
-
127
-
128
-
129
-
130
-
131
-
132
-
133
-
134
-
135
-
136
-
137
-
138
-
139
-
140
-
141
-
142
-
143
-
144
-
145
-
146
-
147
-
148
-
149
-
150
-
151
-
152
-
153
-
154
-
155
-
156
-
157
-
158
-
159
-
160
-
161
-
162
-
163
 |
 |

4-16
Service Manual
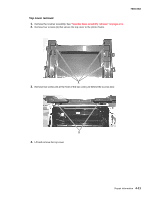
7003-XXX
Developer drive coupling assembly removal
1.
Remove the left side cover. See
“Left side cover removal” on page 4-3
.
2.
Carefully place the MFP on its right side. Protect the cover from marring.
3.
Remove four screws (A) in the gear train metal cover.
4.
Remove the gear train metal cover.
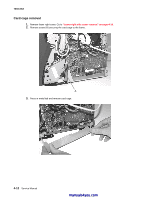
5.
Remove the conical spring (B) and the developer drive coupling assembly (C).
manuals4you.com
manuals4you.com