Lexmark X342N Service Manual - Page 90
Fan removal, Upper right side cover removal
 |
UPC - 734646256292
View all Lexmark X342N manuals
Add to My Manuals
Save this manual to your list of manuals |
Page 90 highlights
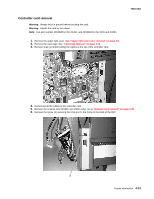
7003-XXX 6. Remove the two screws (B) securing the fuser. 7. Slide the fuser out just enough to access the screw holding the sensor. 8. Remove the sensor and its attached cable. 9. Observe the orientation of the flag and spring before replacing units. Fan removal 1. Open the upper right side cover. See "Upper right side cover removal" on page 4-8. 2. Unplug the fan from the controller card at J19. 3. Remove two screws (A) holding the fan to the metal side frame. 4-18 Service Manual manuals4you.com
-
 1
1 -
2
-
3
-
4
-
5
-
6
-
7
-
8
-
9
-
10
-
11
-
12
-
13
-
14
-
15
-
16
-
17
-
18
-
19
-
20
-
21
-
22
-
23
-
24
-
25
-
26
-
27
-
28
-
29
-
30
-
31
-
32
-
33
-
34
-
35
-
36
-
37
-
38
-
39
-
40
-
41
-
42
-
43
-
44
-
45
-
46
-
47
-
48
-
49
-
50
-
51
-
52
-
53
-
54
-
55
-
56
-
57
-
58
-
59
-
60
-
61
-
62
-
63
-
64
-
65
-
66
-
67
-
68
-
69
-
70
-
71
-
72
-
73
-
74
-
75
-
76
-
77
-
78
-
79
-
80
-
81
-
82
-
83
-
84
-
 85
85 -
 86
86 -
 87
87 -
 88
88 -
 89
89 -
 90
90 -
 91
91 -
 92
92 -
 93
93 -
 94
94 -
 95
95 -
96
-
97
-
98
-
99
-
100
-
101
-
102
-
103
-
104
-
105
-
106
-
107
-
108
-
109
-
110
-
111
-
112
-
113
-
114
-
115
-
116
-
117
-
118
-
119
-
120
-
121
-
122
-
123
-
124
-
125
-
126
-
127
-
128
-
129
-
130
-
131
-
132
-
133
-
134
-
135
-
136
-
137
-
138
-
139
-
140
-
141
-
142
-
143
-
144
-
145
-
146
-
147
-
148
-
149
-
150
-
151
-
152
-
153
-
154
-
155
-
156
-
157
-
158
-
159
-
160
-
161
-
162
-
163
 |
 |

4-18
Service Manual
7003-XXX
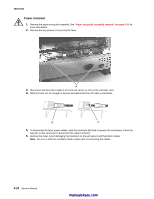
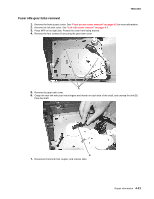
6.
Remove the two screws (B) securing the fuser.
7.
Slide the fuser out just enough to access the screw holding the sensor.
8.
Remove the sensor and its attached cable.
9.
Observe the orientation of the flag and spring before replacing units.
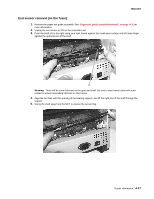
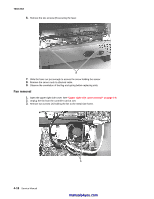
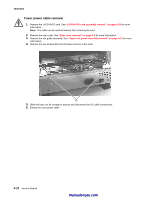
Fan removal
1.
Open the upper right side cover. See
“Upper right side cover removal” on page 4-8
.
2.
Unplug the fan from the controller card at J19.
3.
Remove two screws (A) holding the fan to the metal side frame.
manuals4you.com
manuals4you.com