NEC NP1150 NP1150/2150/3150/3151W user's manual - Page 115
Using Multi-Screen Compensation [MULTI-SCREEN COMP.], Select [MULTI-SCREEN COMP.]
 |
UPC - 805736019568
View all NEC NP1150 manuals
Add to My Manuals
Save this manual to your list of manuals |
Page 115 highlights
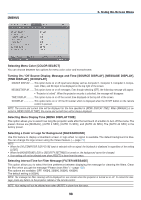
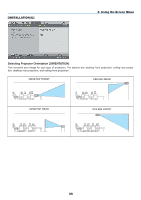
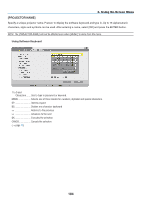
6. Using On-Screen Menu Using Multi-Screen Compensation [MULTI-SCREEN COMP.] This feature allows you to match images projected from multiple projectors that are placed in parallel. MODE OFF: Turns off this function to return to the normal brightness. . ON: Turns on this function to make the screen darker. The [BRIGHTNESS] and the [CONTRAST] can be adjusted. CONTRAST Adjusts the bright part of the picture. BRIGHTNESS......... Adjusts the dark part of the picture. Adjusting 1. Prepare black and white images so that the images can be displayed on the computer screen. 2. Display the black image on the computer screen, and project the image from the projector. 3. Select [MULTI-SCREEN COMP.] → [MODE] → [ON]. 4. Adjust the dark part of the images. Press the SELECT H button to select [BRIGHTNESS] and use the SELECT or to match the black part of another projector. 5. Display the white screen on the computer screen. Project the image from two or more projectors. 6. Adjust the bright part of the images. Press the SELECT H button to select [CONTRAST] and use the SELECT or to match the white part of another projector. Moving the slide bar toward [+] (plus) can change the white part of the image. Should this happen, move the slide bar toward [-] (minus) to adjust the brightness. TIP: • When you use multiple projectors, you can use the [CONTROL ID] function to operate a single projector or all the projectors from the remote control. (→ page 117) • Your setting will not be affected even when [RESET] is done from the menu. 101
-
 1
1 -
2
-
3
-
4
-
5
-
6
-
7
-
8
-
9
-
10
-
11
-
12
-
13
-
14
-
15
-
16
-
17
-
18
-
19
-
20
-
21
-
22
-
23
-
24
-
25
-
26
-
27
-
28
-
29
-
30
-
31
-
32
-
33
-
34
-
35
-
36
-
37
-
38
-
39
-
40
-
41
-
42
-
43
-
44
-
45
-
46
-
47
-
48
-
49
-
50
-
51
-
52
-
53
-
54
-
55
-
56
-
57
-
58
-
59
-
60
-
61
-
62
-
63
-
64
-
65
-
66
-
67
-
68
-
69
-
70
-
71
-
72
-
73
-
74
-
75
-
76
-
77
-
78
-
79
-
80
-
81
-
82
-
83
-
84
-
85
-
86
-
87
-
88
-
89
-
90
-
91
-
92
-
93
-
94
-
95
-
96
-
97
-
98
-
99
-
100
-
101
-
102
-
103
-
104
-
105
-
106
-
107
-
108
-
109
-
 110
110 -
 111
111 -
 112
112 -
 113
113 -
 114
114 -
 115
115 -
 116
116 -
 117
117 -
 118
118 -
 119
119 -
 120
120 -
121
-
122
-
123
-
124
-
125
-
126
-
127
-
128
-
129
-
130
-
131
-
132
-
133
-
134
-
135
-
136
-
137
-
138
-
139
-
140
-
141
-
142
-
143
-
144
-
145
-
146
-
147
-
148
-
149
-
150
-
151
-
152
-
153
-
154
-
155
-
156
-
157
-
158
-
159
-
160
-
161
-
162
-
163
-
164
-
165
-
166
-
167
-
168
-
169
-
170
-
171
-
172
 |
 |