NEC NP1150 NP1150/2150/3150/3151W user's manual - Page 116
[INSTALLATION(2)], CAUTION, Hints on How to Set Up LAN Connection
 |
UPC - 805736019568
View all NEC NP1150 manuals
Add to My Manuals
Save this manual to your list of manuals |
Page 116 highlights
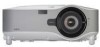
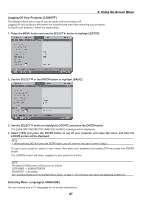
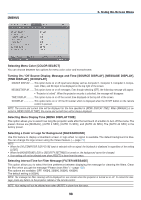
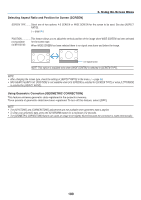
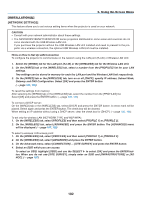
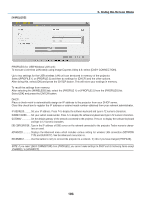
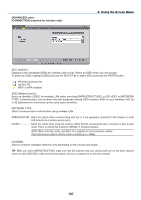
6. Using On-Screen Menu [INSTALLATION(2)] [NETWORK SETTINGS] This feature allows you to set various setting items when the projector is used on your network. CAUTION • Consult with your network administrator about these settings. • The NP3150/NP2150/NP1150/NP3151W series projectors distributed in some areas and countries do not come standard with the USB Wireless LAN Unit. If you purchase the projector without the USB Wireless LAN Unit installed and need to present to the projector via a wireless connection, the optional USB Wireless LAN Unit must be installed. Hints on How to Set Up LAN Connection To configure the projector to communicate on the network using the LAN port (RJ-45) or Wireless LAN Unit: 1. Select the [WIRED] tab for the LAN port (RJ-45) or the [WIRELESS] tab for the Wireless LAN Unit. 2. On the [WIRED] tab or the [WIRELESS] tab, select a number from the [Profiles] list for your LAN settings. Two settings can be stored in memory for each the LAN port and the Wireless LAN Unit respectively. 3. On the [WIRED] tab or the [WIRELESS] tab, turn on or off [DHCP], specify IP address, Subnet Mask, Gateway and DNS Configuration. Select [OK] and press the ENTER button. (→ page 105, 106) To recall the settings from memory: After selecting the [WIRED] tab or the [WIRELESS] tab, select the number from the [Profiles] list. Select [OK] and press the ENTER button. (→ page 105, 106) To connect a DHCP server: On the [WIRED] tab or the [WIRELESS] tab, select [DHCP] and press the ENTER button. A check mark will be placed. Select again and press the ENTER button. The check box will be cleared. When setting an IP address without using a DHCP server, clear the check box for [DHCP]. (→ page 105, 106) To set only for wireless LAN (Network Type and WEP/WPA): 1. On the [WIRELESS] tab, select [Profiles] and then select [Profile 1] or [Profile 2]. 2. On the [WIRELESS] tab, select [Advanced] and press the ENTER button. The [Advanced] menu will be displayed. (→ page 107, 108) To select a wireless LAN access point: 1. On the [WIRELESS] tab, select [Profiles] and then select [Profile 1] or [Profile 2]. 2. On the [WIRELESS] tab, select [Advanced] and press the ENTER button. 3. On the Advanced menu, select [CONNECTION] → [Site Survey] and press the ENTER button. 4. Select an SSID which you can access. To select an SSID, highlight [SSID] and use the SELECT to select [OK] and press the ENTER button. When you do not use [SITE SURVEY], simply enter an SSID and [INFRASTRUCTURE] or [AD HOC]. (→ page 107) 102
-
 1
1 -
2
-
3
-
4
-
5
-
6
-
7
-
8
-
9
-
10
-
11
-
12
-
13
-
14
-
15
-
16
-
17
-
18
-
19
-
20
-
21
-
22
-
23
-
24
-
25
-
26
-
27
-
28
-
29
-
30
-
31
-
32
-
33
-
34
-
35
-
36
-
37
-
38
-
39
-
40
-
41
-
42
-
43
-
44
-
45
-
46
-
47
-
48
-
49
-
50
-
51
-
52
-
53
-
54
-
55
-
56
-
57
-
58
-
59
-
60
-
61
-
62
-
63
-
64
-
65
-
66
-
67
-
68
-
69
-
70
-
71
-
72
-
73
-
74
-
75
-
76
-
77
-
78
-
79
-
80
-
81
-
82
-
83
-
84
-
85
-
86
-
87
-
88
-
89
-
90
-
91
-
92
-
93
-
94
-
95
-
96
-
97
-
98
-
99
-
100
-
101
-
102
-
103
-
104
-
105
-
106
-
107
-
108
-
109
-
110
-
 111
111 -
 112
112 -
 113
113 -
 114
114 -
 115
115 -
 116
116 -
 117
117 -
 118
118 -
 119
119 -
 120
120 -
 121
121 -
122
-
123
-
124
-
125
-
126
-
127
-
128
-
129
-
130
-
131
-
132
-
133
-
134
-
135
-
136
-
137
-
138
-
139
-
140
-
141
-
142
-
143
-
144
-
145
-
146
-
147
-
148
-
149
-
150
-
151
-
152
-
153
-
154
-
155
-
156
-
157
-
158
-
159
-
160
-
161
-
162
-
163
-
164
-
165
-
166
-
167
-
168
-
169
-
170
-
171
-
172
 |
 |