Netgear WC7500-Wireless User Manual - Page 138
Table 10., Network authentication and data encryption settings continued, Data Encryption, bit WEP
 |
View all Netgear WC7500-Wireless manuals
Add to My Manuals
Save this manual to your list of manuals |
Page 138 highlights
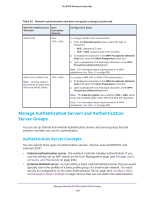
ProSAFE Wireless Controller Table 10. Network authentication and data encryption settings (continued) Network Authentication Data Selection Encryption Options Shared Key 64-bit WEP 128-bit WEP 152-bit WEP Legacy 802.1x None WPA with Radius TKIP TKIP + AES Configuration Steps To configure Shared Key authentication with WEP: 1. From the Data Encryption menu, select a level of WEP encryption: - 64-bit WEP. Uses 40/64-bit encryption. - 128-bit WEP. Uses 104/128-bit encryption. - 152-bit WEP. A proprietary mode that works only with other WiFi devices that support this mode. 2. To display the characters in the key fields, select the Show Key check box. 3. Select a key radio button (Key1, Key2, Key3, or Key4). 4. Enter a key in the corresponding field: - 64-bit WEP requires a key with 10 characters. - 128-bit WEP requires a key with 26 characters. - 152-bit WEP requires a key with 32 characters. Note: For information about requirements for WEP keys, see Table 15 on page 389. To configure legacy 802.1x authentication: 1. Set up and enable an internal or external (RADIUS or LDAP) authentication server. For information, see Manage Authentication Servers and Authentication Server Groups on page 140. 2. Select the Local or External radio button. 3. If you select the External radio button, select the authentication server that you wish to use from the menu. To configure WPA authentication with a RADIUS server: 1. Set up and enable an internal or external (RADIUS or LDAP) authentication server. For information, see Manage Authentication Servers and Authentication Server Groups on page 140. 2. From the Data Encryption menu, select the type of encryption: - TKIP. Supports Temporal Key Integrity Protocol (TKIP) only. - TKIP + AES. Supports both TKIP and Advanced Encryption Standard (AES). 3. Select the Local or External radio button. 4. If you select the External radio button, select the authentication server that you wish to use from the menu. Manage Security Profiles and Profile Groups 138
-
 1
1 -
2
-
3
-
4
-
5
-
6
-
7
-
8
-
9
-
10
-
11
-
12
-
13
-
14
-
15
-
16
-
17
-
18
-
19
-
20
-
21
-
22
-
23
-
24
-
25
-
26
-
27
-
28
-
29
-
30
-
31
-
32
-
33
-
34
-
35
-
36
-
37
-
38
-
39
-
40
-
41
-
42
-
43
-
44
-
45
-
46
-
47
-
48
-
49
-
50
-
51
-
52
-
53
-
54
-
55
-
56
-
57
-
58
-
59
-
60
-
61
-
62
-
63
-
64
-
65
-
66
-
67
-
68
-
69
-
70
-
71
-
72
-
73
-
74
-
75
-
76
-
77
-
78
-
79
-
80
-
81
-
82
-
83
-
84
-
85
-
86
-
87
-
88
-
89
-
90
-
91
-
92
-
93
-
94
-
95
-
96
-
97
-
98
-
99
-
100
-
101
-
102
-
103
-
104
-
105
-
106
-
107
-
108
-
109
-
110
-
111
-
112
-
113
-
114
-
115
-
116
-
117
-
118
-
119
-
120
-
121
-
122
-
123
-
124
-
125
-
126
-
127
-
128
-
129
-
130
-
131
-
132
-
 133
133 -
 134
134 -
 135
135 -
 136
136 -
 137
137 -
 138
138 -
 139
139 -
 140
140 -
 141
141 -
 142
142 -
 143
143 -
144
-
145
-
146
-
147
-
148
-
149
-
150
-
151
-
152
-
153
-
154
-
155
-
156
-
157
-
158
-
159
-
160
-
161
-
162
-
163
-
164
-
165
-
166
-
167
-
168
-
169
-
170
-
171
-
172
-
173
-
174
-
175
-
176
-
177
-
178
-
179
-
180
-
181
-
182
-
183
-
184
-
185
-
186
-
187
-
188
-
189
-
190
-
191
-
192
-
193
-
194
-
195
-
196
-
197
-
198
-
199
-
200
-
201
-
202
-
203
-
204
-
205
-
206
-
207
-
208
-
209
-
210
-
211
-
212
-
213
-
214
-
215
-
216
-
217
-
218
-
219
-
220
-
221
-
222
-
223
-
224
-
225
-
226
-
227
-
228
-
229
-
230
-
231
-
232
-
233
-
234
-
235
-
236
-
237
-
238
-
239
-
240
-
241
-
242
-
243
-
244
-
245
-
246
-
247
-
248
-
249
-
250
-
251
-
252
-
253
-
254
-
255
-
256
-
257
-
258
-
259
-
260
-
261
-
262
-
263
-
264
-
265
-
266
-
267
-
268
-
269
-
270
-
271
-
272
-
273
-
274
-
275
-
276
-
277
-
278
-
279
-
280
-
281
-
282
-
283
-
284
-
285
-
286
-
287
-
288
-
289
-
290
-
291
-
292
-
293
-
294
-
295
-
296
-
297
-
298
-
299
-
300
-
301
-
302
-
303
-
304
-
305
-
306
-
307
-
308
-
309
-
310
-
311
-
312
-
313
-
314
-
315
-
316
-
317
-
318
-
319
-
320
-
321
-
322
-
323
-
324
-
325
-
326
-
327
-
328
-
329
-
330
-
331
-
332
-
333
-
334
-
335
-
336
-
337
-
338
-
339
-
340
-
341
-
342
-
343
-
344
-
345
-
346
-
347
-
348
-
349
-
350
-
351
-
352
-
353
-
354
-
355
-
356
-
357
-
358
-
359
-
360
-
361
-
362
-
363
-
364
-
365
-
366
-
367
-
368
-
369
-
370
-
371
-
372
-
373
-
374
-
375
-
376
-
377
-
378
-
379
-
380
-
381
-
382
-
383
-
384
-
385
-
386
-
387
-
388
-
389
-
390
-
391
-
392
-
393
-
394
-
395
-
396
-
397
-
398
 |
 |
