Netgear WC7500-Wireless User Manual - Page 78
Confirm, Edit Properties, Delete
 |
View all Netgear WC7500-Wireless manuals
Add to My Manuals
Save this manual to your list of manuals |
Page 78 highlights
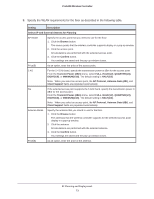
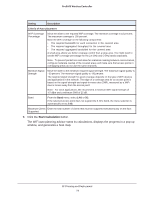
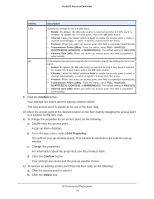
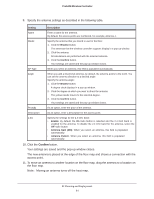
ProSAFE Wireless Controller Setting Description 2.4G Specify the settings for the 2.4 GHz band: • Enable. By default, the On radio button is selected and the 2.4 GHz band is enabled. To disable the 2.4 GHz band, select the Off radio button. • Channel. Leave the default selection Auto to enable the access point to select a channel automatically, or select a specific channel from the menu. • Protocol. When you select an access point, this field is populated automatically. • Transmission Power (dBm). From the menu, select FULL, HALF(1/2), QUARTER(1/4), EIGHT(1/8), or MINIMUM(1/16). The default setting is HALF(1/2). • Antenna Gain (dBi). When you select an access point, this field is populated automatically. 5G If the selected access point supports the 5 GHz band, specify the settings for the 5 GHz band: • Enable. By default, the On radio button is selected and the 5 GHz band is enabled. To disable the 5 GHz band, select the Off radio button. • Channel. Leave the default selection Auto to enable the access point to select a channel automatically, or select a specific channel from the menu. • Protocol. When you select an access point, this field is populated automatically. • Transmission Power (dBm). From the menu, select FULL, HALF(1/2), QUARTER(1/4), EIGHT(1/8), or MINIMUM(1/16). The default setting is HALF(1/2). • Antenna Gain (dBi). When you select an access point, this field is populated automatically. 9. Click the Confirm button. Your settings are saved and the pop-up window closes. The new access point is placed at the top of the floor map. 10. Move the access point to the desired location on the floor map by dragging the access point to a location on the floor map. 11. To change the properties for an access point, do the following: a. Double-click the access point. A pop-up menu displays. b. From the pop-menu, select Edit Properties. The Edit AP pop-up window opens. This window is identical to the Add AP pop-up window. c. Change the properties. For information about the properties, see the previous table. d. Click the Confirm button. Your settings are saved and the pop-up window closes. 12. To remove an existing access point from the floor map, do the following: a. Click the access point to select it. b. Click the Delete link. RF Planning and Deployment 78
-
 1
1 -
2
-
3
-
4
-
5
-
6
-
7
-
8
-
9
-
10
-
11
-
12
-
13
-
14
-
15
-
16
-
17
-
18
-
19
-
20
-
21
-
22
-
23
-
24
-
25
-
26
-
27
-
28
-
29
-
30
-
31
-
32
-
33
-
34
-
35
-
36
-
37
-
38
-
39
-
40
-
41
-
42
-
43
-
44
-
45
-
46
-
47
-
48
-
49
-
50
-
51
-
52
-
53
-
54
-
55
-
56
-
57
-
58
-
59
-
60
-
61
-
62
-
63
-
64
-
65
-
66
-
67
-
68
-
69
-
70
-
71
-
72
-
 73
73 -
 74
74 -
 75
75 -
 76
76 -
 77
77 -
 78
78 -
 79
79 -
 80
80 -
 81
81 -
 82
82 -
 83
83 -
84
-
85
-
86
-
87
-
88
-
89
-
90
-
91
-
92
-
93
-
94
-
95
-
96
-
97
-
98
-
99
-
100
-
101
-
102
-
103
-
104
-
105
-
106
-
107
-
108
-
109
-
110
-
111
-
112
-
113
-
114
-
115
-
116
-
117
-
118
-
119
-
120
-
121
-
122
-
123
-
124
-
125
-
126
-
127
-
128
-
129
-
130
-
131
-
132
-
133
-
134
-
135
-
136
-
137
-
138
-
139
-
140
-
141
-
142
-
143
-
144
-
145
-
146
-
147
-
148
-
149
-
150
-
151
-
152
-
153
-
154
-
155
-
156
-
157
-
158
-
159
-
160
-
161
-
162
-
163
-
164
-
165
-
166
-
167
-
168
-
169
-
170
-
171
-
172
-
173
-
174
-
175
-
176
-
177
-
178
-
179
-
180
-
181
-
182
-
183
-
184
-
185
-
186
-
187
-
188
-
189
-
190
-
191
-
192
-
193
-
194
-
195
-
196
-
197
-
198
-
199
-
200
-
201
-
202
-
203
-
204
-
205
-
206
-
207
-
208
-
209
-
210
-
211
-
212
-
213
-
214
-
215
-
216
-
217
-
218
-
219
-
220
-
221
-
222
-
223
-
224
-
225
-
226
-
227
-
228
-
229
-
230
-
231
-
232
-
233
-
234
-
235
-
236
-
237
-
238
-
239
-
240
-
241
-
242
-
243
-
244
-
245
-
246
-
247
-
248
-
249
-
250
-
251
-
252
-
253
-
254
-
255
-
256
-
257
-
258
-
259
-
260
-
261
-
262
-
263
-
264
-
265
-
266
-
267
-
268
-
269
-
270
-
271
-
272
-
273
-
274
-
275
-
276
-
277
-
278
-
279
-
280
-
281
-
282
-
283
-
284
-
285
-
286
-
287
-
288
-
289
-
290
-
291
-
292
-
293
-
294
-
295
-
296
-
297
-
298
-
299
-
300
-
301
-
302
-
303
-
304
-
305
-
306
-
307
-
308
-
309
-
310
-
311
-
312
-
313
-
314
-
315
-
316
-
317
-
318
-
319
-
320
-
321
-
322
-
323
-
324
-
325
-
326
-
327
-
328
-
329
-
330
-
331
-
332
-
333
-
334
-
335
-
336
-
337
-
338
-
339
-
340
-
341
-
342
-
343
-
344
-
345
-
346
-
347
-
348
-
349
-
350
-
351
-
352
-
353
-
354
-
355
-
356
-
357
-
358
-
359
-
360
-
361
-
362
-
363
-
364
-
365
-
366
-
367
-
368
-
369
-
370
-
371
-
372
-
373
-
374
-
375
-
376
-
377
-
378
-
379
-
380
-
381
-
382
-
383
-
384
-
385
-
386
-
387
-
388
-
389
-
390
-
391
-
392
-
393
-
394
-
395
-
396
-
397
-
398
 |
 |
