Oki B930dn User Guide (English) - Page 142
Fuser Unit, Caution on Handling the Fuser Unit, Replacing the Fuser Unit
 |
View all Oki B930dn manuals
Add to My Manuals
Save this manual to your list of manuals |
Page 142 highlights
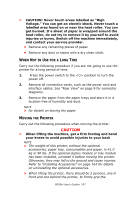
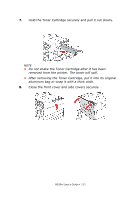
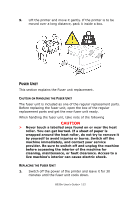
9. Lift the printer and move it gently. If the printer is to be moved over a long distance, pack it inside a box. FUSER UNIT This section explains the Fuser unit replacement. CAUTION ON HANDLING THE FUSER UNIT The fuser unit is included as one of the regular replacement parts. Before replacing the fuser unit, open the box of the regular replacement parts and get the new fuser unit ready. When handling the fuser unit, take note of the following CAUTION > Never touch a labelled area found on or near the heat roller. You can get burned. If a sheet of paper is wrapped around the heat roller, do not try to remove it by yourself to avoid injuries or burns. Switch off the machine immediately, and contact your service provider. Be sure to switch off and unplug the machine before accessing the interior of the machine for cleaning, maintenance, or fault clearance. Access to a live machine's interior can cause electric shock. REPLACING THE FUSER UNIT 1. Switch off the power of the printer and leave it for 30 minutes until the fuser unit cools down. B930n User's Guide> 112
-
 1
1 -
2
-
3
-
4
-
5
-
6
-
7
-
8
-
9
-
10
-
11
-
12
-
13
-
14
-
15
-
16
-
17
-
18
-
19
-
20
-
21
-
22
-
23
-
24
-
25
-
26
-
27
-
28
-
29
-
30
-
31
-
32
-
33
-
34
-
35
-
36
-
37
-
38
-
39
-
40
-
41
-
42
-
43
-
44
-
45
-
46
-
47
-
48
-
49
-
50
-
51
-
52
-
53
-
54
-
55
-
56
-
57
-
58
-
59
-
60
-
61
-
62
-
63
-
64
-
65
-
66
-
67
-
68
-
69
-
70
-
71
-
72
-
73
-
74
-
75
-
76
-
77
-
78
-
79
-
80
-
81
-
82
-
83
-
84
-
85
-
86
-
87
-
88
-
89
-
90
-
91
-
92
-
93
-
94
-
95
-
96
-
97
-
98
-
99
-
100
-
101
-
102
-
103
-
104
-
105
-
106
-
107
-
108
-
109
-
110
-
111
-
112
-
113
-
114
-
115
-
116
-
117
-
118
-
119
-
120
-
121
-
122
-
123
-
124
-
125
-
126
-
127
-
128
-
129
-
130
-
131
-
132
-
133
-
134
-
135
-
136
-
 137
137 -
 138
138 -
 139
139 -
 140
140 -
 141
141 -
 142
142 -
 143
143 -
 144
144 -
 145
145 -
 146
146 -
 147
147 -
148
-
149
-
150
-
151
-
152
-
153
-
154
-
155
-
156
-
157
-
158
-
159
-
160
-
161
-
162
-
163
-
164
-
165
-
166
-
167
-
168
-
169
-
170
-
171
-
172
-
173
-
174
-
175
-
176
-
177
-
178
-
179
-
180
-
181
-
182
-
183
-
184
-
185
-
186
-
187
-
188
-
189
-
190
-
191
-
192
-
193
-
194
-
195
-
196
-
197
-
198
-
199
-
200
-
201
-
202
-
203
-
204
-
205
-
206
-
207
-
208
-
209
-
210
-
211
 |
 |
