Oki B930dn User Guide (English) - Page 198
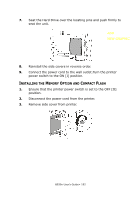
Installing the Memory Option and Compact Flash, Disconnect the power cord from the printer.
 |
View all Oki B930dn manuals
Add to My Manuals
Save this manual to your list of manuals |
Page 198 highlights
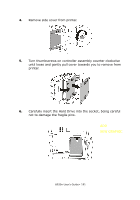
7. Seat the Hard Drive over the locating pins and push firmly to seat the unit. ADD NEW GRAPHIC 8. Reinstall the side covers in reverse order. 9. Connect the power cord to the wall outlet.Turn the printer power switch to the ON [I] position. INSTALLING THE MEMORY OPTION AND COMPACT FLASH 1. Ensure that the printer power switch is set to the OFF [O] position. 2. Disconnect the power cord from the printer. 3. Remove side cover from printer. B930n User's Guide> 192
-
 1
1 -
2
-
3
-
4
-
5
-
6
-
7
-
8
-
9
-
10
-
11
-
12
-
13
-
14
-
15
-
16
-
17
-
18
-
19
-
20
-
21
-
22
-
23
-
24
-
25
-
26
-
27
-
28
-
29
-
30
-
31
-
32
-
33
-
34
-
35
-
36
-
37
-
38
-
39
-
40
-
41
-
42
-
43
-
44
-
45
-
46
-
47
-
48
-
49
-
50
-
51
-
52
-
53
-
54
-
55
-
56
-
57
-
58
-
59
-
60
-
61
-
62
-
63
-
64
-
65
-
66
-
67
-
68
-
69
-
70
-
71
-
72
-
73
-
74
-
75
-
76
-
77
-
78
-
79
-
80
-
81
-
82
-
83
-
84
-
85
-
86
-
87
-
88
-
89
-
90
-
91
-
92
-
93
-
94
-
95
-
96
-
97
-
98
-
99
-
100
-
101
-
102
-
103
-
104
-
105
-
106
-
107
-
108
-
109
-
110
-
111
-
112
-
113
-
114
-
115
-
116
-
117
-
118
-
119
-
120
-
121
-
122
-
123
-
124
-
125
-
126
-
127
-
128
-
129
-
130
-
131
-
132
-
133
-
134
-
135
-
136
-
137
-
138
-
139
-
140
-
141
-
142
-
143
-
144
-
145
-
146
-
147
-
148
-
149
-
150
-
151
-
152
-
153
-
154
-
155
-
156
-
157
-
158
-
159
-
160
-
161
-
162
-
163
-
164
-
165
-
166
-
167
-
168
-
169
-
170
-
171
-
172
-
173
-
174
-
175
-
176
-
177
-
178
-
179
-
180
-
181
-
182
-
183
-
184
-
185
-
186
-
187
-
188
-
189
-
190
-
191
-
192
-
 193
193 -
 194
194 -
 195
195 -
 196
196 -
 197
197 -
 198
198 -
 199
199 -
 200
200 -
 201
201 -
 202
202 -
 203
203 -
204
-
205
-
206
-
207
-
208
-
209
-
210
-
211
 |
 |
B930n User’s Guide> 192
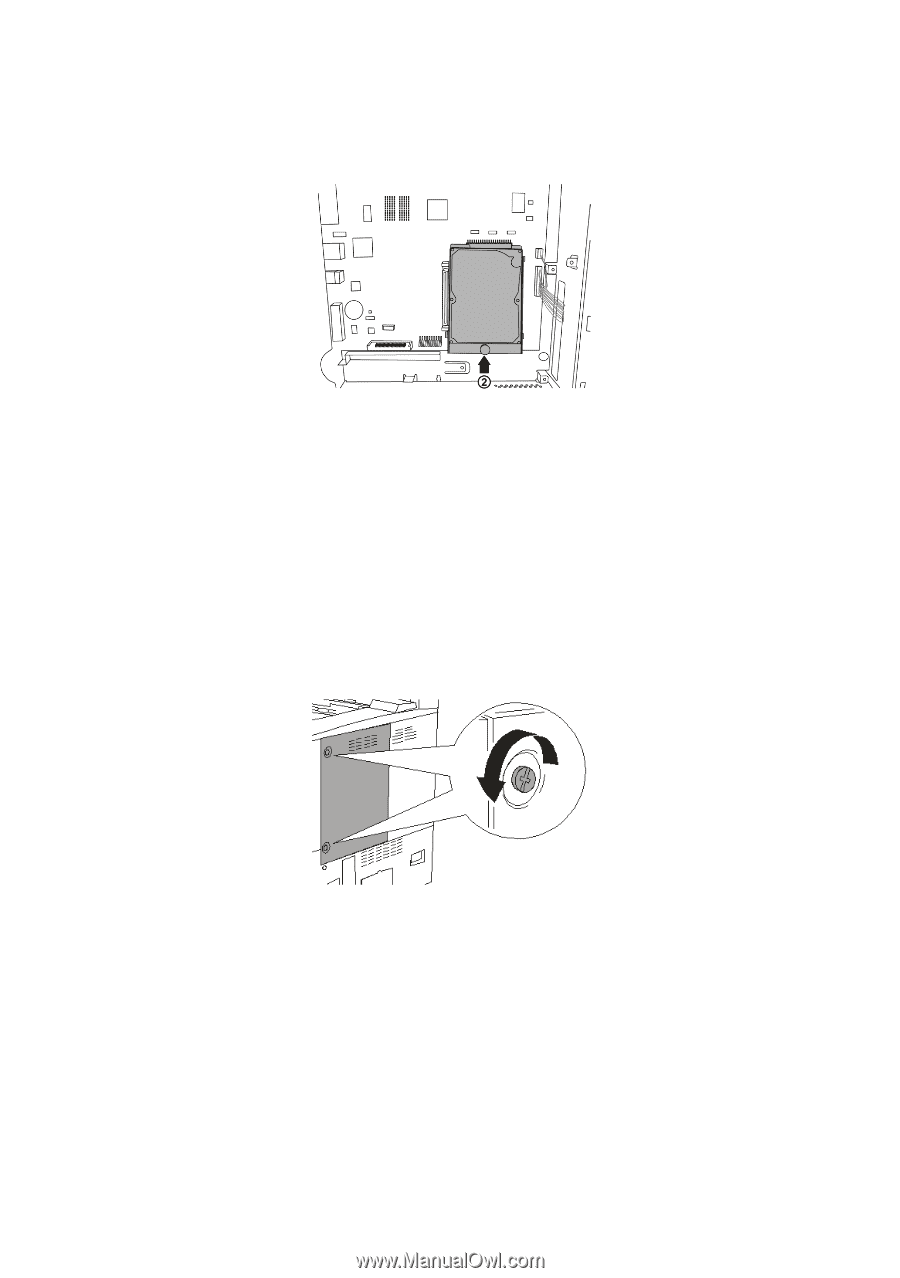
7.
Seat the Hard Drive over the locating pins and push firmly to
seat the unit.
8.
Reinstall the side covers in reverse order.
9.
Connect the power cord to the wall outlet.Turn the printer
power switch to the ON [I] position.
I
NSTALLING
THE
M
EMORY
O
PTION
AND
C
OMPACT
F
LASH
1.
Ensure that the printer power switch is set to the OFF [O]
position.
2.
Disconnect the power cord from the printer.
3.
Remove side cover from printer.
ADD
NEW GRAPHIC