Pioneer AVIC-X930BT Owner's Manual - Page 166
Setting for rear view camera - reverse camera
 |
UPC - 884938127097
View all Pioneer AVIC-X930BT manuals
Add to My Manuals
Save this manual to your list of manuals |
Page 166 highlights
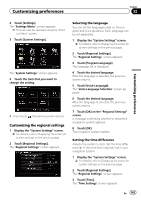
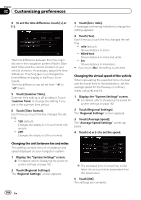
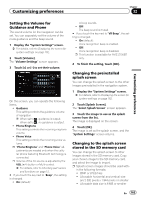
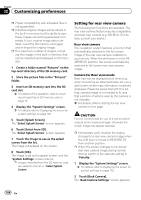
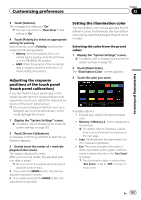
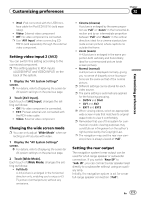
Chapter 32 Customizing preferences p Proper compatibility with allowable files is not guaranteed. p Imported original images will be stored in the built-in memory, but the ability to save these images cannot be guaranteed completely. If your original image data is deleted, insert the SD memory card again and re-import the original image. p The maximum number of images, including the images in the built-in memory, that can be imported and displayed on the list is 200. 1 Create a folder named "Pictures" on the top-most directory of the SD memory card. 2 Store the picture files in the "Pictures" folder. 3 Insert an SD memory card into the SD card slot. = For details of the operation, refer to Inserting and ejecting an SD memory card on page 16. 4 Display the "System Settings" screen. = For details, refer to Displaying the screen for system settings on page 162. 5 Touch [Splash Screen]. The "Select Splash Screen" screen appears. 6 Touch [Select from SD]. The "Select Splash Screen" screen appears. 7 Touch the image to use as the splash screen from the list. The image is displayed on the screen. 8 Touch [OK]. The image is set as the splash screen, and the "System Settings" screen returns. p Images imported from the SD memory card are added to the list on "Select Splash Screen". Setting for rear view camera The following two functions are available. The rear view camera feature requires a separately sold rear view camera (e.g. ND-BC4). (For details, consult your dealer.) Rear view camera The navigation system features a function that automatically switches to the full-screen image of the rear view camera installed on your vehicle. When the shift lever is in the REVERSE (R) position, the screen automatically switches to full-screen rear view camera image. Camera for Rear view mode Rear view can be displayed at all times (e.g. when monitoring an attached trailer, etc.) as a split screen where map information is partially displayed. Please be aware that with this setting, camera image is not resized to fit, and that a portion of what is seen by the camera is not viewable. = For details, refer to Setting for rear view camera on this page. CAUTION Pioneer recommends the use of a camera which outputs mirror reversed images, otherwise the screen image may appear reversed. p Immediately verify whether the display changes to a rear view camera image when the shift lever is moved to REVERSE (R) from another position. p When the screen changes to full-screen rear view camera image during normal driving, switch to the opposite setting in "Polarity". 1 Display the "System Settings" screen. = For details, refer to Displaying the screen for system settings on page 162. 2 Touch [Back Camera]. The "Back Camera Settings" screen appears. 166 En
-
 1
1 -
2
-
3
-
4
-
5
-
6
-
7
-
8
-
9
-
10
-
11
-
12
-
13
-
14
-
15
-
16
-
17
-
18
-
19
-
20
-
21
-
22
-
23
-
24
-
25
-
26
-
27
-
28
-
29
-
30
-
31
-
32
-
33
-
34
-
35
-
36
-
37
-
38
-
39
-
40
-
41
-
42
-
43
-
44
-
45
-
46
-
47
-
48
-
49
-
50
-
51
-
52
-
53
-
54
-
55
-
56
-
57
-
58
-
59
-
60
-
61
-
62
-
63
-
64
-
65
-
66
-
67
-
68
-
69
-
70
-
71
-
72
-
73
-
74
-
75
-
76
-
77
-
78
-
79
-
80
-
81
-
82
-
83
-
84
-
85
-
86
-
87
-
88
-
89
-
90
-
91
-
92
-
93
-
94
-
95
-
96
-
97
-
98
-
99
-
100
-
101
-
102
-
103
-
104
-
105
-
106
-
107
-
108
-
109
-
110
-
111
-
112
-
113
-
114
-
115
-
116
-
117
-
118
-
119
-
120
-
121
-
122
-
123
-
124
-
125
-
126
-
127
-
128
-
129
-
130
-
131
-
132
-
133
-
134
-
135
-
136
-
137
-
138
-
139
-
140
-
141
-
142
-
143
-
144
-
145
-
146
-
147
-
148
-
149
-
150
-
151
-
152
-
153
-
154
-
155
-
156
-
157
-
158
-
159
-
160
-
 161
161 -
 162
162 -
 163
163 -
 164
164 -
 165
165 -
 166
166 -
 167
167 -
 168
168 -
 169
169 -
 170
170 -
 171
171 -
172
-
173
-
174
-
175
-
176
-
177
-
178
-
179
-
180
-
181
-
182
-
183
-
184
-
185
-
186
-
187
-
188
-
189
-
190
-
191
-
192
-
193
-
194
-
195
-
196
-
197
-
198
-
199
-
200
-
201
-
202
-
203
-
204
-
205
-
206
-
207
-
208
-
209
-
210
-
211
-
212
-
213
-
214
-
215
-
216
-
217
-
218
-
219
-
220
-
221
-
222
-
223
-
224
-
225
-
226
-
227
-
228
-
229
-
230
-
231
-
232
 |
 |