Samsung SCH-S950C User Manual - Page 66
Google Talk, Email
 |
View all Samsung SCH-S950C manuals
Add to My Manuals
Save this manual to your list of manuals |
Page 66 highlights
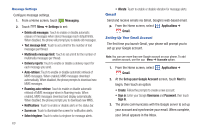
Google Talk Google Talk™ is a free Windows and web-based application for instant messaging offered by Google. Conversation logs are automatically saved to a Chats area in your Gmail account. This allows you to search a chat log and store them in your Gmail accounts. Tip: Talk requires that you have a Google account set up on your phone. For more information, see "Setting Up Your Accounts" on page 35. Note: Before using this application, you must first have an active Gmail account available and be currently logged in. 1. From the Home screen, select Talk. 2. Begin using Google Talk. Applications ➔ Note: If you have already set up your Google account, you are automatically logged in. If you do not have a Google account, you can touch Create to create a new Google account. Email Send and receive email using popular email services. Note: Only some paid "Plus" accounts include POP access to allow this program to connect. If you are not able to sign in with your correct email address and password, you may not have a paid "Plus" account. Please launch the Web browser to access your account. Configuring a new Email Accounts You can configure Email for most accounts in just a few steps. 1. From the Home screen, select Applications ➔ Email. 2. If you already have other email account setup: • Press • Press Menu ➔ Accounts. Menu ➔ Add account ➔ Corporate. - or - Select Corporate as an email type. 3. Enter your Email address and Password, then touch Next. 4. At the Exchange server settings screen, enter an updated Domain, and confirm your Username and Password information. 62
-
 1
1 -
2
-
3
-
4
-
5
-
6
-
7
-
8
-
9
-
10
-
11
-
12
-
13
-
14
-
15
-
16
-
17
-
18
-
19
-
20
-
21
-
22
-
23
-
24
-
25
-
26
-
27
-
28
-
29
-
30
-
31
-
32
-
33
-
34
-
35
-
36
-
37
-
38
-
39
-
40
-
41
-
42
-
43
-
44
-
45
-
46
-
47
-
48
-
49
-
50
-
51
-
52
-
53
-
54
-
55
-
56
-
57
-
58
-
59
-
60
-
 61
61 -
 62
62 -
 63
63 -
 64
64 -
 65
65 -
 66
66 -
 67
67 -
 68
68 -
 69
69 -
 70
70 -
 71
71 -
72
-
73
-
74
-
75
-
76
-
77
-
78
-
79
-
80
-
81
-
82
-
83
-
84
-
85
-
86
-
87
-
88
-
89
-
90
-
91
-
92
-
93
-
94
-
95
-
96
-
97
-
98
-
99
-
100
-
101
-
102
-
103
-
104
-
105
-
106
-
107
-
108
-
109
-
110
-
111
-
112
-
113
-
114
-
115
-
116
-
117
-
118
-
119
-
120
-
121
-
122
-
123
-
124
-
125
-
126
-
127
-
128
-
129
-
130
-
131
-
132
-
133
-
134
-
135
-
136
-
137
-
138
-
139
-
140
-
141
-
142
-
143
-
144
-
145
-
146
-
147
-
148
-
149
-
150
-
151
-
152
-
153
-
154
-
155
-
156
-
157
-
158
-
159
-
160
-
161
 |
 |
