Samsung SM-P905V User Manual Verizon Wireless Sm-p905v Galaxy Note Pro 12.2 Kk - Page 50
Groups, Sharing Contact Information, Create a New Group
 |
View all Samsung SM-P905V manuals
Add to My Manuals
Save this manual to your list of manuals |
Page 50 highlights
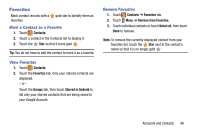
Separating Contacts 1. Touch Contacts. 2. Touch a contact in the Contacts list to display it. 3. Touch Menu ➔ Separate contact. A list of linked contacts is displayed. 4. Touch to separate a linked contact. Sharing Contact Information You can send a contact's information using Bluetooth to other Bluetooth devices, or in an Email or Gmail as an attachment. Note: Not all Bluetooth devices accept contacts and not all devices support transfers of multiple contacts. Check the target device's documentation. 1. Touch Contacts. 2. Touch Menu ➔ Share namecard via. 3. Touch Selected contact to share only the displayed contact, or touch Multiple contacts. 4. Touch a sending method, such as Bluetooth or email. 5. Follow the prompts to send the contact information. Groups Assign contacts to Groups to make searching for contacts faster or to quickly send messages to group members. Create a New Group Create a new group when you add or edit a contact. 1. Touch Contacts ➔ Groups tab. 2. Touch Create. 3. Touch the Group name field and enter a name. 4. Touch Add member, touch individual contacts or touch Select all, and then touch Done to add the selected contacts to the group. 5. Touch Save. Tip: Contacts can belong to more than one group. While editing a contact, touch the Groups field to add additional groups. Once you create a new group, the Contacts list can be set to display only the contacts in that group. For more information, refer to "Contacts Display Options" on page 43. Accounts and Contacts 44
-
 1
1 -
2
-
3
-
4
-
5
-
6
-
7
-
8
-
9
-
10
-
11
-
12
-
13
-
14
-
15
-
16
-
17
-
18
-
19
-
20
-
21
-
22
-
23
-
24
-
25
-
26
-
27
-
28
-
29
-
30
-
31
-
32
-
33
-
34
-
35
-
36
-
37
-
38
-
39
-
40
-
41
-
42
-
43
-
44
-
 45
45 -
 46
46 -
 47
47 -
 48
48 -
 49
49 -
 50
50 -
 51
51 -
 52
52 -
 53
53 -
 54
54 -
 55
55 -
56
-
57
-
58
-
59
-
60
-
61
-
62
-
63
-
64
-
65
-
66
-
67
-
68
-
69
-
70
-
71
-
72
-
73
-
74
-
75
-
76
-
77
-
78
-
79
-
80
-
81
-
82
-
83
-
84
-
85
-
86
-
87
-
88
-
89
-
90
-
91
-
92
-
93
-
94
-
95
-
96
-
97
-
98
-
99
-
100
-
101
-
102
-
103
-
104
-
105
-
106
-
107
-
108
-
109
-
110
-
111
-
112
-
113
-
114
-
115
-
116
-
117
-
118
-
119
-
120
-
121
-
122
-
123
-
124
-
125
-
126
-
127
-
128
-
129
-
130
-
131
-
132
-
133
-
134
-
135
-
136
-
137
-
138
-
139
-
140
-
141
-
142
-
143
-
144
-
145
-
146
-
147
-
148
-
149
-
150
-
151
-
152
-
153
-
154
-
155
-
156
-
157
-
158
 |
 |
