Sony HDR-FX1 Operating Instructions - Page 46
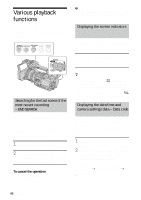
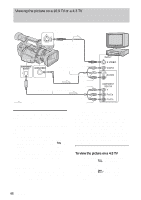
Playing the picture on a TV, Viewing the picture on a high definition TV
 |
UPC - 027242654815
View all Sony HDR-FX1 manuals
Add to My Manuals
Save this manual to your list of manuals |
Page 46 highlights
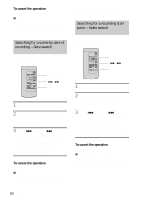
Playing the picture on a TV TV connections differ depending on the type of TV. Connect the supplied AC Adaptor to the wall outlet for the power supply (p. 14). Refer also to the instruction manuals supplied with the devices to be connected. To copy to another tape, see page 70. Viewing the picture on a high definition TV When you have an S video jack TV on your TV or VCR S video cable (optional) Yellow A/V connecting cable (supplied) White Red Component video cable (supplied) Green i.LINK cable (optional) Blue Red Signal flow Connect your camcorder and your TV using either cables described below. To connect the TV using an i.LINK cable This connection is recommended when your TV is compatible with HDV/DV and has an i.LINK jack. • Before connecting the i.LINK cable, select the (IN/OUT REC) menu, [VCR HDV/DV], then [AUTO] (the default setting). • In case of this connection, the TV needs to be set so that it recognizes that the camcorder is connected. Refer to the operating manual supplied with the TV for the details. To connect the TV using the component video cable • To view the picture recorded in the HDV format, set [COMPONENT] on the (IN/ OUT REC) menu according to your TV (p. 60). When the picture recorded in the DV 46 Playback
-
 1
1 -
2
-
3
-
4
-
5
-
6
-
7
-
8
-
9
-
10
-
11
-
12
-
13
-
14
-
15
-
16
-
17
-
18
-
19
-
20
-
21
-
22
-
23
-
24
-
25
-
26
-
27
-
28
-
29
-
30
-
31
-
32
-
33
-
34
-
35
-
36
-
37
-
38
-
39
-
40
-
 41
41 -
 42
42 -
 43
43 -
 44
44 -
 45
45 -
 46
46 -
 47
47 -
 48
48 -
 49
49 -
 50
50 -
 51
51 -
52
-
53
-
54
-
55
-
56
-
57
-
58
-
59
-
60
-
61
-
62
-
63
-
64
-
65
-
66
-
67
-
68
-
69
-
70
-
71
-
72
-
73
-
74
-
75
-
76
-
77
-
78
-
79
-
80
-
81
-
82
-
83
-
84
-
85
-
86
-
87
-
88
-
89
-
90
-
91
-
92
-
93
-
94
-
95
-
96
-
97
-
98
-
99
-
100
-
101
-
102
-
103
-
104
-
105
-
106
-
107
-
108
-
109
-
110
-
111
-
112
 |
 |
