Sony HDR-FX1 Operating Instructions - Page 55
Zebra Level, Center Markr, Frame Rec, Dv Wide Rec, Press Rec Start/stop.
 |
UPC - 027242654815
View all Sony HDR-FX1 manuals
Add to My Manuals
Save this manual to your list of manuals |
Page 55 highlights
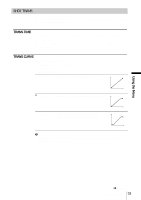
Using the Menu Speeds 1 through 8 are available. The larger the number, the faster the zoom speed. 3 Select [OK] by turning the SEL/PUSH EXEC dial, then press the dial. 4 Press MENU to hide the menu screen. ZEBRA LEVEL See page 31 for details. CENTER MARKR GOFF ON Select when you do not want to display the center marker on the screen (p. 21). Select to display the center marker on the screen. b Note • The center marker and its position do not affect the adjustment, setting, or recording in any way. FRAME REC You can record pictures with a stop-motion animated effect by alternately recording a few frames and then moving the subject a little. Operate your camcorder using the Remote Commander to prevent camera shake. GOFF ON ( ) Select to record in the standard recording mode. Select to record pictures using the FRAME REC function. 1 Select [ON], then press the dial. 2 Press MENU to hide the menu screen. 3 Press REC START/STOP. A picture (approximately 6 frames) is recorded, and your camcorder enters the standby mode. 4 Move the subject and repeat step 3. b Note • When you use frame recording continuously, the remaining tape time will not be indicated correctly. • The last scene will be longer than other scenes. • You cannot record index signals during frame recording. DV WIDE REC See page 40 for details. Using the Menu 55
-
 1
1 -
2
-
3
-
4
-
5
-
6
-
7
-
8
-
9
-
10
-
11
-
12
-
13
-
14
-
15
-
16
-
17
-
18
-
19
-
20
-
21
-
22
-
23
-
24
-
25
-
26
-
27
-
28
-
29
-
30
-
31
-
32
-
33
-
34
-
35
-
36
-
37
-
38
-
39
-
40
-
41
-
42
-
43
-
44
-
45
-
46
-
47
-
48
-
49
-
 50
50 -
 51
51 -
 52
52 -
 53
53 -
 54
54 -
 55
55 -
 56
56 -
 57
57 -
 58
58 -
 59
59 -
 60
60 -
61
-
62
-
63
-
64
-
65
-
66
-
67
-
68
-
69
-
70
-
71
-
72
-
73
-
74
-
75
-
76
-
77
-
78
-
79
-
80
-
81
-
82
-
83
-
84
-
85
-
86
-
87
-
88
-
89
-
90
-
91
-
92
-
93
-
94
-
95
-
96
-
97
-
98
-
99
-
100
-
101
-
102
-
103
-
104
-
105
-
106
-
107
-
108
-
109
-
110
-
111
-
112
 |
 |