Sony HDR-FX1 Operating Instructions - Page 76
Set the POWER switch to VCR., insert a cassette.
 |
UPC - 027242654815
View all Sony HDR-FX1 manuals
Add to My Manuals
Save this manual to your list of manuals |
Page 76 highlights
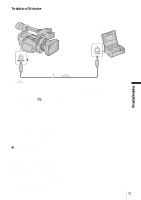
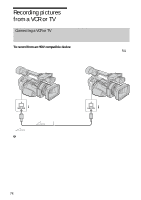
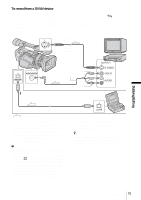
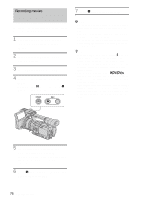
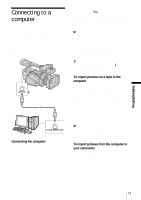
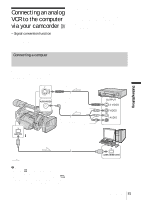
Recording movies 7 Press x (stop) to stop recording. Insert a cassette for recording in your camcorder before the following operations. 1 Connect your TV or VCR to your camcorder as a playback device (p. 74). 2 If you are recording from a VCR, insert a cassette. 3 Set the POWER switch to VCR. 4 Set your camcorder to recording pause. While pressing X (pause), press both z REC (record) buttons simultaneously. b Note • When you use an i.LINK cable, the recorded picture becomes rough when a picture is paused on your VCR. • When you use an i.LINK cable, you cannot record the picture and sound separately. • When you use an i.LINK cable, if you pause or stop the recording and restart it, the picture may not be recorded smoothly. z Tip • The i.LINK lamp, HDV or DV, on the HDV/DV jack holder will light up and indicate the format of the input signal when you use an i.LINK cable. • When you use an i.LINK cable, the video and sound signals are transmitted digitally, producing high quality pictures. • When you use an i.LINK cable, appears during recording. This indicator may appear on the screen of the playback device, however they will not be recorded. • Index signals are automatically recorded on the tape during recording. You can also record index signals at the desired positions during recording by pressing the ASSIGN button assigned to the index function (p. 39). 5 Start playing the cassette on your VCR, or select a TV program. The picture played on the connected device appears on the LCD screen of your camcorder. 6 Press X (pause) again at the point you want to start recording. 76 Dubbing/Editing
-
 1
1 -
2
-
3
-
4
-
5
-
6
-
7
-
8
-
9
-
10
-
11
-
12
-
13
-
14
-
15
-
16
-
17
-
18
-
19
-
20
-
21
-
22
-
23
-
24
-
25
-
26
-
27
-
28
-
29
-
30
-
31
-
32
-
33
-
34
-
35
-
36
-
37
-
38
-
39
-
40
-
41
-
42
-
43
-
44
-
45
-
46
-
47
-
48
-
49
-
50
-
51
-
52
-
53
-
54
-
55
-
56
-
57
-
58
-
59
-
60
-
61
-
62
-
63
-
64
-
65
-
66
-
67
-
68
-
69
-
70
-
 71
71 -
 72
72 -
 73
73 -
 74
74 -
 75
75 -
 76
76 -
 77
77 -
 78
78 -
 79
79 -
 80
80 -
 81
81 -
82
-
83
-
84
-
85
-
86
-
87
-
88
-
89
-
90
-
91
-
92
-
93
-
94
-
95
-
96
-
97
-
98
-
99
-
100
-
101
-
102
-
103
-
104
-
105
-
106
-
107
-
108
-
109
-
110
-
111
-
112
 |
 |