Sony HDR-FX1 Operating Instructions - Page 79
Dubbing/Editing, To set the end point for audio dubbing, Recording sound, Checking and adjusting
 |
UPC - 027242654815
View all Sony HDR-FX1 manuals
Add to My Manuals
Save this manual to your list of manuals |
Page 79 highlights
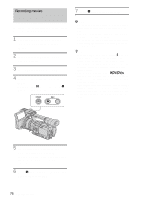
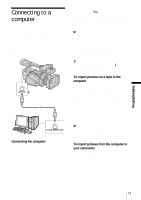
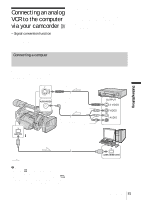
Dubbing/Editing - On blank sections of the tape. - When the write-protect tab of the cassette is set to SAVE. - On the tape recorded on another device with a 4ch microphone (4CH MIC REC). • When you use an external microphone (optional) to record additional audio, you can check the picture and the sound by connecting your camcorder to a TV using the A/V connecting cable. However, sound you have recorded afterwards is not output from the speaker. Check the sound by using headphones or a TV. • The sound from a monaural device connected to the MIC/LINE jack is recorded in the L channel. Recording sound Assign the audio dubbing function to one of the ASSIGN buttons in advance. See page 68 for details on how to assign a function. 1 Insert a recorded cassette into your camcorder. 2 Set the POWER switch to VCR. 3 Press N (play) to play the tape. 4 Press X (pause) at the point where you want to start recording the sound. The playback pauses. 5 Press the ASSIGN button assigned to audio dubbing. The X mark appears on the LCD screen. 6 Press X (pause) and start playing back the audio you want to record at the same time. The mark remains on the LCD screen while sound is recorded. The new sound is recorded in stereo 2 (ST2). 7 Press x (stop) when you want to stop recording. To set the end point for audio dubbing During playback, press ZERO SET MEMORY at the scene at which you want to stop audio dubbing. Then, perform steps 4 to 6. The recording stops automatically at the selected scene. b Note • You can only record additional audio over a tape recorded on your camcorder. The sound may deteriorate when you dub audio on a tape recorded on other camcorders (including other HDR-FX1 camcorders). z Tip • You can manually adjust the microphone volume when you are: - Recording sound from an external microphone or audio device connected to the MIC/LINE jack. - Recording sound from a device connected to the AUDIO/VIDEO jack. - Recording sound using the internal microphone. Checking and adjusting the recorded sound 1 Play back the tape on which you have recorded audio following the procedures in "Recording sound" (p. 79). 2 Press MENU. 3 Select the (AUDIO SET) menu by turning the SEL/PUSH EXEC dial, then press the dial. 4 Select [AUDIO MIX] by turning the SEL/PUSH EXEC dial, then press the dial. ,continued Dubbing/Editing 79
-
 1
1 -
2
-
3
-
4
-
5
-
6
-
7
-
8
-
9
-
10
-
11
-
12
-
13
-
14
-
15
-
16
-
17
-
18
-
19
-
20
-
21
-
22
-
23
-
24
-
25
-
26
-
27
-
28
-
29
-
30
-
31
-
32
-
33
-
34
-
35
-
36
-
37
-
38
-
39
-
40
-
41
-
42
-
43
-
44
-
45
-
46
-
47
-
48
-
49
-
50
-
51
-
52
-
53
-
54
-
55
-
56
-
57
-
58
-
59
-
60
-
61
-
62
-
63
-
64
-
65
-
66
-
67
-
68
-
69
-
70
-
71
-
72
-
73
-
 74
74 -
 75
75 -
 76
76 -
 77
77 -
 78
78 -
 79
79 -
 80
80 -
 81
81 -
 82
82 -
 83
83 -
 84
84 -
85
-
86
-
87
-
88
-
89
-
90
-
91
-
92
-
93
-
94
-
95
-
96
-
97
-
98
-
99
-
100
-
101
-
102
-
103
-
104
-
105
-
106
-
107
-
108
-
109
-
110
-
111
-
112
 |
 |