Canon Optura 200MC DIGITAL VIDEO SOLUTION DISK Ver.4 Software Instruction Manu - Page 68
Adding Card Mix and Card Animation Images to the, Memory Card
 |
View all Canon Optura 200MC manuals
Add to My Manuals
Save this manual to your list of manuals |
Page 68 highlights
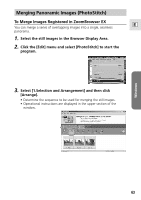
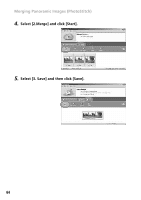
Adding Still Images from Your Computer to the Memory Card Adding Card Mix and Card Animation Images to the Memory Card You can add card mix and card animation images to the memory card. 4 images for CARD CHROMA, 2 images for CARD LUMINANCE, 2 images for CAMERA CHROMA and 4 images for CARD ANIMATION are provided on the Canon DIGITAL VIDEO SOLUTION DISK. 1. Insert the DIGITAL VIDEO SOLUTION DISK to the computer's CD-ROM drive. 2. Click (Upload). • A dialog box appears. 3. Double-click the CD-ROM icon, followed by the [DVC CARD IMAGE] folder. 4. Open the [CARD CHROMA], [CARD LUMINANCE], [CAMERA CHROMA] or [CARD ANIMATION] folder, select the image you wish to copy to the camcorder and click [Open]. • The [Save to Camera] window appears. 5. Select [Small] for [Image Size] and click [Save to Camera] (if you are using a memory card reader, click [Save to Camera Folder]). Notes: • Image enlargement and reduction are not performed when both [Adjust Height] and [Adjust Width] are deselected. • When [Adjust Height] and [Adjust Width] are both selected, the aspect ratio of the still image (the ratio between the height and width of the image) may change when the still image is resized. • JPEG, Windows bitmap, TIFF and Windows Metafile format images can be added to a memory card. Note, however, that an image becomes JPEG format when it is stored on the memory card. • You can also add still images to a memory card by using drag and drop to move the image from the browser area to the camera window. 68
-
 1
1 -
2
-
3
-
4
-
5
-
6
-
7
-
8
-
9
-
10
-
11
-
12
-
13
-
14
-
15
-
16
-
17
-
18
-
19
-
20
-
21
-
22
-
23
-
24
-
25
-
26
-
27
-
28
-
29
-
30
-
31
-
32
-
33
-
34
-
35
-
36
-
37
-
38
-
39
-
40
-
41
-
42
-
43
-
44
-
45
-
46
-
47
-
48
-
49
-
50
-
51
-
52
-
53
-
54
-
55
-
56
-
57
-
58
-
59
-
60
-
61
-
62
-
 63
63 -
 64
64 -
 65
65 -
 66
66 -
 67
67 -
 68
68 -
 69
69 -
 70
70 -
 71
71 -
 72
72 -
 73
73 -
74
-
75
-
76
-
77
-
78
-
79
-
80
-
81
-
82
-
83
-
84
-
85
-
86
-
87
-
88
-
89
-
90
-
91
-
92
-
93
-
94
-
95
-
96
-
97
-
98
-
99
-
100
-
101
-
102
-
103
-
104
-
105
-
106
 |
 |
