Canon PIXMA iP5200R iP5200R Setup Guide - Page 14
Installing the Ink Tanks
 |
View all Canon PIXMA iP5200R manuals
Add to My Manuals
Save this manual to your list of manuals |
Page 14 highlights
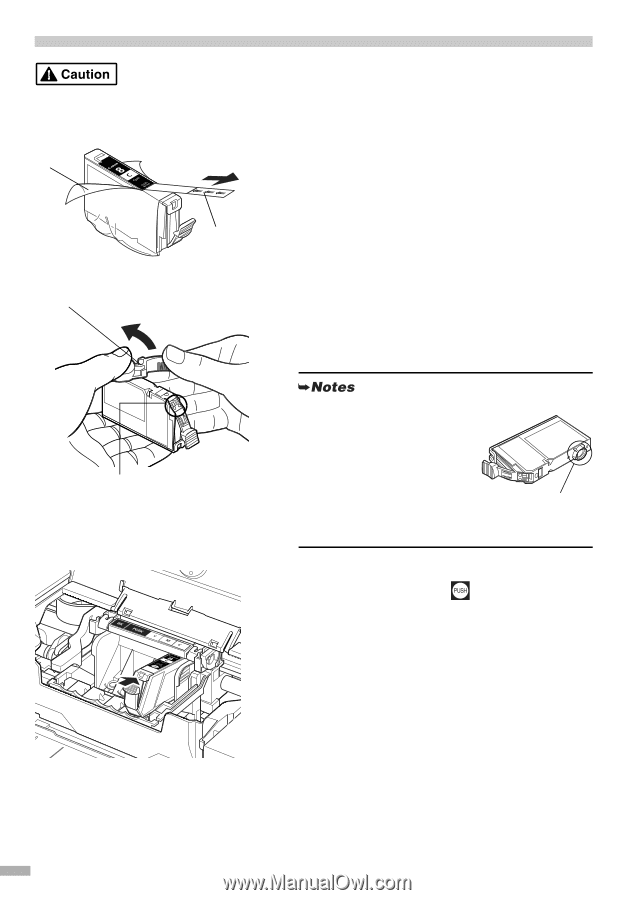
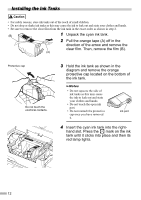
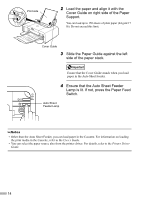
Installing the Ink Tanks • For safety reasons, store ink tanks out of the reach of small children. • Do not drop or shake ink tanks as this may cause the ink to leak out and stain your clothes and hands. • Be sure to remove the clear film from the ink tank in the exact order as shown in step 2. (B) 1 Unpack the cyan ink tank. 2 Pull the orange tape (A) off in the direction of the arrow and remove the clear film. Then, remove the film (B). (A) Protective cap Do not touch the electrical contacts. 3 Hold the ink tank as shown in the diagram and remove the orange protective cap located on the bottom of the ink tank. • Do not squeeze the side of ink tanks as this may cause the ink to leak out and stain your clothes and hands. • Do not touch the open ink port. • Do not reattach the protective cap once you have removed it. ink port 4 Insert the cyan ink tank into the right- hand slot. Press the mark on the ink tank until it clicks into place and then its red lamp lights. 12
-
 1
1 -
2
-
3
-
4
-
5
-
6
-
7
-
8
-
 9
9 -
 10
10 -
 11
11 -
 12
12 -
 13
13 -
 14
14 -
 15
15 -
 16
16 -
 17
17 -
 18
18 -
 19
19 -
20
-
21
-
22
-
23
-
24
-
25
-
26
-
27
-
28
-
29
-
30
-
31
-
32
-
33
-
34
-
35
-
36
-
37
-
38
-
39
-
40
-
41
-
42
-
43
-
44
-
45
-
46
-
47
-
48
-
49
-
50
-
51
-
52
-
53
-
54
-
55
-
56
-
57
-
58
-
59
-
60
-
61
-
62
-
63
-
64
-
65
-
66
-
67
-
68
-
69
-
70
-
71
-
72
-
73
-
74
-
75
-
76
 |
 |