Canon PIXMA iP5200R iP5200R Setup Guide - Page 45
Setup, Canon IJ, Network Tool
 |
View all Canon PIXMA iP5200R manuals
Add to My Manuals
Save this manual to your list of manuals |
Page 45 highlights
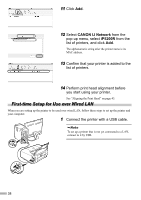
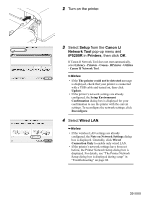
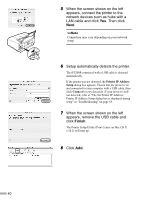
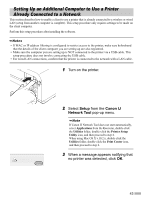
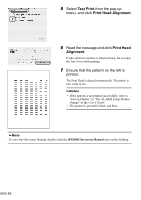
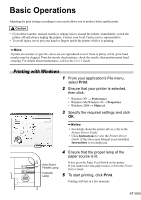
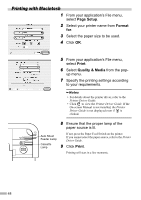
Setting Up an Additional Computer to Use a Printer Already Connected to a Network This section describes how to enable a client to use a printer that is already connected to a wireless or wired LAN (setup from another computer is complete). This setup procedure only requires settings to be made on the client computer. Perform this setup procedure after installing the software. • If MAC or IP address filtering is configured to restrict access to the printer, make sure beforehand that the details of the client computer you are setting up are also registered. • Make sure the computer you are setting up is NOT connected to the printer via a USB cable. This setup procedure does not involve connecting the USB cable. • For wired LAN connections, confirm that the printer is connected to the network with a LAN cable. 1 Turn on the printer. 2 Select Setup from the Canon IJ Network Tool pop-up menu. If Canon IJ Network Tool does not start automatically, select Applications from the Go menu, double-click the Utilities folder, double-click the Printer Setup Utility icon, and then proceed to step 6. When using Mac OS X v.10.2.x, double-click the Utilities folder, double-click the Print Center icon, and then proceed to step 6. 3 When a message appears notifying that no printer was detected, click OK. 43
-
 1
1 -
2
-
3
-
4
-
5
-
6
-
7
-
8
-
9
-
10
-
11
-
12
-
13
-
14
-
15
-
16
-
17
-
18
-
19
-
20
-
21
-
22
-
23
-
24
-
25
-
26
-
27
-
28
-
29
-
30
-
31
-
32
-
33
-
34
-
35
-
36
-
37
-
38
-
39
-
 40
40 -
 41
41 -
 42
42 -
 43
43 -
 44
44 -
 45
45 -
 46
46 -
 47
47 -
 48
48 -
 49
49 -
 50
50 -
51
-
52
-
53
-
54
-
55
-
56
-
57
-
58
-
59
-
60
-
61
-
62
-
63
-
64
-
65
-
66
-
67
-
68
-
69
-
70
-
71
-
72
-
73
-
74
-
75
-
76
 |
 |
