Canon PIXMA iP5200R iP5200R Setup Guide - Page 32
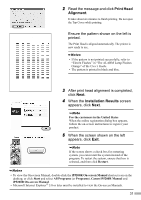
Aligning the Print Head
 |
View all Canon PIXMA iP5200R manuals
Add to My Manuals
Save this manual to your list of manuals |
Page 32 highlights
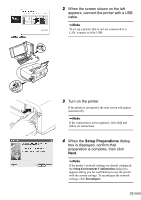
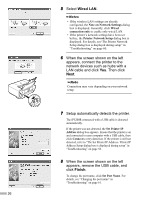
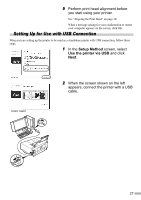
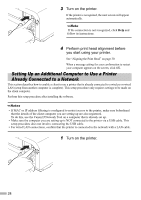
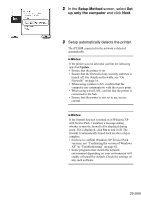
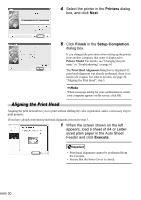
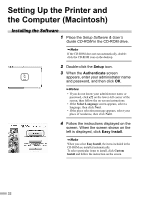
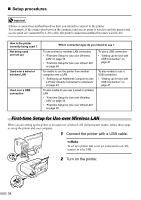
4 Select the printer in the Printers dialog box, and click Next. 5 Click Finish in the Setup Completion dialog box. If you changed the port name when setting up the printer from another computer, that name is displayed in Printer Model. For details, see "Changing the port name" in "Troubleshooting" on page 61. The Print Head Alignment dialog box is displayed. If print head alignment was already performed, there is no need to do it again. For what to do next, see page 30, "Aligning the Print Head", step 3. When a message asking for your confirmation to restart your computer appears on the screen, click OK. Aligning the Print Head Aligning the print head allows you to print without shifting the color registration, and is a necessary step to print properly. If you have already performed print head alignment, proceed to step 3. 1 When the screen shown on the left appears, load a sheet of A4 or Lettersized plain paper in the Auto Sheet Feeder and click Execute. • Print head alignment cannot be performed from the Cassette. • Ensure that the Inner Cover is closed. 30
-
 1
1 -
2
-
3
-
4
-
5
-
6
-
7
-
8
-
9
-
10
-
11
-
12
-
13
-
14
-
15
-
16
-
17
-
18
-
19
-
20
-
21
-
22
-
23
-
24
-
25
-
26
-
 27
27 -
 28
28 -
 29
29 -
 30
30 -
 31
31 -
 32
32 -
 33
33 -
 34
34 -
 35
35 -
 36
36 -
 37
37 -
38
-
39
-
40
-
41
-
42
-
43
-
44
-
45
-
46
-
47
-
48
-
49
-
50
-
51
-
52
-
53
-
54
-
55
-
56
-
57
-
58
-
59
-
60
-
61
-
62
-
63
-
64
-
65
-
66
-
67
-
68
-
69
-
70
-
71
-
72
-
73
-
74
-
75
-
76
 |
 |
