Canon PIXMA iP5200R iP5200R Setup Guide - Page 48
Test Print, Print Head Alignment, Print Head, Alignment
 |
View all Canon PIXMA iP5200R manuals
Add to My Manuals
Save this manual to your list of manuals |
Page 48 highlights
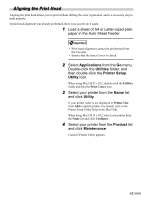
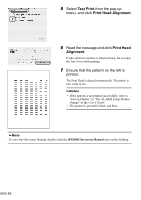
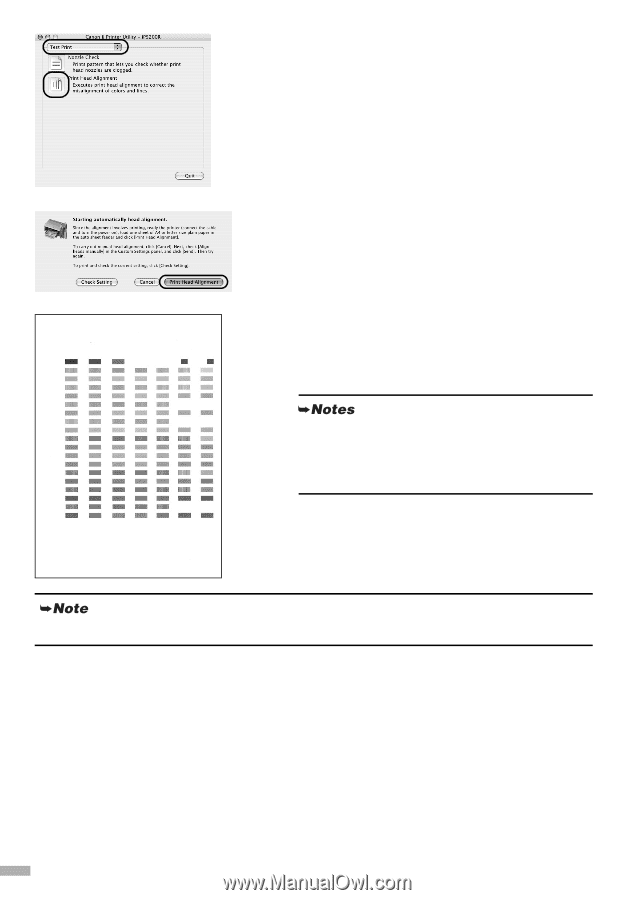
5 Select Test Print from the pop-up menu, and click Print Head Alignment. 6 Read the message and click Print Head Alignment. It takes about six minutes to finish printing. Do not open the Top Cover while printing. 7 Ensure that the pattern on the left is printed. The Print Head is aligned automatically. The printer is now ready to use. • If the pattern is not printed successfully, refer to "Eleven Flashes" in "The ALARM Lamp Flashes Orange" of the User's Guide. • The pattern is printed in black and blue. To view the On-screen Manual, double-click the iP5200R On-screen Manual alias on the desktop. 46
-
 1
1 -
2
-
3
-
4
-
5
-
6
-
7
-
8
-
9
-
10
-
11
-
12
-
13
-
14
-
15
-
16
-
17
-
18
-
19
-
20
-
21
-
22
-
23
-
24
-
25
-
26
-
27
-
28
-
29
-
30
-
31
-
32
-
33
-
34
-
35
-
36
-
37
-
38
-
39
-
40
-
41
-
42
-
 43
43 -
 44
44 -
 45
45 -
 46
46 -
 47
47 -
 48
48 -
 49
49 -
 50
50 -
 51
51 -
 52
52 -
 53
53 -
54
-
55
-
56
-
57
-
58
-
59
-
60
-
61
-
62
-
63
-
64
-
65
-
66
-
67
-
68
-
69
-
70
-
71
-
72
-
73
-
74
-
75
-
76
 |
 |
46
5
Select
Test Print
from the pop-up
menu, and click
Print Head Alignment
.
6
Read the message and click
Print Head
Alignment
.
It takes about six minutes to finish printing. Do not open
the Top Cover while printing.
7
Ensure that the pattern on the left is
printed.
The Print Head is aligned automatically. The printer is
now ready to use.
•
If the pattern is not printed successfully, refer to
“Eleven Flashes” in “The ALARM Lamp Flashes
Orange” of the
User’s Guide
.
•
The pattern is printed in black and blue.
To view the On-screen Manual, double-click the
iP5200R On-screen Manual
alias on the desktop.