Canon PowerShot SX60 HS User Guide - Page 27
Shooting Modes
 |
View all Canon PowerShot SX60 HS manuals
Add to My Manuals
Save this manual to your list of manuals |
Page 27 highlights
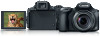
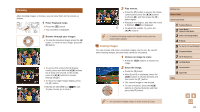
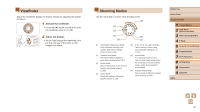
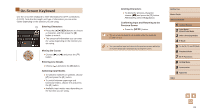
Viewfinder Adjust the viewfinder display for sharper images by adjusting the diopter, as follows. 1 Activate the viewfinder. ●●Press the [ ] button several times until the viewfinder goes on (=28). 2 Adjust the diopter. ●●As you look through the viewfinder, turn the dial one way or the other so that images look sharp. Shooting Modes Use the mode dial to access each shooting mode. (5) (1) (2) (3) (6) (4) (7) (1) Auto Mode / Hybrid Auto Mode Fully automatic shooting, with camera-determined settings (=22, =33, =35). (2) Creative Shot Mode See several effects applied to each shot automatically (=57). (3) Sports Mode Shoot continuously as the camera focuses on moving subjects (= 58). (4) Scene Mode Shoot with optimal settings for specific scenes (=59). (5) P, Tv, Av, M, C1, and C2 Modes Take a variety of shots using your preferred settings (=71, = 92). (6) Movie Mode For shooting movies (=67). You can also shoot movies when the mode dial is not set to Movie mode, simply by pressing the movie button. (7) Creative Filters Mode Add a variety of effects to images when shooting (=60). Before Use Basic Guide Advanced Guide 1 Camera Basics 2 Auto Mode / Hybrid Auto Mode 3 Other Shooting Modes 4 P Mode 5 Tv, Av, M, C1, and C2 Mode 6 Playback Mode 7 Wi-Fi Functions 8 Setting Menu 9 Accessories 10 Appendix Index 27
-
 1
1 -
2
-
3
-
4
-
5
-
6
-
7
-
8
-
9
-
10
-
11
-
12
-
13
-
14
-
15
-
16
-
17
-
18
-
19
-
20
-
21
-
 22
22 -
 23
23 -
 24
24 -
 25
25 -
 26
26 -
 27
27 -
 28
28 -
 29
29 -
 30
30 -
 31
31 -
 32
32 -
33
-
34
-
35
-
36
-
37
-
38
-
39
-
40
-
41
-
42
-
43
-
44
-
45
-
46
-
47
-
48
-
49
-
50
-
51
-
52
-
53
-
54
-
55
-
56
-
57
-
58
-
59
-
60
-
61
-
62
-
63
-
64
-
65
-
66
-
67
-
68
-
69
-
70
-
71
-
72
-
73
-
74
-
75
-
76
-
77
-
78
-
79
-
80
-
81
-
82
-
83
-
84
-
85
-
86
-
87
-
88
-
89
-
90
-
91
-
92
-
93
-
94
-
95
-
96
-
97
-
98
-
99
-
100
-
101
-
102
-
103
-
104
-
105
-
106
-
107
-
108
-
109
-
110
-
111
-
112
-
113
-
114
-
115
-
116
-
117
-
118
-
119
-
120
-
121
-
122
-
123
-
124
-
125
-
126
-
127
-
128
-
129
-
130
-
131
-
132
-
133
-
134
-
135
-
136
-
137
-
138
-
139
-
140
-
141
-
142
-
143
-
144
-
145
-
146
-
147
-
148
-
149
-
150
-
151
-
152
-
153
-
154
-
155
-
156
-
157
-
158
-
159
-
160
-
161
-
162
-
163
-
164
-
165
-
166
-
167
-
168
-
169
-
170
-
171
-
172
-
173
-
174
-
175
-
176
-
177
-
178
-
179
-
180
-
181
-
182
-
183
-
184
-
185
-
186
-
187
-
188
-
189
-
190
-
191
-
192
-
193
-
194
-
195
-
196
-
197
-
198
-
199
-
200
-
201
-
202
-
203
 |
 |