Dell EqualLogic PS6210XS EqualLogic Group Manager Administrator s Guide PS Ser - Page 131
Enable and Disable a Volume RAID Preference, Prerequisites, Procedure
 |
View all Dell EqualLogic PS6210XS manuals
Add to My Manuals
Save this manual to your list of manuals |
Page 131 highlights
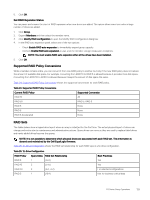
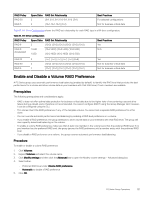
RAID Policy RAID 50 RAID 5 Spare Disks RAID Set Relationship 2 (6+1 ,6+,1, 6+1, 6+1, 6+1, 6+1) (3+1) 2 (12+1, 12+1, 12+1) (6+1) Best Practices For selected configurations Not for business-critical data Table 31. 84-Drive Configuration shows the RAID set relationship for each RAID type in a 84-drive configuration. Table 31. 84-Drive Configuration RAID Policy Spare Disks RAID Set Relationship RAID 6 2 (12+2) (12+2) (12+2) (12+2) (12+2) (10+2) RAID 6 Accelerated 1 HHD 1 SSD (12+2 HDD) (12+2 HDD) (12+2 HDD) (12+2 HDD) (10+2 HDD) (12+2 SSD) Best Practices Yes N/A RAID 10 2 RAID 50 2 RAID 5 2 (7+7) (7+7) (7+7) (7+7) (7+7) (6+6) (12+2) (12+2) (12+2) (12+2) (12+2) (10+2) (12+2) (12+2) (12+2) (12+2) (12+2) (10+2) Yes Not for business-critical data Not for business-critical data Enable and Disable a Volume RAID Preference A PS Series group uses automatic performance load balancing (enabled by default) to identify the RAID level that provides the best performance for a volume and store volume data on pool members with that RAID level, if such members are available. Prerequisites The following prerequisites and considerations apply: • RAID 5 does not offer optimal data protection for business-critical data due to the higher risks of encountering a second drive failure during a rebuild, and is therefore not recommended. You cannot configure RAID 5 using the Group Manager GUI; however, it can be configured using the CLI. • Thin clones inherit the RAID preference, if any, of the template volume. You cannot set a separate RAID preference for a thin clone. • You can override automatic performance load balancing by enabling a RAID level preference on a volume. • If you enable a RAID preference, the group attempts to store volume data on pool members with that RAID level. The group still uses capacity-based load balancing on the volume. • To enable a volume RAID preference, make sure that at least one member in the volume's pool has the preferred RAID level. If no pool member has the preferred RAID level, the group ignores the RAID preference until a member exists with the preferred RAID level. • If you disable a RAID preference on a volume, the group resumes automatic performance load balancing. Procedure To enable or disable a volume RAID preference: 1. Click Volumes. 2. Expand Volumes and select the volume name. 3. Click Modify settings and then click the Advanced tab to open the Modify volume settings - Advanced dialog box. 4. Select either: • Preferred RAID level under Volume RAID preference. • Automatic to disable a RAID preference 5. Click OK. PS Series Group Operations 131
-
 1
1 -
2
-
3
-
4
-
5
-
6
-
7
-
8
-
9
-
10
-
11
-
12
-
13
-
14
-
15
-
16
-
17
-
18
-
19
-
20
-
21
-
22
-
23
-
24
-
25
-
26
-
27
-
28
-
29
-
30
-
31
-
32
-
33
-
34
-
35
-
36
-
37
-
38
-
39
-
40
-
41
-
42
-
43
-
44
-
45
-
46
-
47
-
48
-
49
-
50
-
51
-
52
-
53
-
54
-
55
-
56
-
57
-
58
-
59
-
60
-
61
-
62
-
63
-
64
-
65
-
66
-
67
-
68
-
69
-
70
-
71
-
72
-
73
-
74
-
75
-
76
-
77
-
78
-
79
-
80
-
81
-
82
-
83
-
84
-
85
-
86
-
87
-
88
-
89
-
90
-
91
-
92
-
93
-
94
-
95
-
96
-
97
-
98
-
99
-
100
-
101
-
102
-
103
-
104
-
105
-
106
-
107
-
108
-
109
-
110
-
111
-
112
-
113
-
114
-
115
-
116
-
117
-
118
-
119
-
120
-
121
-
122
-
123
-
124
-
125
-
 126
126 -
 127
127 -
 128
128 -
 129
129 -
 130
130 -
 131
131 -
 132
132 -
 133
133 -
 134
134 -
 135
135 -
 136
136 -
137
-
138
-
139
-
140
-
141
-
142
-
143
-
144
-
145
-
146
-
147
-
148
-
149
-
150
-
151
-
152
-
153
-
154
-
155
-
156
-
157
-
158
-
159
-
160
-
161
-
162
-
163
-
164
-
165
-
166
-
167
-
168
-
169
-
170
-
171
-
172
-
173
-
174
-
175
-
176
-
177
-
178
-
179
-
180
-
181
-
182
-
183
-
184
-
185
-
186
-
187
-
188
-
189
-
190
-
191
-
192
-
193
-
194
-
195
-
196
-
197
-
198
-
199
-
200
-
201
-
202
-
203
-
204
-
205
-
206
-
207
-
208
-
209
-
210
-
211
-
212
-
213
-
214
-
215
-
216
-
217
-
218
-
219
-
220
-
221
-
222
-
223
-
224
-
225
-
226
-
227
-
228
-
229
-
230
-
231
-
232
-
233
-
234
-
235
-
236
-
237
-
238
-
239
-
240
-
241
-
242
-
243
-
244
-
245
-
246
-
247
-
248
-
249
-
250
-
251
-
252
-
253
-
254
-
255
-
256
-
257
-
258
-
259
-
260
-
261
-
262
-
263
-
264
-
265
-
266
-
267
-
268
-
269
-
270
-
271
-
272
-
273
-
274
-
275
-
276
-
277
-
278
-
279
-
280
-
281
-
282
-
283
-
284
-
285
-
286
-
287
-
288
-
289
-
290
-
291
-
292
-
293
-
294
-
295
-
296
-
297
-
298
-
299
-
300
-
301
-
302
-
303
-
304
-
305
-
306
-
307
-
308
-
309
-
310
-
311
-
312
-
313
-
314
-
315
-
316
-
317
-
318
-
319
-
320
-
321
-
322
-
323
-
324
-
325
-
326
-
327
-
328
-
329
-
330
-
331
-
332
-
333
-
334
-
335
-
336
-
337
-
338
-
339
-
340
-
341
-
342
-
343
-
344
-
345
-
346
-
347
-
348
-
349
-
350
-
351
-
352
-
353
-
354
-
355
-
356
-
357
-
358
-
359
-
360
-
361
-
362
-
363
-
364
-
365
-
366
-
367
-
368
-
369
-
370
-
371
-
372
-
373
-
374
-
375
-
376
-
377
-
378
-
379
-
380
-
381
-
382
-
383
-
384
-
385
-
386
-
387
-
388
-
389
-
390
-
391
-
392
-
393
-
394
-
395
-
396
-
397
-
398
-
399
-
400
-
401
-
402
-
403
-
404
-
405
-
406
-
407
-
408
-
409
-
410
-
411
-
412
-
413
-
414
-
415
-
416
-
417
-
418
-
419
-
420
-
421
-
422
-
423
-
424
-
425
-
426
-
427
-
428
-
429
-
430
-
431
-
432
-
433
-
434
-
435
-
436
-
437
-
438
-
439
-
440
-
441
-
442
-
443
-
444
-
445
-
446
-
447
-
448
-
449
-
450
-
451
-
452
-
453
-
454
-
455
-
456
-
457
-
458
-
459
-
460
-
461
-
462
-
463
-
464
-
465
-
466
-
467
-
468
-
469
-
470
-
471
-
472
-
473
-
474
-
475
-
476
-
477
-
478
-
479
-
480
-
481
-
482
-
483
-
484
-
485
-
486
-
487
-
488
-
489
-
490
-
491
-
492
-
493
-
494
-
495
-
496
-
497
-
498
-
499
-
500
-
501
-
502
-
503
-
504
-
505
-
506
-
507
-
508
-
509
-
510
-
511
-
512
-
513
-
514
-
515
-
516
-
517
-
518
-
519
-
520
-
521
-
522
-
523
-
524
-
525
-
526
-
527
-
528
-
529
-
530
-
531
-
532
-
533
-
534
-
535
-
536
-
537
-
538
-
539
-
540
-
541
-
542
-
543
-
544
-
545
-
546
-
547
-
548
-
549
-
550
-
551
-
552
-
553
-
554
-
555
-
556
-
557
-
558
-
559
-
560
-
561
-
562
-
563
-
564
-
565
-
566
-
567
-
568
-
569
-
570
-
571
-
572
-
573
-
574
-
575
-
576
-
577
-
578
-
579
-
580
-
581
-
582
-
583
 |
 |