Dell PowerEdge R750xa EMC Installation and Service Manual - Page 150
Installing a power supply unit adapter, Removing a power supply unit, systems
 |
View all Dell PowerEdge R750xa manuals
Add to My Manuals
Save this manual to your list of manuals |
Page 150 highlights
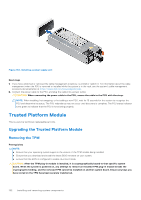
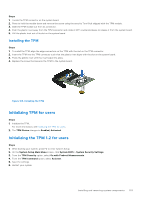
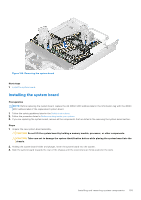
Installing a power supply unit adapter Prerequisites 1. Follow the safety guidelines listed in the Safety instructions. 2. If required, Remove the PSU. NOTE: Install the PSU adapter, when installing PSU with 60 mm wide form factor. Steps 1. Align and insert the power supply unit adapter. 2. Using a phillips #1 screwdriver, tighten the screw. Figure 162. Installing a power supply unit adapter Removing a power supply unit Prerequisites CAUTION: The system requires one power supply unit (PSU) for normal operation. On power-redundant systems, remove and replace only one PSU at a time in a system that is powered on. 1. Follow the safety guidelines listed in the Safety instructions. 2. Disconnect the power cable from the power outlet and from the PSU you intend to remove. 3. Remove the cable from the strap on the PSU handle. 4. Unlatch and lift or remove the optional cable management accessory if it interferes with the PSU removal. NOTE: For information about the cable management when the PSU is removed or installed while the system is in a rack, see the system's cable management arm documentation at https://www.dell.com/poweredgemanuals. Steps Press the release latch and holding the PSU handle, slide the PSU out of the bay. 150 Installing and removing system components
-
 1
1 -
2
-
3
-
4
-
5
-
6
-
7
-
8
-
9
-
10
-
11
-
12
-
13
-
14
-
15
-
16
-
17
-
18
-
19
-
20
-
21
-
22
-
23
-
24
-
25
-
26
-
27
-
28
-
29
-
30
-
31
-
32
-
33
-
34
-
35
-
36
-
37
-
38
-
39
-
40
-
41
-
42
-
43
-
44
-
45
-
46
-
47
-
48
-
49
-
50
-
51
-
52
-
53
-
54
-
55
-
56
-
57
-
58
-
59
-
60
-
61
-
62
-
63
-
64
-
65
-
66
-
67
-
68
-
69
-
70
-
71
-
72
-
73
-
74
-
75
-
76
-
77
-
78
-
79
-
80
-
81
-
82
-
83
-
84
-
85
-
86
-
87
-
88
-
89
-
90
-
91
-
92
-
93
-
94
-
95
-
96
-
97
-
98
-
99
-
100
-
101
-
102
-
103
-
104
-
105
-
106
-
107
-
108
-
109
-
110
-
111
-
112
-
113
-
114
-
115
-
116
-
117
-
118
-
119
-
120
-
121
-
122
-
123
-
124
-
125
-
126
-
127
-
128
-
129
-
130
-
131
-
132
-
133
-
134
-
135
-
136
-
137
-
138
-
139
-
140
-
141
-
142
-
143
-
144
-
 145
145 -
 146
146 -
 147
147 -
 148
148 -
 149
149 -
 150
150 -
 151
151 -
 152
152 -
 153
153 -
 154
154 -
 155
155 -
156
-
157
-
158
-
159
-
160
-
161
-
162
-
163
-
164
-
165
-
166
-
167
-
168
-
169
-
170
-
171
-
172
-
173
-
174
-
175
-
176
-
177
-
178
-
179
-
180
-
181
-
182
-
183
-
184
-
185
-
186
-
187
-
188
-
189
-
190
 |
 |
