Dell PowerEdge R750xa EMC Installation and Service Manual - Page 70
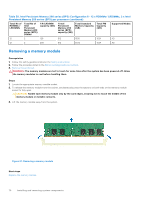
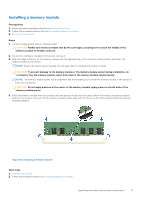
Removing a memory module
 |
View all Dell PowerEdge R750xa manuals
Add to My Manuals
Save this manual to your list of manuals |
Page 70 highlights
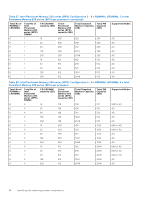
Table 30. Intel Persistent Memory 200 series (BPS) Configuration 6 - 12 x RDIMMs/ LRDIMMs, 2 x Intel Persistent Memory 200 series (BPS) per processor (continued) Total No of RDIMMs / LRDIMMs Total No of Intel Persistent Memory 200 series (BPS) DIMMs 1 R/LRDIMM capacity (GB) 1 Intel Persistent Memory 200 series (BPS) capacity (GB) Total Standard Memory Capacity (GB) Total PM Capacity (GB) Supported Modes 12 2 128 512 1536 1024 AD 12 2 256 512 3072 1024 AD Removing a memory module Prerequisites 1. Follow the safety guidelines listed in the Safety instructions. 2. Follow the procedure listed in the Before working inside your system. 3. Remove the air shroud. WARNING: The memory modules are hot to touch for some time after the system has been powered off. Allow the memory modules to cool before handling them. Steps 1. Locate the appropriate memory module socket. 2. To release the memory module from the socket, simultaneously press the ejectors on both ends of the memory module socket to fully open. CAUTION: Handle each memory module only by the card edges, ensuring not to touch the middle of the memory module or metallic contacts. 3. Lift the memory module away from the system. Figure 61. Removing a memory module Next steps Replace the memory module. 70 Installing and removing system components
-
 1
1 -
2
-
3
-
4
-
5
-
6
-
7
-
8
-
9
-
10
-
11
-
12
-
13
-
14
-
15
-
16
-
17
-
18
-
19
-
20
-
21
-
22
-
23
-
24
-
25
-
26
-
27
-
28
-
29
-
30
-
31
-
32
-
33
-
34
-
35
-
36
-
37
-
38
-
39
-
40
-
41
-
42
-
43
-
44
-
45
-
46
-
47
-
48
-
49
-
50
-
51
-
52
-
53
-
54
-
55
-
56
-
57
-
58
-
59
-
60
-
61
-
62
-
63
-
64
-
 65
65 -
 66
66 -
 67
67 -
 68
68 -
 69
69 -
 70
70 -
 71
71 -
 72
72 -
 73
73 -
 74
74 -
 75
75 -
76
-
77
-
78
-
79
-
80
-
81
-
82
-
83
-
84
-
85
-
86
-
87
-
88
-
89
-
90
-
91
-
92
-
93
-
94
-
95
-
96
-
97
-
98
-
99
-
100
-
101
-
102
-
103
-
104
-
105
-
106
-
107
-
108
-
109
-
110
-
111
-
112
-
113
-
114
-
115
-
116
-
117
-
118
-
119
-
120
-
121
-
122
-
123
-
124
-
125
-
126
-
127
-
128
-
129
-
130
-
131
-
132
-
133
-
134
-
135
-
136
-
137
-
138
-
139
-
140
-
141
-
142
-
143
-
144
-
145
-
146
-
147
-
148
-
149
-
150
-
151
-
152
-
153
-
154
-
155
-
156
-
157
-
158
-
159
-
160
-
161
-
162
-
163
-
164
-
165
-
166
-
167
-
168
-
169
-
170
-
171
-
172
-
173
-
174
-
175
-
176
-
177
-
178
-
179
-
180
-
181
-
182
-
183
-
184
-
185
-
186
-
187
-
188
-
189
-
190
 |
 |
