Garmin GPS 152 Owner's Manual - Page 15
Initializing the Receiver
 |
UPC - 753759028145
View all Garmin GPS 152 manuals
Add to My Manuals
Save this manual to your list of manuals |
Page 15 highlights
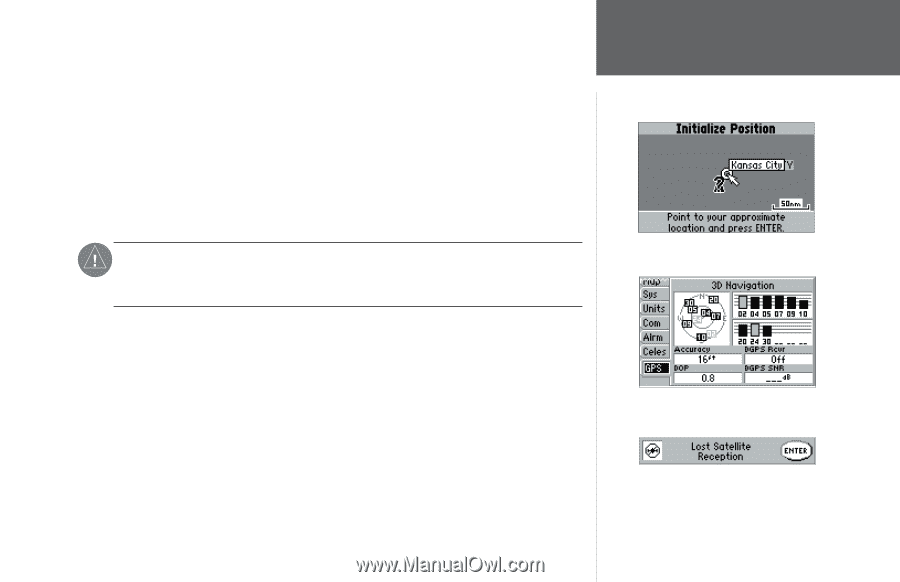
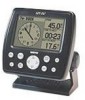
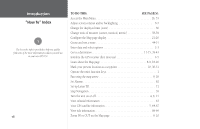
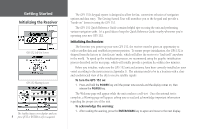
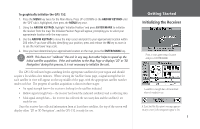
To graphically initialize the GPS 152: 1. Press the MENU key twice for the Main Menu. Press UP or DOWN on the ARROW KEYPAD until the 'GPS' tab is highlighted, then press the MENU key once. 2. Using the ARROW KEYPAD, highlight 'Initialize Position' and press ENTER/MARK to initialize the receiver from the map. The Initialize Position Page will appear, prompting you to select your approximate location with the map cursor. 3. Use the ARROW KEYPAD to move the map cursor and point to your approximate location within 200 miles. If you have difficulty identifying your position, press and release the IN key to zoom in to see the next lower map scale. 4. Once you have determined your approximate location on the map, press the ENTER/MARK key. , NOTE: This does not "calibrate" the unit in any way, but rather helps to speed up the initial satellite acquisition. If the unit switches to the Map Page or displays '2D' or '3D Navigation' during this process, it is not necessary to initialize the unit. The GPS 152 will now begin searching for the appropriate satellites for your region and should acquire a fix within a few minutes. When viewing the Satellite Status page, a signal strength bar for each satellite in view will appear on the top middle of the page, with the appropriate satellite number under each bar. The progress of satellite acquisition is shown in three stages: • No signal strength bars- the receiver is looking for the satellites indicated. • Hollow signal strength bars- the receiver has found the indicated satellite(s) and is collecting data. • Solid signal strength bars- the receiver has collected the necessary data and the satellite(s) are ready for use. Once the receiver has collected information from at least three satellites, the top of the screen will display either "2D or 3D Navigation", and the GPS 152 is ready for use. Getting Started Initializing the Receiver Point to your approximate location and press ENTER/MARK. A satellite's strength bar will turn black when it's ready for use. A 'Lost Satellite Reception' message appears on any screen if the navigation signal is lost. 5
-
 1
1 -
2
-
3
-
4
-
5
-
6
-
7
-
8
-
9
-
 10
10 -
 11
11 -
 12
12 -
 13
13 -
 14
14 -
 15
15 -
 16
16 -
 17
17 -
 18
18 -
 19
19 -
 20
20 -
21
-
22
-
23
-
24
-
25
-
26
-
27
-
28
-
29
-
30
-
31
-
32
-
33
-
34
-
35
-
36
-
37
-
38
-
39
-
40
-
41
-
42
-
43
-
44
-
45
-
46
-
47
-
48
-
49
-
50
-
51
-
52
-
53
-
54
-
55
-
56
-
57
-
58
-
59
-
60
-
61
-
62
-
63
-
64
-
65
-
66
-
67
-
68
-
69
-
70
-
71
-
72
-
73
-
74
-
75
-
76
-
77
-
78
-
79
-
80
-
81
-
82
-
83
-
84
-
85
-
86
-
87
-
88
-
89
-
90
-
91
-
92
-
93
-
94
-
95
-
96
-
97
-
98
 |
 |