Garmin GPS 152 Owner's Manual - Page 42
To create a new waypoint from a map feature, To create a new waypoint by entering a location's
 |
UPC - 753759028145
View all Garmin GPS 152 manuals
Add to My Manuals
Save this manual to your list of manuals |
Page 42 highlights
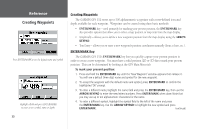
Reference Creating Waypoints Choose 'Create Waypoint' on the Information page to use the map item for a new waypoint. Highlight the position field and use the ARROW KEYPAD to enter the desired position coordinates. 32 To create a new waypoint from a map feature: 1. Use the ARROW KEYPAD to move the cursor to the desired map feature. 2. Press the ENTER/MARK key to capture the cursor location. An Information page for that map feature will appear. Use the ARROW KEYPAD to highlight 'Create Waypt' and press ENTER/MARK. 3. The 'New Waypoint' page will appear. To accept the waypoint with the default name and symbol based on the map feature, highlight 'OK' and press ENTER/MARK. To change the name, symbol or enter a depth, highlight the appropriate field and press ENTER/MARK. Make your changes and press ENTER/MARK when done. After entering and confirming your changes, move the field highlight back to the 'OK' prompt and press ENTER/MARK. Creating Waypoints By Text Entry Waypoints may also be created by entering a position's coordinates through the 'Wpt' tab on the main menu page. To create a new waypoint by entering a location's coordinates: 1. Press MENU twice to display the main menu page. 2. Highlight the 'Wpt' tab option and press MENU. Then highlight 'New Waypoint' and press ENTER/MARK. The 'New Waypoint' page will appear, with the next available waypoint number and the receiver's last known position as the default name and position. 3. To enter coordinates, or change the waypoint name, symbol or enter a depth, highlight the desired field and press ENTER/MARK. Use the ARROW KEYPAD to enter the new information, and press ENTER/MARK after the last character in each section. 4. When you have finished entering all the waypoint data, highlight 'OK' and press ENTER/MARK.
-
 1
1 -
2
-
3
-
4
-
5
-
6
-
7
-
8
-
9
-
10
-
11
-
12
-
13
-
14
-
15
-
16
-
17
-
18
-
19
-
20
-
21
-
22
-
23
-
24
-
25
-
26
-
27
-
28
-
29
-
30
-
31
-
32
-
33
-
34
-
35
-
36
-
 37
37 -
 38
38 -
 39
39 -
 40
40 -
 41
41 -
 42
42 -
 43
43 -
 44
44 -
 45
45 -
 46
46 -
 47
47 -
48
-
49
-
50
-
51
-
52
-
53
-
54
-
55
-
56
-
57
-
58
-
59
-
60
-
61
-
62
-
63
-
64
-
65
-
66
-
67
-
68
-
69
-
70
-
71
-
72
-
73
-
74
-
75
-
76
-
77
-
78
-
79
-
80
-
81
-
82
-
83
-
84
-
85
-
86
-
87
-
88
-
89
-
90
-
91
-
92
-
93
-
94
-
95
-
96
-
97
-
98
 |
 |
