Garmin GPS 152 Owner's Manual - Page 26
Data Fields, Main Menu
 |
UPC - 753759028145
View all Garmin GPS 152 manuals
Add to My Manuals
Save this manual to your list of manuals |
Page 26 highlights
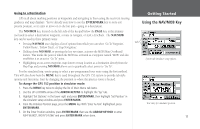
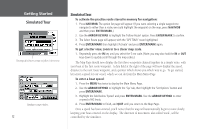
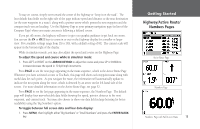
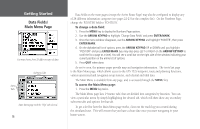
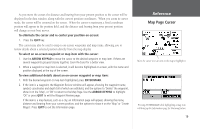
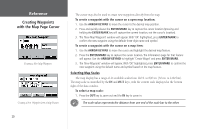
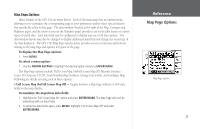
Getting Started Data Fields/ Main Menu Page You may choose from 28 different types of data. Submenu Tabs Menu Tabs Main Menu page with the 'Wpt' tab selected. 16 Data fields on the main pages (except the Active Route Page) may also be configured to display any of 28 different information categories (see pages 22-23 for the complete list). On the Numbers Page, change the 'POINTER' field to 'POSITION'. To change a data field: 1. Press the MENU key to display the Numbers Page options. 2. Use the ARROW KEYPAD to highlight 'Change Data Fields' and press ENTER/MARK. 3. Once the menu window disappears, use the ARROW KEYPAD and highlight 'POINTER', then press ENTER/MARK. 4. On the alphabetical list of options, press the ARROW KEYPAD UP or DOWN until you highlight 'POSITION' and press ENTER/MARK (you may also press LEFT or RIGHT on the ARROW KEYPAD to scroll the list a page at a time). You will see a scroll bar on the right side of the window indicating your current position on the entire list of options. 5. Press QUIT when done. As you've seen, the primary pages provide map and navigation information. The tour's last page is the Main Menu page, which allows access to the GPS 152's waypoint, route and planning functions, various operational and navigation setup features, and celestial and tidal data. The Main Menu is available from any page, and is accessed through the MENU key. To access the Main Menu page: 1. Press the MENU key twice. The Main Menu page lists 14 menu 'tabs' that are divided into categories by function. You can view a particular menu by simply highlighting the desired tab, which will then show any secondary submenu tabs and options for that tab. To get a feel for how the Main Menu page works, clear out the track log you created during the simulated tour. This will ensure that you have a clean slate once you start navigating in your home waters.
-
 1
1 -
2
-
3
-
4
-
5
-
6
-
7
-
8
-
9
-
10
-
11
-
12
-
13
-
14
-
15
-
16
-
17
-
18
-
19
-
20
-
 21
21 -
 22
22 -
 23
23 -
 24
24 -
 25
25 -
 26
26 -
 27
27 -
 28
28 -
 29
29 -
 30
30 -
 31
31 -
32
-
33
-
34
-
35
-
36
-
37
-
38
-
39
-
40
-
41
-
42
-
43
-
44
-
45
-
46
-
47
-
48
-
49
-
50
-
51
-
52
-
53
-
54
-
55
-
56
-
57
-
58
-
59
-
60
-
61
-
62
-
63
-
64
-
65
-
66
-
67
-
68
-
69
-
70
-
71
-
72
-
73
-
74
-
75
-
76
-
77
-
78
-
79
-
80
-
81
-
82
-
83
-
84
-
85
-
86
-
87
-
88
-
89
-
90
-
91
-
92
-
93
-
94
-
95
-
96
-
97
-
98
 |
 |
