HTC P6300 User Manual - Page 128
Create and send MMS messages
 |
View all HTC P6300 manuals
Add to My Manuals
Save this manual to your list of manuals |
Page 128 highlights
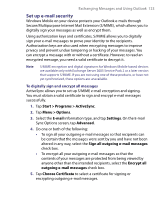
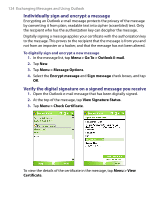
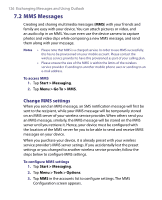
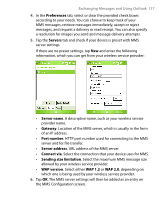
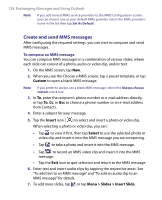
128 Exchanging Messages and Using Outlook Note If you add several MMS service providers to the MMS Configuration screen, you can choose one as your default MMS provider. Select the MMS provider's name in the list then tap Set As Default. Create and send MMS messages After configuring the required settings, you can start to compose and send MMS messages. To compose an MMS message You can compose MMS messages in a combination of various slides, where each slide can consist of a photo, audio or video clip, and/or text. 1. On the MMS screen, tap New. 2. When you see the Choose a MMS screen, tap a preset template, or tap Custom to open a blank MMS message. Note If you prefer to always use a blank MMS message, select the Always choose custom check box. 3. In To, enter the recipient's phone number or e-mail address directly, or tap To, Cc, or Bcc to choose a phone number or an e-mail address from Contacts. 4. Enter a subject for your message. 5. Tap the Insert icon ( ) to select and insert a photo or video clip. When selecting a photo or video clip, you can: • Tap to view it first, then tap Select to use the selected photo or video clip and insert it into the MMS message you are composing. • Tap to take a photo and insert it into the MMS message. • Tap to record an MMS video clip and insert it into the MMS message. • Tap the Exit icon to quit selection and return to the MMS message. 6. Enter text and insert audio clips by tapping the respective areas. See "To add text to an MMS message" and "To add an audio clip to an MMS message" for details. 7. To add more slides, tap or tap Menu > Slides > Insert Slide.
-
 1
1 -
2
-
3
-
4
-
5
-
6
-
7
-
8
-
9
-
10
-
11
-
12
-
13
-
14
-
15
-
16
-
17
-
18
-
19
-
20
-
21
-
22
-
23
-
24
-
25
-
26
-
27
-
28
-
29
-
30
-
31
-
32
-
33
-
34
-
35
-
36
-
37
-
38
-
39
-
40
-
41
-
42
-
43
-
44
-
45
-
46
-
47
-
48
-
49
-
50
-
51
-
52
-
53
-
54
-
55
-
56
-
57
-
58
-
59
-
60
-
61
-
62
-
63
-
64
-
65
-
66
-
67
-
68
-
69
-
70
-
71
-
72
-
73
-
74
-
75
-
76
-
77
-
78
-
79
-
80
-
81
-
82
-
83
-
84
-
85
-
86
-
87
-
88
-
89
-
90
-
91
-
92
-
93
-
94
-
95
-
96
-
97
-
98
-
99
-
100
-
101
-
102
-
103
-
104
-
105
-
106
-
107
-
108
-
109
-
110
-
111
-
112
-
113
-
114
-
115
-
116
-
117
-
118
-
119
-
120
-
121
-
122
-
 123
123 -
 124
124 -
 125
125 -
 126
126 -
 127
127 -
 128
128 -
 129
129 -
 130
130 -
 131
131 -
 132
132 -
 133
133 -
134
-
135
-
136
-
137
-
138
-
139
-
140
-
141
-
142
-
143
-
144
-
145
-
146
-
147
-
148
-
149
-
150
-
151
-
152
-
153
-
154
-
155
-
156
-
157
-
158
-
159
-
160
-
161
-
162
-
163
-
164
-
165
-
166
-
167
-
168
-
169
-
170
-
171
-
172
-
173
-
174
-
175
-
176
-
177
-
178
-
179
-
180
-
181
-
182
-
183
-
184
-
185
-
186
-
187
-
188
-
189
-
190
-
191
-
192
-
193
-
194
-
195
-
196
-
197
-
198
-
199
-
200
-
201
-
202
-
203
-
204
-
205
-
206
-
207
-
208
 |
 |
