HP 6125XLG R2306-HP 6125XLG Blade Switch Network Management and Monitoring Con - Page 25
Configuring NTP authentication in symmetric active/passive mode, Enable NTP
 |
View all HP 6125XLG manuals
Add to My Manuals
Save this manual to your list of manuals |
Page 25 highlights
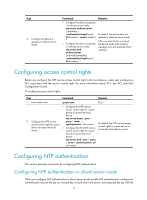
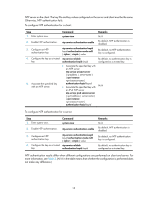
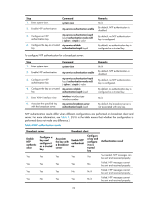
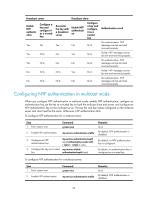
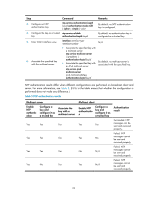
Table 2 NTP authentication results Client Enable NTP authenticati on Yes Yes Yes Yes Yes No Configure a key and configure it as a trusted key Yes Yes Yes No N/A N/A Server Associate the key Enable NTP with an NTP authenticati server on Yes Yes Yes Yes Yes No Yes N/A No N/A N/A N/A Configure a key and configure it as a trusted key Yes No N/A N/A N/A N/A Authentication result Succeeded. NTP messages can be sent and received properly. Failed. NTP messages cannot be sent and received properly. Failed. NTP messages cannot be sent and received properly. Failed. NTP messages cannot be sent and received properly. No authentication. NTP messages can be sent and received properly. No authentication. NTP messages can be sent and received properly. Configuring NTP authentication in symmetric active/passive mode When you configure NTP authentication in symmetric peers mode, enable NTP authentication, configure an authentication key, set the key as a trusted key on both active peer and passive peer, and associate the key with the passive peer on the active peer. The key IDs and key values configured on the active peer and passive peer must be the same. Otherwise, NTP authentication fails. To configure NTP authentication for an active peer: Step 1. Enter system view. 2. Enable NTP authentication. Command system-view ntp-service authentication enable Remarks N/A By default, NTP authentication is disabled. 19
-
 1
1 -
2
-
3
-
4
-
5
-
6
-
7
-
8
-
9
-
10
-
11
-
12
-
13
-
14
-
15
-
16
-
17
-
18
-
19
-
 20
20 -
 21
21 -
 22
22 -
 23
23 -
 24
24 -
 25
25 -
 26
26 -
 27
27 -
 28
28 -
 29
29 -
 30
30 -
31
-
32
-
33
-
34
-
35
-
36
-
37
-
38
-
39
-
40
-
41
-
42
-
43
-
44
-
45
-
46
-
47
-
48
-
49
-
50
-
51
-
52
-
53
-
54
-
55
-
56
-
57
-
58
-
59
-
60
-
61
-
62
-
63
-
64
-
65
-
66
-
67
-
68
-
69
-
70
-
71
-
72
-
73
-
74
-
75
-
76
-
77
-
78
-
79
-
80
-
81
-
82
-
83
-
84
-
85
-
86
-
87
-
88
-
89
-
90
-
91
-
92
-
93
-
94
-
95
-
96
-
97
-
98
-
99
-
100
-
101
-
102
-
103
-
104
-
105
-
106
-
107
-
108
-
109
-
110
-
111
-
112
-
113
-
114
-
115
-
116
-
117
-
118
-
119
-
120
-
121
-
122
-
123
-
124
-
125
-
126
-
127
-
128
-
129
-
130
-
131
-
132
-
133
-
134
-
135
-
136
-
137
-
138
-
139
-
140
-
141
-
142
-
143
-
144
-
145
-
146
-
147
-
148
 |
 |