HP Deskjet 6940 User Guide - Pre-Windows 2000 - Page 123
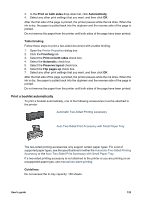
Install the duplexer, Configuration, Automatic Two-Sided Printing Module, Auto Two-Sided Print - door open
 |
UPC - 882780263406
View all HP Deskjet 6940 manuals
Add to My Manuals
Save this manual to your list of manuals |
Page 123 highlights
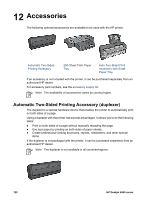
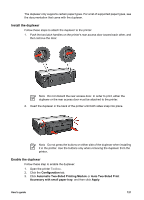
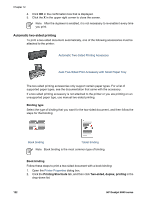
The duplexer only supports certain paper types. For a list of supported paper types, see the documentation that came with the duplexer. Install the duplexer Follow these steps to attach the duplexer to the printer: 1. Push the two latch handles on the printer's rear access door toward each other, and then remove the door. Note Do not discard the rear access door. In order to print, either the duplexer or the rear access door must be attached to the printer. 2. Insert the duplexer in the back of the printer until both sides snap into place. Note Do not press the buttons on either side of the duplexer when installing it in the printer. Use the buttons only when removing the duplexer from the printer. Enable the duplexer Follow these step to enable the duplexer: 1. Open the printer Toolbox. 2. Click the Configuration tab. 3. Click Automatic Two-Sided Printing Module or Auto Two-Sided Print Accessory with small paper tray, and then click Apply. User's guide 121
-
 1
1 -
2
-
3
-
4
-
5
-
6
-
7
-
8
-
9
-
10
-
11
-
12
-
13
-
14
-
15
-
16
-
17
-
18
-
19
-
20
-
21
-
22
-
23
-
24
-
25
-
26
-
27
-
28
-
29
-
30
-
31
-
32
-
33
-
34
-
35
-
36
-
37
-
38
-
39
-
40
-
41
-
42
-
43
-
44
-
45
-
46
-
47
-
48
-
49
-
50
-
51
-
52
-
53
-
54
-
55
-
56
-
57
-
58
-
59
-
60
-
61
-
62
-
63
-
64
-
65
-
66
-
67
-
68
-
69
-
70
-
71
-
72
-
73
-
74
-
75
-
76
-
77
-
78
-
79
-
80
-
81
-
82
-
83
-
84
-
85
-
86
-
87
-
88
-
89
-
90
-
91
-
92
-
93
-
94
-
95
-
96
-
97
-
98
-
99
-
100
-
101
-
102
-
103
-
104
-
105
-
106
-
107
-
108
-
109
-
110
-
111
-
112
-
113
-
114
-
115
-
116
-
117
-
 118
118 -
 119
119 -
 120
120 -
 121
121 -
 122
122 -
 123
123 -
 124
124 -
 125
125 -
 126
126 -
 127
127 -
 128
128 -
129
-
130
-
131
-
132
-
133
-
134
-
135
-
136
-
137
-
138
-
139
-
140
-
141
-
142
-
143
-
144
-
145
-
146
-
147
-
148
-
149
-
150
 |
 |
