HP Deskjet 6940 User Guide - Pre-Windows 2000 - Page 138
Print small photos, Con the printer to feed paper from the accessory, Report Cancel
 |
UPC - 882780263406
View all HP Deskjet 6940 manuals
Add to My Manuals
Save this manual to your list of manuals |
Page 138 highlights
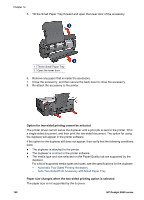
Chapter 12 Configure the printer to feed paper from the accessory Follow these steps to configure the printer to feed paper from the accessory: 1. Press and hold down the Report Page button. 2. While holding down the Report Page button, press the Cancel button twice. 3. Release the Report Page button. After configuring the printer to feed paper from the accessory, load the photo paper into the accessory and then follow the PictBridge printing instructions. Note The printer only needs to be configured to print PictBridge photos from the Auto Two-Sided Print Accessory with Small Paper Tray once. After being configured, the printer will attempt to print from the accessory until the printer is configured to use the In tray for PictBridge photos. Configure the printer to feed paper from the In tray Follow these steps to configure the printer to feed paper from the In tray for PictBridge photos: 1. Press and hold down the Report Page button. 2. While holding down the Report Page button, press the Cancel button twice, and then press the Resume button once. 3. Release the Report Page button. Print small photos Guidelines ● For high-quality results, use a photo print cartridge in combination with the tri-color print cartridge. ● For maximum fade resistance, use HP Premium Plus Photo Paper and install a photo print cartridge in the printer. ● Learn how to use the available photo printing features. ● Use HP Everyday Photo Paper, Semi-gloss to save money and ink when printing photos. ● Verify that the photo paper that you are using is flat. For information about preventing photo paper from curling, see the photo paper storage instructions. ● Do not exceed the In-tray capacity: 80 sheets of photo paper. 136 HP Deskjet 6940 series
-
 1
1 -
2
-
3
-
4
-
5
-
6
-
7
-
8
-
9
-
10
-
11
-
12
-
13
-
14
-
15
-
16
-
17
-
18
-
19
-
20
-
21
-
22
-
23
-
24
-
25
-
26
-
27
-
28
-
29
-
30
-
31
-
32
-
33
-
34
-
35
-
36
-
37
-
38
-
39
-
40
-
41
-
42
-
43
-
44
-
45
-
46
-
47
-
48
-
49
-
50
-
51
-
52
-
53
-
54
-
55
-
56
-
57
-
58
-
59
-
60
-
61
-
62
-
63
-
64
-
65
-
66
-
67
-
68
-
69
-
70
-
71
-
72
-
73
-
74
-
75
-
76
-
77
-
78
-
79
-
80
-
81
-
82
-
83
-
84
-
85
-
86
-
87
-
88
-
89
-
90
-
91
-
92
-
93
-
94
-
95
-
96
-
97
-
98
-
99
-
100
-
101
-
102
-
103
-
104
-
105
-
106
-
107
-
108
-
109
-
110
-
111
-
112
-
113
-
114
-
115
-
116
-
117
-
118
-
119
-
120
-
121
-
122
-
123
-
124
-
125
-
126
-
127
-
128
-
129
-
130
-
131
-
132
-
 133
133 -
 134
134 -
 135
135 -
 136
136 -
 137
137 -
 138
138 -
 139
139 -
 140
140 -
 141
141 -
 142
142 -
 143
143 -
144
-
145
-
146
-
147
-
148
-
149
-
150
 |
 |
