HP Deskjet 6940 User Guide - Pre-Windows 2000 - Page 55
Envelopes, Presentation printing
 |
UPC - 882780263406
View all HP Deskjet 6940 manuals
Add to My Manuals
Save this manual to your list of manuals |
Page 55 highlights
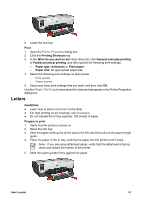
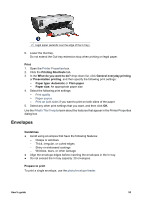
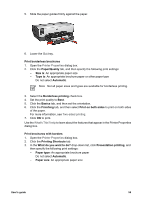
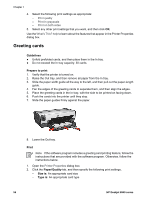
2 Legal paper (extends over the edge of the In tray) 6. Lower the Out tray. Do not extend the Out-tray extension stop when printing on legal paper. Print 1. Open the Printer Properties box. 2. Click the Printing Shortcuts tab. 3. In the What do you want to do? drop-down list, click General everyday printing or Presentation printing, and then specify the following print settings: - Paper type: Automatic or Plain paper - Paper size: An appropriate paper size 4. Select the following print settings: - Print quality - Paper source - Print on both sides if you want to print on both sides of the paper 5. Select any other print settings that you want, and then click OK. Use the What's This? help to learn about the features that appear in the Printer Properties dialog box. Envelopes Guidelines ● Avoid using envelopes that have the following features: - Clasps or windows - Thick, irregular, or curled edges - Shiny or embossed coatings - Wrinkles, tears, or other damage ● Align the envelope edges before inserting the envelopes in the In tray. ● Do not exceed the In tray capacity: 20 envelopes. Prepare to print To print a single envelope, use the photo/envelope feeder. User's guide 53
-
 1
1 -
2
-
3
-
4
-
5
-
6
-
7
-
8
-
9
-
10
-
11
-
12
-
13
-
14
-
15
-
16
-
17
-
18
-
19
-
20
-
21
-
22
-
23
-
24
-
25
-
26
-
27
-
28
-
29
-
30
-
31
-
32
-
33
-
34
-
35
-
36
-
37
-
38
-
39
-
40
-
41
-
42
-
43
-
44
-
45
-
46
-
47
-
48
-
49
-
 50
50 -
 51
51 -
 52
52 -
 53
53 -
 54
54 -
 55
55 -
 56
56 -
 57
57 -
 58
58 -
 59
59 -
 60
60 -
61
-
62
-
63
-
64
-
65
-
66
-
67
-
68
-
69
-
70
-
71
-
72
-
73
-
74
-
75
-
76
-
77
-
78
-
79
-
80
-
81
-
82
-
83
-
84
-
85
-
86
-
87
-
88
-
89
-
90
-
91
-
92
-
93
-
94
-
95
-
96
-
97
-
98
-
99
-
100
-
101
-
102
-
103
-
104
-
105
-
106
-
107
-
108
-
109
-
110
-
111
-
112
-
113
-
114
-
115
-
116
-
117
-
118
-
119
-
120
-
121
-
122
-
123
-
124
-
125
-
126
-
127
-
128
-
129
-
130
-
131
-
132
-
133
-
134
-
135
-
136
-
137
-
138
-
139
-
140
-
141
-
142
-
143
-
144
-
145
-
146
-
147
-
148
-
149
-
150
 |
 |
