HP Deskjet 6940 User Guide - Pre-Windows 2000 - Page 141
Problems with the Auto Two-Sided Print Accessory with Small Paper Tray, Print, Paper/Quality, Size is
 |
UPC - 882780263406
View all HP Deskjet 6940 manuals
Add to My Manuals
Save this manual to your list of manuals |
Page 141 highlights
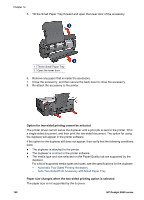
Print 1. Open the Printer Properties dialog box. 2. Click the Paper/Quality tab, and then specify the following print settings: - Size is: The appropriate envelope size - Type is: The appropriate paper type - Source is: Rear tray 3. Select any other print settings that you want, and then click OK. Use the What's This? help to learn about the features that you see in the Printer Properties dialog box. Problems with the Auto Two-Sided Print Accessory with Small Paper Tray Paper jam Do not clear a paper jam from the front of the printer. Follow these steps to remove a paper jam from the Auto Two-Sided Print Accessory with Small Paper Tray: 1. Turn off the printer. 2. Press the buttons on the left and right sides of the accessory, and then remove it from the printer. Warning Remove the Auto Two-Sided Print Accessory with Small Paper Tray before opening it when clearing a paper jam. 3. Remove any paper that is inside the printer. 4. Lift the back lever on the accessory, and then unhook the Small Paper Tray. User's guide 139
-
 1
1 -
2
-
3
-
4
-
5
-
6
-
7
-
8
-
9
-
10
-
11
-
12
-
13
-
14
-
15
-
16
-
17
-
18
-
19
-
20
-
21
-
22
-
23
-
24
-
25
-
26
-
27
-
28
-
29
-
30
-
31
-
32
-
33
-
34
-
35
-
36
-
37
-
38
-
39
-
40
-
41
-
42
-
43
-
44
-
45
-
46
-
47
-
48
-
49
-
50
-
51
-
52
-
53
-
54
-
55
-
56
-
57
-
58
-
59
-
60
-
61
-
62
-
63
-
64
-
65
-
66
-
67
-
68
-
69
-
70
-
71
-
72
-
73
-
74
-
75
-
76
-
77
-
78
-
79
-
80
-
81
-
82
-
83
-
84
-
85
-
86
-
87
-
88
-
89
-
90
-
91
-
92
-
93
-
94
-
95
-
96
-
97
-
98
-
99
-
100
-
101
-
102
-
103
-
104
-
105
-
106
-
107
-
108
-
109
-
110
-
111
-
112
-
113
-
114
-
115
-
116
-
117
-
118
-
119
-
120
-
121
-
122
-
123
-
124
-
125
-
126
-
127
-
128
-
129
-
130
-
131
-
132
-
133
-
134
-
135
-
 136
136 -
 137
137 -
 138
138 -
 139
139 -
 140
140 -
 141
141 -
 142
142 -
 143
143 -
 144
144 -
 145
145 -
 146
146 -
147
-
148
-
149
-
150
 |
 |
