HP Deskjet 6940 User Guide - Pre-Windows 2000 - Page 139
Paper type
 |
UPC - 882780263406
View all HP Deskjet 6940 manuals
Add to My Manuals
Save this manual to your list of manuals |
Page 139 highlights
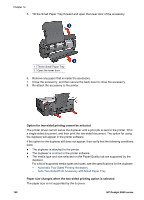
Prepare to print 1. Slide the paper-width guide to the left. 2. Pull the paper lever forward and insert the photo paper. The side of the photo paper to be printed on should face outward. Note If the photo paper has a tear-off tab, the tab must point up rather than leading into the printer. 3. Release the paper lever. 4. Slide the paper-width guide against the edge of the photo paper. Print 1. Open the Printer Properties dialog box. 2. On the Printing Shortcuts tab, click Photo printing-borderless or Photo printing- with white borders as the type of document, and then select the following options: - Print quality: Normal, Best, or Max dpi - Paper size: The appropriate photo paper size - Paper source: Rear tray - Paper type: The appropriate photo paper type - Orientation: Portrait or Landscape User's guide 137
-
 1
1 -
2
-
3
-
4
-
5
-
6
-
7
-
8
-
9
-
10
-
11
-
12
-
13
-
14
-
15
-
16
-
17
-
18
-
19
-
20
-
21
-
22
-
23
-
24
-
25
-
26
-
27
-
28
-
29
-
30
-
31
-
32
-
33
-
34
-
35
-
36
-
37
-
38
-
39
-
40
-
41
-
42
-
43
-
44
-
45
-
46
-
47
-
48
-
49
-
50
-
51
-
52
-
53
-
54
-
55
-
56
-
57
-
58
-
59
-
60
-
61
-
62
-
63
-
64
-
65
-
66
-
67
-
68
-
69
-
70
-
71
-
72
-
73
-
74
-
75
-
76
-
77
-
78
-
79
-
80
-
81
-
82
-
83
-
84
-
85
-
86
-
87
-
88
-
89
-
90
-
91
-
92
-
93
-
94
-
95
-
96
-
97
-
98
-
99
-
100
-
101
-
102
-
103
-
104
-
105
-
106
-
107
-
108
-
109
-
110
-
111
-
112
-
113
-
114
-
115
-
116
-
117
-
118
-
119
-
120
-
121
-
122
-
123
-
124
-
125
-
126
-
127
-
128
-
129
-
130
-
131
-
132
-
133
-
 134
134 -
 135
135 -
 136
136 -
 137
137 -
 138
138 -
 139
139 -
 140
140 -
 141
141 -
 142
142 -
 143
143 -
 144
144 -
145
-
146
-
147
-
148
-
149
-
150
 |
 |
