HP LaserJet M1319 HP LaserJet M1319 MFP Series - Software Technical Reference - Page 101
Set up Windows sharing (peer-to-peer networking), Printer sharing disclaimer
 |
View all HP LaserJet M1319 manuals
Add to My Manuals
Save this manual to your list of manuals |
Page 101 highlights
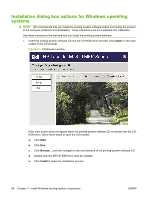
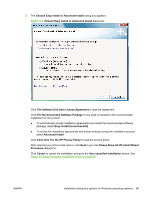
9. On the Install from Disk dialog box, click OK. 10. Click Next. Complete the installation. When prompted, print a test page to ensure that the printer driver is installed correctly. Set up Windows sharing (peer-to-peer networking) ● Printer sharing disclaimer ● Set up the host computer running Windows 2000 or Windows Server 2003 ● Set up the host computer running Windows XP or Windows Vista ● Set up the client computers running Windows 2000 or Windows Server 2003 ● Set up the client computers running Windows XP or Windows Vista NOTE: Using Windows sharing, the person who uses the host computer that is directly connected to the product can allow other users on the network to print to it. When the product is shared, install the printer drivers on all of the computers that print to the product. The client computers will have print-only functionality. After you have set up the host computer to share the product, you must also set up the client computers. For information about setting up the client computers for other network users who want to use the product, see Set up the client computers running Windows 2000 or Windows Server 2003 on page 86 or Set up the client computers running Windows XP or Windows Vista on page 87. Printer sharing disclaimer HP does not support peer-to-peer networking, as the feature is a function of Microsoft operating systems and not of the HP printer drivers. Go to Microsoft at www.microsoft.com. Set up the host computer running Windows 2000 or Windows Server 2003 At the host computer that is directly connected to the product, perform the following steps: 1. Click Start, and then do one of the following: For Windows 2000: Select Settings, and then click Printers. -or- For Windows Server 2003: Select Settings, and then click Printers and Faxes. 2. In the printer list, right-click the icon for the product, and then click Sharing. 3. On the Sharing tab, select Share As, and then type a name for the product in the Share Name field. Click OK. ENWW Installation options 85
-
 1
1 -
2
-
3
-
4
-
5
-
6
-
7
-
8
-
9
-
10
-
11
-
12
-
13
-
14
-
15
-
16
-
17
-
18
-
19
-
20
-
21
-
22
-
23
-
24
-
25
-
26
-
27
-
28
-
29
-
30
-
31
-
32
-
33
-
34
-
35
-
36
-
37
-
38
-
39
-
40
-
41
-
42
-
43
-
44
-
45
-
46
-
47
-
48
-
49
-
50
-
51
-
52
-
53
-
54
-
55
-
56
-
57
-
58
-
59
-
60
-
61
-
62
-
63
-
64
-
65
-
66
-
67
-
68
-
69
-
70
-
71
-
72
-
73
-
74
-
75
-
76
-
77
-
78
-
79
-
80
-
81
-
82
-
83
-
84
-
85
-
86
-
87
-
88
-
89
-
90
-
91
-
92
-
93
-
94
-
95
-
 96
96 -
 97
97 -
 98
98 -
 99
99 -
 100
100 -
 101
101 -
 102
102 -
 103
103 -
 104
104 -
 105
105 -
 106
106 -
107
-
108
-
109
-
110
-
111
-
112
-
113
-
114
-
115
-
116
-
117
-
118
-
119
-
120
-
121
-
122
-
123
-
124
-
125
-
126
-
127
-
128
-
129
-
130
-
131
-
132
-
133
-
134
-
135
-
136
-
137
-
138
-
139
-
140
-
141
-
142
-
143
-
144
-
145
-
146
-
147
-
148
-
149
-
150
-
151
-
152
-
153
-
154
-
155
-
156
-
157
-
158
-
159
-
160
-
161
-
162
-
163
-
164
-
165
-
166
-
167
-
168
-
169
-
170
-
171
-
172
-
173
-
174
-
175
-
176
-
177
-
178
-
179
-
180
-
181
-
182
-
183
-
184
-
185
-
186
-
187
-
188
-
189
-
190
-
191
-
192
-
193
-
194
-
195
-
196
-
197
-
198
-
199
-
200
-
201
-
202
-
203
-
204
-
205
-
206
-
207
-
208
-
209
-
210
-
211
-
212
-
213
-
214
 |
 |
