HP Pavilion xu100 HP OmniBook 500 - Reference Guide Revision 3 - Page 104
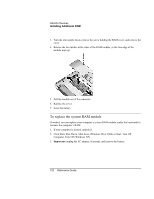
Reinstall the three screws along the top of the keyboard.
 |
View all HP Pavilion xu100 manuals
Add to My Manuals
Save this manual to your list of manuals |
Page 104 highlights
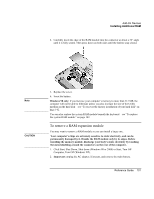
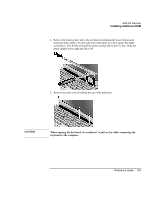
Add-On Devices Installing Additional RAM 6. Raise the top edge of the keyboard slightly, then slide it back about 1 cm (1/2 in) and fold it onto the front of the case. WARNING Do not touch the metal surfaces inside the computer until they have cooled off. They could be very hot if the computer was running recently. Do not touch the electronic components inside the computer. Static electricity can permanently damage them. 7. Release the two latches at the sides of the RAM module by pressing them outward, so that the free edge of the module pops up. 8. Pull the module out of the connector. 9. Carefully insert the edge of the new RAM module into the connector at about a 30° angle until it is fully seated. Then press down on both sides until the latches snap closed. 10. Move the keyboard back into position. Slide its front edge into the computer case, then lower the top of the keyboard into place. 11. Reinstall the three screws along the top of the keyboard. 12. Hold the plastic panel in your right hand, and insert the tabs on the left end of the panel into the slots in the computer case just above the ESC and F4 keys. 13. Slide the panel to the left and press it into place. 14. Reinstall the battery. 104 Reference Guide
-
 1
1 -
2
-
3
-
4
-
5
-
6
-
7
-
8
-
9
-
10
-
11
-
12
-
13
-
14
-
15
-
16
-
17
-
18
-
19
-
20
-
21
-
22
-
23
-
24
-
25
-
26
-
27
-
28
-
29
-
30
-
31
-
32
-
33
-
34
-
35
-
36
-
37
-
38
-
39
-
40
-
41
-
42
-
43
-
44
-
45
-
46
-
47
-
48
-
49
-
50
-
51
-
52
-
53
-
54
-
55
-
56
-
57
-
58
-
59
-
60
-
61
-
62
-
63
-
64
-
65
-
66
-
67
-
68
-
69
-
70
-
71
-
72
-
73
-
74
-
75
-
76
-
77
-
78
-
79
-
80
-
81
-
82
-
83
-
84
-
85
-
86
-
87
-
88
-
89
-
90
-
91
-
92
-
93
-
94
-
95
-
96
-
97
-
98
-
 99
99 -
 100
100 -
 101
101 -
 102
102 -
 103
103 -
 104
104 -
 105
105 -
 106
106 -
 107
107 -
 108
108 -
 109
109 -
110
-
111
-
112
-
113
-
114
-
115
-
116
-
117
-
118
-
119
-
120
-
121
-
122
-
123
-
124
-
125
-
126
-
127
-
128
-
129
-
130
-
131
-
132
-
133
-
134
-
135
-
136
-
137
-
138
-
139
-
140
-
141
-
142
-
143
-
144
-
145
-
146
-
147
-
148
-
149
-
150
-
151
-
152
-
153
-
154
-
155
-
156
-
157
-
158
-
159
-
160
-
161
-
162
-
163
-
164
-
165
-
166
-
167
-
168
-
169
-
170
-
171
-
172
-
173
-
174
-
175
-
176
-
177
-
178
-
179
-
180
-
181
 |
 |
