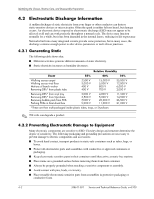
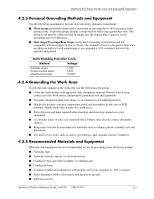
HP Workstation xw3100 HP Workstation xw3100 - Service and Technical Reference - Page 48
Security > Master Boot Record Security > Enabled., Security > Save Master Boot Record.
 |
View all HP Workstation xw3100 manuals
Add to My Manuals
Save this manual to your list of manuals |
Page 48 highlights
Desktop Management To enable MBR Security, complete the following steps: 1. Turn on or restart the workstation. If you are in Windows, click Start > Shut Down > Restart the Computer. 2. Press the F10 key as soon as the monitor light turns green. Press Enter to bypass the title screen, if necessary. ✎ If you do not press the F10 key at the appropriate time, you must turn the workstation off, then on again, and press the F10 key again to access the utility. 3. Select Security > Master Boot Record Security > Enabled. 4. Select Security > Save Master Boot Record. 5. Before exiting, click File > Save Changes and Exit. When MBR Security is enabled, the BIOS prevents any changes being made to the MBR of the current bootable disk while in MS-DOS or Windows Safe Mode. ✎ Most operating systems control access to the MBR of the current bootable disk; the BIOS cannot prevent changes that may occur while the operating system is running. Each time the workstation is turned on or restarted, the BIOS compares the MBR of the current bootable disk to the previously saved MBR. If changes are detected and if the current bootable disk is the same disk from which the MBR was previously saved, the following message is displayed: 1999-Master Boot Record has changed. Press any key to enter Setup to configure MBR Security. Upon entering Computer Setup, you must ■ Save the MBR of the current bootable disk; ■ Restore the previously saved MBR; or ■ Disable the MBR Security feature. You must know the setup password, if one exists. If changes are detected and if the current bootable disk is not the same disk from which the MBR was previously saved, the following message is displayed: 2000-Master Boot Record Hard Drive has changed. Press any key to enter Setup to configure MBR Security. Upon entering Computer Setup, you must ■ Save the MBR of the current bootable disk; or ■ Disable the MBR Security feature. You must know the setup password, if one exists. In the unlikely event that the previously saved MBR has been corrupted, the following message is displayed: 1998-Master Boot Record has been lost. Press any key to enter Setup to configure MBR Security. 3-18 338611-001 Service and Technical Reference Guide, xw3100
-
 1
1 -
2
-
3
-
4
-
5
-
6
-
7
-
8
-
9
-
10
-
11
-
12
-
13
-
14
-
15
-
16
-
17
-
18
-
19
-
20
-
21
-
22
-
23
-
24
-
25
-
26
-
27
-
28
-
29
-
30
-
31
-
32
-
33
-
34
-
35
-
36
-
37
-
38
-
39
-
40
-
41
-
42
-
 43
43 -
 44
44 -
 45
45 -
 46
46 -
 47
47 -
 48
48 -
 49
49 -
 50
50 -
 51
51 -
 52
52 -
 53
53 -
54
-
55
-
56
-
57
-
58
-
59
-
60
-
61
-
62
-
63
-
64
-
65
-
66
-
67
-
68
-
69
-
70
-
71
-
72
-
73
-
74
-
75
-
76
-
77
-
78
-
79
-
80
-
81
-
82
-
83
-
84
-
85
-
86
-
87
-
88
-
89
-
90
-
91
-
92
-
93
-
94
-
95
-
96
-
97
-
98
-
99
-
100
-
101
-
102
-
103
-
104
-
105
-
106
-
107
-
108
-
109
-
110
-
111
-
112
-
113
-
114
-
115
-
116
-
117
-
118
-
119
-
120
-
121
-
122
-
123
-
124
-
125
-
126
-
127
-
128
-
129
-
130
-
131
-
132
-
133
-
134
-
135
-
136
-
137
-
138
-
139
-
140
-
141
-
142
-
143
-
144
-
145
-
146
-
147
-
148
 |
 |