HP Workstation xw3100 HP Workstation xw3100 - Service and Technical Reference - Page 76
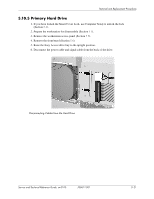
Connect the power cable, flat ribbon cable, and audio cable to the rear of the optical drive.
 |
View all HP Workstation xw3100 manuals
Add to My Manuals
Save this manual to your list of manuals |
Page 76 highlights
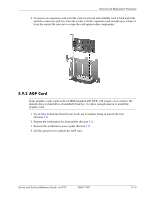
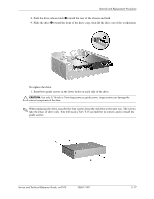
Removal and Replacement Procedures 2. Position the guide screws on the drive into the J-slots in the drive bay 1. Then, slide the drive towards the rear of the workstation 2. ✎ The drive release latch automatically locks in place when installing a drive. 3. Raise the Easy Access drive bay to the upright position and connect the flat ribbon cable and audio cable to the system board. 4. Connect the power cable, flat ribbon cable, and audio cable to the rear of the optical drive. 5. Return the Easy Access drive bay to the down position. Be sure not to pinch the cables in the chassis when lowering the Easy Access drive bay. 6. Replace the front bezel and workstation access panel. 5-18 338611-001 Service and Technical Reference Guide, xw3100
-
 1
1 -
2
-
3
-
4
-
5
-
6
-
7
-
8
-
9
-
10
-
11
-
12
-
13
-
14
-
15
-
16
-
17
-
18
-
19
-
20
-
21
-
22
-
23
-
24
-
25
-
26
-
27
-
28
-
29
-
30
-
31
-
32
-
33
-
34
-
35
-
36
-
37
-
38
-
39
-
40
-
41
-
42
-
43
-
44
-
45
-
46
-
47
-
48
-
49
-
50
-
51
-
52
-
53
-
54
-
55
-
56
-
57
-
58
-
59
-
60
-
61
-
62
-
63
-
64
-
65
-
66
-
67
-
68
-
69
-
70
-
 71
71 -
 72
72 -
 73
73 -
 74
74 -
 75
75 -
 76
76 -
 77
77 -
 78
78 -
 79
79 -
 80
80 -
 81
81 -
82
-
83
-
84
-
85
-
86
-
87
-
88
-
89
-
90
-
91
-
92
-
93
-
94
-
95
-
96
-
97
-
98
-
99
-
100
-
101
-
102
-
103
-
104
-
105
-
106
-
107
-
108
-
109
-
110
-
111
-
112
-
113
-
114
-
115
-
116
-
117
-
118
-
119
-
120
-
121
-
122
-
123
-
124
-
125
-
126
-
127
-
128
-
129
-
130
-
131
-
132
-
133
-
134
-
135
-
136
-
137
-
138
-
139
-
140
-
141
-
142
-
143
-
144
-
145
-
146
-
147
-
148
 |
 |
5–18
338611-001
Service and Technical Reference Guide, xw3100
Removal and Replacement Procedures
2.
Position the guide screws on the drive into the J-slots in the drive bay
1
. Then, slide the drive
towards the rear of the workstation
2
.
✎
The drive release latch automatically locks in place when installing a drive.
3.
Raise the Easy Access drive bay to the upright position and connect the flat ribbon cable and
audio cable to the system board.
4. Connect the power cable, flat ribbon cable, and audio cable to the rear of the optical drive.
5.
Return the Easy Access drive bay to the down position. Be sure not to pinch the cables in the
chassis when lowering the Easy Access drive bay.
6. Replace the front bezel and workstation access panel.