HP Workstation xw3100 HP Workstation xw3100 - Service and Technical Reference - Page 74
Optical Drive, Drive Positions
 |
View all HP Workstation xw3100 manuals
Add to My Manuals
Save this manual to your list of manuals |
Page 74 highlights
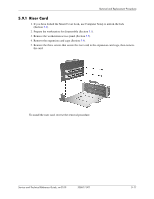
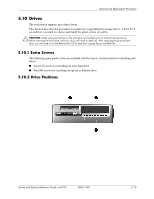
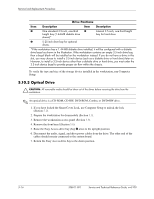
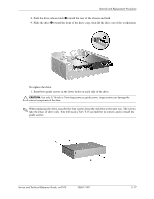
Removal and Replacement Procedures Drive Positions Item Description Item Description 1 One standard 3.5-inch, one-third 3 Internal 3.5-inch, one-third height height bay (1.44-MB diskette drive bay for hard drive shown)* 2 5.25-inch drive bay for optional drives. *If the workstation has a 1.44-MB diskette drive installed, it will be configured with a diskette drive bezel as shown in the illustration. If the workstation contains an empty 3.5-inch drive bay, then a bezel blank will be installed on the workstation instead. If you do not have a drive in this slot, you may choose to install a 3.5-inch device (such as a diskette drive or hard drive) later on. However, to install a 3.5-inch device other than a diskette drive or hard drive, you must order the 3.5-inch device bezel to provide proper air flow within the chassis. To verify the type and size of the storage device installed in the workstation, run Computer Setup. 5.10.3 Optical Drive Ä CAUTION: All removable media should be taken out of the drives before removing the drive from the workstation. ✎ An optical drive is a CD-ROM, CD-RW, DVD-ROM, Combo, or DVD+RW drive. 1. If you have locked the Smart Cover Lock, use Computer Setup to unlock the lock (Section 5.2). 2. Prepare the workstation for disassembly (Section 5.1). 3. Remove the workstation access panel (Section 5.5). 4. Remove the front bezel (Section 5.6). 5. Raise the Easy Access drive bay (bay 2 area) to the upright position. 6. Disconnect the audio, signal, and drive power cables from the drive. The other end of the cables should remain connected to the system board. 7. Return the Easy Access drive bay to the down position. 5-16 338611-001 Service and Technical Reference Guide, xw3100
-
 1
1 -
2
-
3
-
4
-
5
-
6
-
7
-
8
-
9
-
10
-
11
-
12
-
13
-
14
-
15
-
16
-
17
-
18
-
19
-
20
-
21
-
22
-
23
-
24
-
25
-
26
-
27
-
28
-
29
-
30
-
31
-
32
-
33
-
34
-
35
-
36
-
37
-
38
-
39
-
40
-
41
-
42
-
43
-
44
-
45
-
46
-
47
-
48
-
49
-
50
-
51
-
52
-
53
-
54
-
55
-
56
-
57
-
58
-
59
-
60
-
61
-
62
-
63
-
64
-
65
-
66
-
67
-
68
-
 69
69 -
 70
70 -
 71
71 -
 72
72 -
 73
73 -
 74
74 -
 75
75 -
 76
76 -
 77
77 -
 78
78 -
 79
79 -
80
-
81
-
82
-
83
-
84
-
85
-
86
-
87
-
88
-
89
-
90
-
91
-
92
-
93
-
94
-
95
-
96
-
97
-
98
-
99
-
100
-
101
-
102
-
103
-
104
-
105
-
106
-
107
-
108
-
109
-
110
-
111
-
112
-
113
-
114
-
115
-
116
-
117
-
118
-
119
-
120
-
121
-
122
-
123
-
124
-
125
-
126
-
127
-
128
-
129
-
130
-
131
-
132
-
133
-
134
-
135
-
136
-
137
-
138
-
139
-
140
-
141
-
142
-
143
-
144
-
145
-
146
-
147
-
148
 |
 |