HP Workstation xw3100 HP Workstation xw3100 - Service and Technical Reference - Page 60
Unlocking the Smart Cover Lock, Smart Cover Lock.
 |
View all HP Workstation xw3100 manuals
Add to My Manuals
Save this manual to your list of manuals |
Page 60 highlights
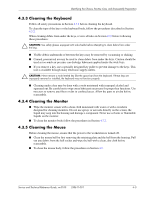
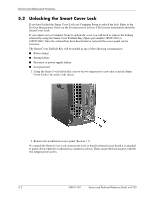
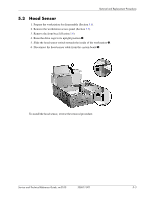
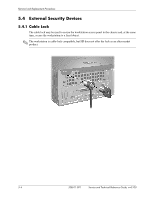
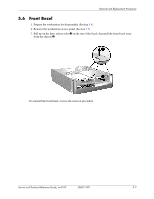
Removal and Replacement Procedures 5.2 Unlocking the Smart Cover Lock If you have locked the Smart Cover Lock use Computer Setup to unlock the lock. Refer to the Desktop Management Guide on the Documentation Library CD for more information about the Smart Cover Lock. If you cannot access Computer Setup to unlock the cover you will need to remove the locking solenoid by using the Smart Cover FailSafe Key (Spare part number 166527-001 or 166527-002). Once the solenoid has been deactivated or removed the access panel can be removed. The Smart Cover FailSafe Key will be needed in any of the following circumstances: ■ Power outage ■ Startup failure ■ Processor or power supply failure ■ Lost password 1. Using the Smart Cover FailSafe Key, remove the two tamper-proof screws that secure the Smart Cover Lock to the inside of the chassis. 2. Remove the workstation access panel (Section 5.5). To reattach the Smart Cover Lock, position the lock so that the printed circuit board it is attached to points down when the workstation is oriented as shown. Then, secure the lock in place with the two tamper-proof screws. 5-2 338611-001 Service and Technical Reference Guide, xw3100
-
 1
1 -
2
-
3
-
4
-
5
-
6
-
7
-
8
-
9
-
10
-
11
-
12
-
13
-
14
-
15
-
16
-
17
-
18
-
19
-
20
-
21
-
22
-
23
-
24
-
25
-
26
-
27
-
28
-
29
-
30
-
31
-
32
-
33
-
34
-
35
-
36
-
37
-
38
-
39
-
40
-
41
-
42
-
43
-
44
-
45
-
46
-
47
-
48
-
49
-
50
-
51
-
52
-
53
-
54
-
 55
55 -
 56
56 -
 57
57 -
 58
58 -
 59
59 -
 60
60 -
 61
61 -
 62
62 -
 63
63 -
 64
64 -
 65
65 -
66
-
67
-
68
-
69
-
70
-
71
-
72
-
73
-
74
-
75
-
76
-
77
-
78
-
79
-
80
-
81
-
82
-
83
-
84
-
85
-
86
-
87
-
88
-
89
-
90
-
91
-
92
-
93
-
94
-
95
-
96
-
97
-
98
-
99
-
100
-
101
-
102
-
103
-
104
-
105
-
106
-
107
-
108
-
109
-
110
-
111
-
112
-
113
-
114
-
115
-
116
-
117
-
118
-
119
-
120
-
121
-
122
-
123
-
124
-
125
-
126
-
127
-
128
-
129
-
130
-
131
-
132
-
133
-
134
-
135
-
136
-
137
-
138
-
139
-
140
-
141
-
142
-
143
-
144
-
145
-
146
-
147
-
148
 |
 |