HP iPAQ 512 HP iPAQ 500 Voice Messenger Series - Product Guide
HP iPAQ 512 - Voice Messenger Manual
 |
View all HP iPAQ 512 manuals
Add to My Manuals
Save this manual to your list of manuals |
HP iPAQ 512 manual content summary:
- HP iPAQ 512 | HP iPAQ 500 Voice Messenger Series - Product Guide - Page 1
HP iPAQ Product Guide - HP iPAQ 512 | HP iPAQ 500 Voice Messenger Series - Product Guide - Page 2
, L.P. under license. All other product names mentioned herein may be trademarks of their respective companies. HP encourages customers to recycle used electronic hardware, HP original print cartridges, and rechargeable batteries. For more information about recycling programs, go to http://www - HP iPAQ 512 | HP iPAQ 500 Voice Messenger Series - Product Guide - Page 3
Panel Components ...5 4 Setting Up Your HP iPAQ Step 1: Remove the battery cover and insert the SIM card 6 Step 2: Install the battery and replace the battery cover 7 Step 3: Charge the battery ...7 Step 4: Turn on your HP iPAQ ...8 Protecting Your HP iPAQ with a Password 8 Finding the Serial - HP iPAQ 512 | HP iPAQ 500 Voice Messenger Series - Product Guide - Page 4
Changing the Type of ActiveSync Connection 16 Troubleshooting Help for Synchronization Issues 17 6 Using Your Smartphone Using the Home Key ...19 Using the Back key ...19 Using the 4-Way Navigation Key ...19 Calling Features ...19 Making a Call ...19 Answering a Call ...19 Using Call Waiting ...19 - HP iPAQ 512 | HP iPAQ 500 Voice Messenger Series - Product Guide - Page 5
Manually Connecting to a Wi-Fi Network 31 Finding an IP Address ...31 Deleting a Wireless Network Connection 31 Configuring 802.1x Authentication Settings 32 Configuring IP PBX using HP iPAQ Synchronizing E-mail ...44 Composing E-mail using Voice Commander 44 Setting up Messaging Accounts ...45 - HP iPAQ 512 | HP iPAQ 500 Voice Messenger Series - Product Guide - Page 6
HP iPAQ Setup Assistant 57 Voice Commands ...57 HP iPAQ Shortcuts ...58 Task Manager ...59 HP iPAQ DataConnect ...59 HP iPAQ Tips ...59 HP iPAQ QuickStart Tour 59 Using Windows Media MP3 Player ...59 Using Voice Recorder ...60 Using MS Office Applications ...61 File Management ...61 Playing Games - HP iPAQ 512 | HP iPAQ 500 Voice Messenger Series - Product Guide - Page 7
Migrating Data from Palm Desktop to Microsoft Windows Mobile 6.0 Standard 66 Wireless Synchronization Cost Saving Tips 16 Product Specifications System Specifications ...69 Physical Specifications ...69 Operating LAN Devices 74 Battery Warning ...74 Battery Recycling ...74 Battery Disposal ...74 - HP iPAQ 512 | HP iPAQ 500 Voice Messenger Series - Product Guide - Page 8
error message on my HP iPAQ display screen 80 I have trouble charging my battery. What should I do 80 I am unable to use the ActiveSync feature. What should I do 80 19 Care and Maintenance Guidelines for using your HP iPAQ ...81 Guidelines for cleaning your HP iPAQ 81 Guidelines for carrying - HP iPAQ 512 | HP iPAQ 500 Voice Messenger Series - Product Guide - Page 9
1 Registering the iPAQ Registering your HP iPAQ You need to register your HP iPAQ with Hewlett-Packard to be able to: ● Access support and services, and get the most out of your HP products ● Manage your profile ● Sign up for free support alerts, driver notices, and personalized newsletters In some - HP iPAQ 512 | HP iPAQ 500 Voice Messenger Series - Product Guide - Page 10
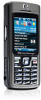
the items that come in the box with your HP iPAQ. NOTE: Box contents vary by model. (1) HP iPAQ Voice Messenger (2) 1100 mAh Li-Ion removable/rechargeable battery (3) Getting Started CD with special software (4) HP iPAQ documentation (5) Wired stereo headset NOTE: Listening to personal - HP iPAQ 512 | HP iPAQ 500 Voice Messenger Series - Product Guide - Page 11
and hold to switch your HP iPAQ on or off. End Key (4) Back Key Press to go back to the previous screen. (5) Keypad Use keys on the keypad to enter text, dial numbers, or navigate menus. (6) 4-Way Use to select items, navigate menus, change feature settings, and play games. Scroll up, down - HP iPAQ 512 | HP iPAQ 500 Voice Messenger Series - Product Guide - Page 12
or to record notes. (3) Strap Loop Use to attach accessories to carry your HP iPAQ. Left and Right Side Components Component Function (1) Volume Button Press to increase or decrease the wired headset is firmly plugged into the headset connector. (4) Voice Commander Button Press to launch the - HP iPAQ 512 | HP iPAQ 500 Voice Messenger Series - Product Guide - Page 13
occupied. (2) Release Button Press the release button on the battery cover and slide the cover down and away from the HP iPAQ to remove the back cover. (3) Battery Cover Remove to insert or remove the battery and/or the SIM card. (4) HP Digital With the camera turned on, frame the subject in - HP iPAQ 512 | HP iPAQ 500 Voice Messenger Series - Product Guide - Page 14
cover and slide the cover down and away from the HP iPAQ. 2. Remove the battery. NOTE: If the battery is already installed, remove it before inserting the SIM card. The SIM card is provided by a mobile phone service provider. 3. Place the SIM card in the provided slot. NOTE: Make sure that the - HP iPAQ 512 | HP iPAQ 500 Voice Messenger Series - Product Guide - Page 15
until it clicks into place. Step 3: Charge the battery CAUTION: To avoid damaging your HP iPAQ or the AC adapter, Make sure all connectors are properly aligned before connecting. The battery provides power for your HP iPAQ to operate. Your HP iPAQ comes with a mini-USB synchronization cable, which - HP iPAQ 512 | HP iPAQ 500 Voice Messenger Series - Product Guide - Page 16
replacement battery is inserted into your HP iPAQ, press the End key for at least two seconds. In case the device does not switch on, attach an AC adapter to switch on your HP iPAQ. Step 4: Turn on your HP iPAQ Press the Power button or End key to turn on your HP iPAQ. Next, follow the instructions - HP iPAQ 512 | HP iPAQ 500 Voice Messenger Series - Product Guide - Page 17
active No SIM card installed New Voice mail Instant message received Battery level low No battery or battery fault Ringer off Wi-Fi on SIM card fault New e-mail or SMS Battery level Battery charging Sync error Speaker phone on Bluetooth General Packet Radio Service (GPRS) available GPRS in use EDGE - HP iPAQ 512 | HP iPAQ 500 Voice Messenger Series - Product Guide - Page 18
the Basics Get started with your HP iPAQ by learning basic functions such as entering text, knowing the Home screen, synchronization, and troubleshooting. Home Screen The Home screen displays the date and time and provides a quick status of the remaining battery capacity, upcoming appointments, your - HP iPAQ 512 | HP iPAQ 500 Voice Messenger Series - Product Guide - Page 19
Entering Text You can enter text and numbers on the HP iPAQ using the keypad. The HP iPAQ supports two input modes for entering text: Multipress and T9. The status indicator on the top of the display screen shows the input mode that is - HP iPAQ 512 | HP iPAQ 500 Voice Messenger Series - Product Guide - Page 20
Words To enter common words embedded in the T9 software: 1. Press a key indicating the first letter by entering the second letter. The word choices are updated with each keypress. Entering New Words You can Owner Information Enter your information so that the HP iPAQ can be returned to you if it is - HP iPAQ 512 | HP iPAQ 500 Voice Messenger Series - Product Guide - Page 21
Reminders, New text messages, Ring tone, Internet call ring tone, New voice message, New instant message, SIM toolkit messages, Exclamation, Question, New channel control. 3. Press Done. NOTE: Turning off notifications helps conserve battery power. Adjusting Speaker Volume ● Use the Volume button to - HP iPAQ 512 | HP iPAQ 500 Voice Messenger Series - Product Guide - Page 22
can close programs manually, if you prefer. 1. Press Start > More > Accessories > Task Manager. 2. From the Application list, select the application you want to close, and press Menu > Kill, or press Menu > Kill All to close all open applications. Customizing the HP iPAQ To get detailed information - HP iPAQ 512 | HP iPAQ 500 Voice Messenger Series - Product Guide - Page 23
as it is assigned to at least one contact or task. Synchronization Microsoft ActiveSync, located on the Getting Started CD, allows your HP iPAQ and your computer to communicate with each other. For synchronization to work properly, install Microsoft ActiveSync on your computer before you connect - HP iPAQ 512 | HP iPAQ 500 Voice Messenger Series - Product Guide - Page 24
connection being used between your HP iPAQ and your computer to meet your specific needs. You should use USB Serial Sync mode if you: ● Are having general problems with the ActiveSync connection between your HP iPAQ and your computer. ● Need to connect your HP iPAQ to your computer while you - HP iPAQ 512 | HP iPAQ 500 Voice Messenger Series - Product Guide - Page 25
spinning and grays out.) ● Firewall or other network protection software message box is displayed for ActiveSync to access the network or Internet. Following is a list of troubleshooting tips if you experience difficulty while synchronizing your HP iPAQ and computer. Try the following solutions to - HP iPAQ 512 | HP iPAQ 500 Voice Messenger Series - Product Guide - Page 26
came with your HP iPAQ for specific instructions. ● Once your computer and HP iPAQ restart, reconnect your HP iPAQ to your computer. problem, perform a factory reset on your HP iPAQ using the HP iPAQ Setup Assistant. You can reinstall your applications on your HP iPAQ after the hard or clean reset - HP iPAQ 512 | HP iPAQ 500 Voice Messenger Series - Product Guide - Page 27
Smartphone Using the Home Key You can use the Home key to return to the Home screen from any application to navigate the menu system, change feature settings, and play games. It is also used to scroll be sent to Voice mail, depending on the settings provided by your mobile phone service provider. To - HP iPAQ 512 | HP iPAQ 500 Voice Messenger Series - Product Guide - Page 28
stored in the contact list. As you enter a contact name, the HP iPAQ searches the Contacts, Call History, Speed Dial lists, and the SIM card contacts, enter the first few letters of a contact's name. Your HP iPAQ searches the entire contacts list to display the name. Changing the Default Number - HP iPAQ 512 | HP iPAQ 500 Voice Messenger Series - Product Guide - Page 29
Using Voice Commander Press Voice Commander button and say Call (Contact name) to dial a number saved in your HP iPAQ's contacts list or by saying Digit Dial (number) to directly call a number not stored in your HP iPAQ. Making Emergency Calls You can make calls to emergency service numbers, even - HP iPAQ 512 | HP iPAQ 500 Voice Messenger Series - Product Guide - Page 30
Voice download e-mail, chat using MSN Messenger, or synchronize with the server without using wires. Network connection time is the elapsed time from the moment you connect to your service service provider. For billing information, please contact your service provider directly. NOTE: Your HP iPAQ - HP iPAQ 512 | HP iPAQ 500 Voice Messenger Series - Product Guide - Page 31
Connection and Signal Strength After you insert an active SIM card into your HP iPAQ, it connects to your service provider's network. The signal strength icon indicates that you are connected to your service provider's network. A full strength connection is indicated by a full signal strength icon - HP iPAQ 512 | HP iPAQ 500 Voice Messenger Series - Product Guide - Page 32
Reset Timers, to reset the Recent calls counter. NOTE: The All Calls counter cannot be reset the Phone feature and re- , and Phone features. Press the Action features. Flight mode is a condition when all wireless connections on your HP iPAQ you turn off your HP iPAQ, manage wireless connections - HP iPAQ 512 | HP iPAQ 500 Voice Messenger Series - Product Guide - Page 33
or manually. Profiles You can use profiles on your HP iPAQ to Voice Commander. 2. Select any of the listed profiles and press Done to choose that profile. Editing profiles To edit a profile: 1. Press Start > Settings > Profiles. 2. Press Menu > Edit. Scroll and select to edit the following features - HP iPAQ 512 | HP iPAQ 500 Voice Messenger Series - Product Guide - Page 34
type ● System sound volume Automatic Frequency Band Selection Your HP iPAQ has an integrated Global System for Mobile Communication (GSM)/General Packet Radio Service (GPRS)/Enhanced Data for GSM Evolution (EDGE) feature that supports four different frequency bands (850/900/1800/1900) for - HP iPAQ 512 | HP iPAQ 500 Voice Messenger Series - Product Guide - Page 35
feature to enable your HP iPAQ to feature, if necessary Outgoing Server Enter your outgoing mail server Outgoing server Check this feature, if necessary requires authentication Download Finish. Voice Notes You can use Voice recorder to record audio clips. You can attach them as voice notes to - HP iPAQ 512 | HP iPAQ 500 Voice Messenger Series - Product Guide - Page 36
7 Connections You can use your HP iPAQ to connect to and exchange information with other handheld devices, your computer, various network types, connected to your Internet Service Provider (ISP) or private network during synchronization, your device should download proper proxy settings during - HP iPAQ 512 | HP iPAQ 500 Voice Messenger Series - Product Guide - Page 37
Type list. Setting Up GPRS using HP iPAQ DataConnect You can use the HP iPAQ DataConnect application to automatically configure your GPRS settings according to the service provider and the country in which your HP iPAQ is being used. To set up GPRS using HP iPAQ DataConnect: 1. Press Start > More - HP iPAQ 512 | HP iPAQ 500 Voice Messenger Series - Product Guide - Page 38
Every Web site has its own specific IP address on the Internet. service can be free or sometimes requires a fee. Infrastructure This connection mode uses wireless access points to connect to networks. Automatically Connecting to a Wi-Fi Network When you turn on the Wi-Fi radio, your HP iPAQ - HP iPAQ 512 | HP iPAQ 500 Voice Messenger Series - Product Guide - Page 39
-Fi to open Wireless Manager. 3. Scroll and select Wi-Fi to turn Wi-Fi on. 4. After your HP iPAQ detects any existing Wi-Fi network, select the network you want to connect to and press Connect. Manually Connecting to a Wi-Fi Network 1. Press Start > Settings > Connections > Wi-Fi > New. 2. Enter the - HP iPAQ 512 | HP iPAQ 500 Voice Messenger Series - Product Guide - Page 40
: On the Home, if the status of Internet Calling is No Service, it indicates that your HP iPAQ did not register successfully with the IP PBX server. To configure VoIP using HP iPAQ Setup Assistant: 1. Download and install the HP iPAQ Setup Assistant from the Getting Started CD before you begin the - HP iPAQ 512 | HP iPAQ 500 Voice Messenger Series - Product Guide - Page 41
want to change the settings. 3. Follow the on screen instructions and press Done. Bluetooth Device Profiles The functions that Bluetooth supports are called services or profiles. You can communicate only with Bluetooth devices that support at least one of the following profiles: ● ActiveSync-Uses - HP iPAQ 512 | HP iPAQ 500 Voice Messenger Series - Product Guide - Page 42
and within 10 meters from each other. 2. Press Start > Settings > Connections > Bluetooth. 3. To create a new partnership press Add New Device. Your HP iPAQ searches for other devices with Bluetooth capabilities and displays them in the list. 4. Select the name of the other device you want to create - HP iPAQ 512 | HP iPAQ 500 Voice Messenger Series - Product Guide - Page 43
/MMS messages, and sharing video clips. Your HP iPAQ supports GPRS. If you want to HP iPAQ to support EDGE technologies, contact your service provider. Changing GPRS Network Settings The first time you use your SIM Card, the HP iPAQ DataConnect application automatically detects the phone network and - HP iPAQ 512 | HP iPAQ 500 Voice Messenger Series - Product Guide - Page 44
and download the USB driver file. 5. Click Finish. 6. After installing the driver, Smartphone USB Modem will be added to the device list in the Device Manager. 7. Next, disconnect your HP iPAQ from the computer. NOTE: 56K modems are capable of receiving 56 Kbps from a compatible service provider - HP iPAQ 512 | HP iPAQ 500 Voice Messenger Series - Product Guide - Page 45
cable to establish a synchronization relationship before connecting via Bluetooth. 1. Follow the instructions in ActiveSync Help for configuring Bluetooth on your computer to support ActiveSync. 2. On your HP iPAQ, press Start > More > ActiveSync. 3. Press Menu > Connect via Bluetooth. Make sure - HP iPAQ 512 | HP iPAQ 500 Voice Messenger Series - Product Guide - Page 46
button to click a photo and automatically save it in File Manager > My Documents > My Pictures. Viewing Photos To view photos captured on your HP iPAQ: 1. Press Start > More > Pictures & Videos. 2. Navigate to a required folder. 3. Press Open to open a folder and press View to view a photo To Change - HP iPAQ 512 | HP iPAQ 500 Voice Messenger Series - Product Guide - Page 47
the resolution you choose, the more the storage space required and it may take longer to send such photos by Multimedia Messaging Service (MMS), e-mail, or Bluetooth. Changing Mode Settings 1. Press Start > Camera. 2. Press Menu > Mode. 3. Make the necessary changes and press the Action button - HP iPAQ 512 | HP iPAQ 500 Voice Messenger Series - Product Guide - Page 48
to: ◦ Landscape ◦ Portrait ● Select the Play Screensaver when connected to my PC and idle for 2 minutes check box to make your computer screensaver your HP iPAQ screensaver. 3. Camera ● Save files to: Press the Action button and scroll to select the phone or storage card as the storage device. The - HP iPAQ 512 | HP iPAQ 500 Voice Messenger Series - Product Guide - Page 49
GPRS When the phone radio is turned on for the first time, the HP iPAQ DataConnect application detects the mobile phone service provider and automatically populates the MMS settings on the HP iPAQ. To transfer pictures using MMS: 1. Press Start > Messaging > MMS. 2. Press Menu > New. 3. Navigate - HP iPAQ 512 | HP iPAQ 500 Voice Messenger Series - Product Guide - Page 50
Using Bluetooth You can do the following to transfer images from your HP iPAQ to other devices: 1. Press Start > More > Pictures & Videos. 2. Scroll and select a picture. 3. Press Menu > Beam.... Select the device and press Beam. NOTE: You should have - HP iPAQ 512 | HP iPAQ 500 Voice Messenger Series - Product Guide - Page 51
HP iPAQ to keep you updated on your e-mail messages. You can also keep a track of appointments and meetings using your HP iPAQ. Understanding Messages To send and receive e-mail messages using your HP iPAQ using your HP iPAQ. Text messages are sent and received through your wireless service provider - HP iPAQ 512 | HP iPAQ 500 Voice Messenger Series - Product Guide - Page 52
2 KB of each new message is downloaded. NOTE: Text messages are not received via synchronization. Instead, they are sent to your HP iPAQ via your service provider. Composing E-mail using Voice Commander You can use the Voice Commander feature on your HP iPAQ to select the recipient of your e-mail - HP iPAQ 512 | HP iPAQ 500 Voice Messenger Series - Product Guide - Page 53
mail: 1. Press the Voice Commander button on your HP iPAQ. 2. Hold your HP iPAQ 10 cm away from application detects the mobile phone service provider and automatically populates the MMS settings on your HP iPAQ. It is not recommended to change the MMS settings provided by your mobile phone service - HP iPAQ 512 | HP iPAQ 500 Voice Messenger Series - Product Guide - Page 54
downloaded attachment or mark an attachment to download it the next time you send and receive e-mail. You can also download IMAP4 e-mail account with an Internet Service Provider (ISP) or an account that mail. However, this feature does not work if Format (RTF) and TNEF support for your account. With - HP iPAQ 512 | HP iPAQ 500 Voice Messenger Series - Product Guide - Page 55
with the response. The response is sent the next time synchronize or connect to your e-mail server, and your device calendar is updated. Creating or Changing a Signature 1. Press Start > Outlook E-mail. 2. Press Menu > Tools > Options. 3. Press Signatures and scroll to select the account for which - HP iPAQ 512 | HP iPAQ 500 Voice Messenger Series - Product Guide - Page 56
begin synchronization through ActiveSync. 2. Text messages are automatically received when your HP iPAQ is switched on. When your HP iPAQ is switched off (in flight mode), messages are held by your service provider until the next time your HP iPAQ is turned on. TIP: By default, messages you send are - HP iPAQ 512 | HP iPAQ 500 Voice Messenger Series - Product Guide - Page 57
http://www.passport.net. After you have an account, you can use your HP iPAQ MSN Messenger feature. Signing In and Out of Messenger Press Start > More > Messenger to open MSN Messenger feature. To sign into the Messenger: 1. Press Sign In after navigating to a required sign-in status. 2. Enter your - HP iPAQ 512 | HP iPAQ 500 Voice Messenger Series - Product Guide - Page 58
Changing Your Status You can change your status on MSN Messenger according to your need. To change your status: 1. Press the Action button to select your name in the contact list. 2. Press Menu > Change Appearances, and navigate to select the required status. 50 Chapter 9 Messaging - HP iPAQ 512 | HP iPAQ 500 Voice Messenger Series - Product Guide - Page 59
4. Press Done. Updating an Appointment To update an appointment on your calendar: 1. Press Start > Calendar. 2. Select and open the appointment, and then press Menu > Edit to make your changes. 3. Press Done. Canceling an Appointment When you delete an appointment in calendar on your HP iPAQ, it is - HP iPAQ 512 | HP iPAQ 500 Voice Messenger Series - Product Guide - Page 60
Changing the Display of the Work Week You can customize your calendar for a work week to start on Sunday or Monday. You can schedule your calendar for a five to seven-day week. To change the display of the work week: 1. Press Start > Calendar. 2. Press Menu > Tools > Options and do one or both of - HP iPAQ 512 | HP iPAQ 500 Voice Messenger Series - Product Guide - Page 61
11 Contacts Adding a Contact 1. Press Start > Contacts. 2. Press New to add a new contact. 3. Select Outlook Contact or SIM Contact type. 4. Enter the information. 5. Press Done. TIP: Select Outlook Contact type to enter more information about contact. Deleting a Contact 1. Press Start > Contacts. - HP iPAQ 512 | HP iPAQ 500 Voice Messenger Series - Product Guide - Page 62
Adding a Photo To add a photo to contact information: 1. Press Start > Contacts. 2. Select the contact. 3. Press Menu > Edit. 4. Select Picture. 5. Do one of the following: ● Select the photo you want to add ● Select Camera and take a photo 6. Press Done. Sending an E-mail Message to a Contact 1. - HP iPAQ 512 | HP iPAQ 500 Voice Messenger Series - Product Guide - Page 63
name or number, or by using the alphabetical index, enter the name or number into the Name view. ● To see a list of contacts employed by a specific name or company, press Menu > View By > Name or Company. ● To see a summary of information about a contact, press the contact. From there, you can also - HP iPAQ 512 | HP iPAQ 500 Voice Messenger Series - Product Guide - Page 64
Enjoy with your HP iPAQ by listening to your favorite MP3 music using Windows Media Player. You can also record voice clips to be sent as an attachment to family and friends. Use MS Office applications to view presentations, spreadsheets, and documents. Using HP Applications Using HP Voice Reply You - HP iPAQ 512 | HP iPAQ 500 Voice Messenger Series - Product Guide - Page 65
Server. ● VoIP - Voice over Internet Protocol (VoIP) routes voice conversations using an IP-based network. VoIP to VoIP phone calls to any provider are typically free. SIP Proxy servers are used to implement call-routing policies and provide features to users. ● Speed Dial - HP iPAQ Setup Assistant - HP iPAQ 512 | HP iPAQ 500 Voice Messenger Series - Product Guide - Page 66
Start Recording to open the voice recorder and start recording Reminder Schedule A Call To (Contact) to call a contact HP iPAQ Shortcuts Using HP iPAQ Shortcuts Use HP iPAQ Shortcuts to access a list of shortcuts to your favorite applications or features on your HP iPAQ. You can edit the default - HP iPAQ 512 | HP iPAQ 500 Voice Messenger Series - Product Guide - Page 67
DataConnect application to automatically configure your GPRS settings according to the service provider and the country in which your HP iPAQ is being used. To configure GPRS using HP iPAQ DataConnect: 1. Press Start > More > Accessories > HP iPAQ DataConnect. 2. Follow the onscreen instructions to - HP iPAQ 512 | HP iPAQ 500 Voice Messenger Series - Product Guide - Page 68
in a playlist. NOTE: Press the Voice Commander button and say Pause Resume Music to pause or resume the media file. Using Voice Recorder You can use the voice recording feature of your HP iPAQ to record voice clips, and use them as a voice note in your e-mails or MMS. 60 Chapter 12 Applications - HP iPAQ 512 | HP iPAQ 500 Voice Messenger Series - Product Guide - Page 69
clip, press Menu > Rename/Delete. 4. Press Menu > Set as Ringtone to set the voice clip as your HP iPAQ ringtone. Using MS Office Applications To use MS Excel applications: 1. Press Start > More > Office Mobile > Excel Mobile. 2. Navigate to select the file, and then press the Action button to open - HP iPAQ 512 | HP iPAQ 500 Voice Messenger Series - Product Guide - Page 70
Navigate the Tree or List view to select the destination folder to save the shortcut in and press Done. Playing Games Playing Bubble Breaker The objective of Bubble Breaker is to have balls (more than one) of the same color available plays, press Draw to turn over cards. 62 Chapter 12 Applications - HP iPAQ 512 | HP iPAQ 500 Voice Messenger Series - Product Guide - Page 71
Internet Explorer Use Internet Explorer Mobile to view and download web pages as well as browse Web sites through synchronization, or when connected to the Internet. The HP iPAQ DataConnect application detects the network settings and lets you connect to Internet Web sites. To open a link using - HP iPAQ 512 | HP iPAQ 500 Voice Messenger Series - Product Guide - Page 72
your HP iPAQ. 2. Open the protective cover. 3. Insert the storage card into the storage card slot and push the connection edge of the card firmly into the storage card slot. NOTE: If your storage card is not recognized, follow the card manufacturer's instructions to install it. If you have trouble - HP iPAQ 512 | HP iPAQ 500 Voice Messenger Series - Product Guide - Page 73
If the HP iPAQ does not recognize your storage card, try the following: ● Make sure you have firmly pushed the storage card into the storage slot. ● Make sure to install any drivers that came with the storage card. Viewing Content of a Storage Card 65 - HP iPAQ 512 | HP iPAQ 500 Voice Messenger Series - Product Guide - Page 74
If you used a Palm Operating System (OS) based device before purchasing your HP iPAQ, you need to migrate your data from the Palm Desktop software to Microsoft Windows Mobile 6.0 Standard. To migrate data from Palm Desktop to Windows Mobile 6.0 Standard: 1. Make sure you have Microsoft Outlook 98 or - HP iPAQ 512 | HP iPAQ 500 Voice Messenger Series - Product Guide - Page 75
. 5. Insert the Getting Started CD into your computer's CD-ROM drive and follow the onscreen instructions to install ActiveSync on your computer and create a partnership between your HP iPAQ and your computer. Wireless Synchronization Cost Saving Tips How you manage the cost of synchronizing - HP iPAQ 512 | HP iPAQ 500 Voice Messenger Series - Product Guide - Page 76
15 Tasks Setting the Start and Due Dates for a Task 1. Press Start > Tasks. 2. Select and open the task you want to set start and due dates for. NOTE: To create a new task, press Start > Tasks > Menu > New Task. 3. Press Edit and do one or both of the following: ● Select Start date to enter a start - HP iPAQ 512 | HP iPAQ 500 Voice Messenger Series - Product Guide - Page 77
more information on specifications for your particular model, on your HP iPAQ, tap Start > Settings > System tab > AssetViewer. System Feature Processor Operating System Memory External Power Display LED Backlight Secure Digital (SD) Slot Wired Stereo Headset Antenna Audio Battery Bluetooth Wi-Fi - HP iPAQ 512 | HP iPAQ 500 Voice Messenger Series - Product Guide - Page 78
104°F -4° to 140°F 85% RH 0% 0 - 15,000 ft 0 - 40,000 ft Metric 0° to 40°C -20° to 60°C 85% RH 0% 0 - 4572 m 0 - 12192 m 70 Chapter 16 Product Specifications - HP iPAQ 512 | HP iPAQ 500 Voice Messenger Series - Product Guide - Page 79
and, if not installed and used in accordance with the instructions, may cause harmful interference to radio communications. However, there changes or modifications made to this device that are not expressly approved by HP may void the user's authority to operate the equipment. Cables To maintain - HP iPAQ 512 | HP iPAQ 500 Voice Messenger Series - Product Guide - Page 80
(1-800-474-6836) For questions regarding this FCC declaration, write to Hewlett-Packard Company P. O. Box 692000, Mail Stop 510101 Houston, TX 77269-2000 or call HP at 281-514-3333 To identify your product, refer to the part, series, or model number located on the product. Canadian Notice This Class - HP iPAQ 512 | HP iPAQ 500 Voice Messenger Series - Product Guide - Page 81
and for EU harmonized telecommunications products, such as Bluetooth®. ● This CE marking is valid for EU non-harmonized telecommunications products. *If applicable, a notified body number is used. Refer to the regulatory label provided on this product. Hewlett-Packard GmbH, HQ-TRE, Herrenberger - HP iPAQ 512 | HP iPAQ 500 Voice Messenger Series - Product Guide - Page 82
indoor applications. For HP spare. CAUTION: Risk of explosion if battery is replaced by an incorrect type. Dispose of used batteries according to the instructions. Battery Recycling HP encourages customers to recycle used electronic hardware, HP original print cartridges, and rechargeable batteries - HP iPAQ 512 | HP iPAQ 500 Voice Messenger Series - Product Guide - Page 83
. Do not use converter kits sold for appliances to power your HP iPAQ. Airline Travel Notice Use of electronic equipment aboard commercial aircraft is age and health. The exposure standard for mobile devices employs a unit of measurement known as the Specific Absorption Rate, or SAR. The SAR limit - HP iPAQ 512 | HP iPAQ 500 Voice Messenger Series - Product Guide - Page 84
in the bottom front side of the HP iPAQ. The GSM antenna is located in the top back of the HP iPAQ. No metallic body accessories are allowed and network, and is illegal. Failure to observe this instruction may lead to suspension or denial of cellular services to the offender, or legal action or both. - HP iPAQ 512 | HP iPAQ 500 Voice Messenger Series - Product Guide - Page 85
advised that a handheld microphone or telephone handset should not be used by the driver while the vehicle is moving, except in an emergency. Speak only into a fixed, neck slung or clippedon microphone when it would not distract your attention from the road. ● As with other mobile radio transmitting - HP iPAQ 512 | HP iPAQ 500 Voice Messenger Series - Product Guide - Page 86
, headsets or earphones used with this product should comply with the headphone limits in clause 7 of EN 50332-2. ● HP recommends to use the headset delivered with your HP iPAQ (part number 430219, manufactured by Plantronics), that is in compliance to EN 50332-1. 78 Chapter 17 Regulatory Notices - HP iPAQ 512 | HP iPAQ 500 Voice Messenger Series - Product Guide - Page 87
Asked Questions I am having trouble turning on my HP iPAQ. What should I do? Your HP iPAQ appears to have problems with the battery. Please perform the following checks: ● Is the battery charged? ● Is the battery properly installed? ● Are the contacts on the battery and phone clean? If the - HP iPAQ 512 | HP iPAQ 500 Voice Messenger Series - Product Guide - Page 88
into the battery charger socket on the HP iPAQ? ● Is the power cord of the charger damaged? ● Is the battery very old? If yes, replace with a new battery and try again. I am unable to use the ActiveSync feature. What should I do? To be able to use the ActiveSync feature, upgrade your computer - HP iPAQ 512 | HP iPAQ 500 Voice Messenger Series - Product Guide - Page 89
objects into the charging/communications port of your HP iPAQ. This can short- circuit the battery and result in danger. ● Transfer your SMS messages from the HP iPAQ's memory to the SIM card memory. Guidelines for cleaning your HP iPAQ ● Use a soft, clean, and slightly moistened cloth to clean your
-
 1
1 -
 2
2 -
 3
3 -
 4
4 -
 5
5 -
 6
6 -
 7
7 -
8
-
9
-
10
-
11
-
12
-
13
-
14
-
15
-
16
-
17
-
18
-
19
-
20
-
21
-
22
-
23
-
24
-
25
-
26
-
27
-
28
-
29
-
30
-
31
-
32
-
33
-
34
-
35
-
36
-
37
-
38
-
39
-
40
-
41
-
42
-
43
-
44
-
45
-
46
-
47
-
48
-
49
-
50
-
51
-
52
-
53
-
54
-
55
-
56
-
57
-
58
-
59
-
60
-
61
-
62
-
63
-
64
-
65
-
66
-
67
-
68
-
69
-
70
-
71
-
72
-
73
-
74
-
75
-
76
-
77
-
78
-
79
-
80
-
81
-
82
-
83
-
84
-
85
-
86
-
87
-
88
-
89
 |
 |

HP iPAQ
Product Guide