HP iPAQ 512 HP iPAQ 500 Voice Messenger Series - Product Guide - Page 46
Camera, Using the Digital Camera, Capturing Photos, Viewing Photos, Changing Camera Settings
 |
View all HP iPAQ 512 manuals
Add to My Manuals
Save this manual to your list of manuals |
Page 46 highlights
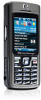
8 Camera Using the Digital Camera Use the built-in digital camera on your HP iPAQ to click and view photos. Capturing Photos You can capture images and store them in your HP iPAQ or memory card. 1. Press Start > Camera. 2. Use the 4-Way Navigation key to zoom in or out. 3. Use the 4-Way Navigation key to decrease or increase brightness. 4. Press the Action button to click a photo and automatically save it in File Manager > My Documents > My Pictures. Viewing Photos To view photos captured on your HP iPAQ: 1. Press Start > More > Pictures & Videos. 2. Navigate to a required folder. 3. Press Open to open a folder and press View to view a photo To Change Image Sizes ● Press the Action button once to the display photo in Full screen view. NOTE: The opened photo displays in the Fit to View screen by default. ● Press the Action button once while in Full screen view to display the photo in actual view. ● Press the Action button once while in actual view to return to the fit to screen view. NOTE: You can create folders to manage your pictures. Press Menu > Edit > New Folder to create a new folder. Changing Camera Settings Changing Brightness Settings 1. Press Start > Camera. 2. Press Menu > Brightness. 3. Make the necessary changes and press the Action button. 38 Chapter 8 Camera
-
 1
1 -
2
-
3
-
4
-
5
-
6
-
7
-
8
-
9
-
10
-
11
-
12
-
13
-
14
-
15
-
16
-
17
-
18
-
19
-
20
-
21
-
22
-
23
-
24
-
25
-
26
-
27
-
28
-
29
-
30
-
31
-
32
-
33
-
34
-
35
-
36
-
37
-
38
-
39
-
40
-
 41
41 -
 42
42 -
 43
43 -
 44
44 -
 45
45 -
 46
46 -
 47
47 -
 48
48 -
 49
49 -
 50
50 -
 51
51 -
52
-
53
-
54
-
55
-
56
-
57
-
58
-
59
-
60
-
61
-
62
-
63
-
64
-
65
-
66
-
67
-
68
-
69
-
70
-
71
-
72
-
73
-
74
-
75
-
76
-
77
-
78
-
79
-
80
-
81
-
82
-
83
-
84
-
85
-
86
-
87
-
88
-
89
 |
 |